Menu

Show posts

This section allows you to view all posts made by this member. Note that you can only see posts made in areas you currently have access to.

Show posts Menu

Topics - a1ex

#51
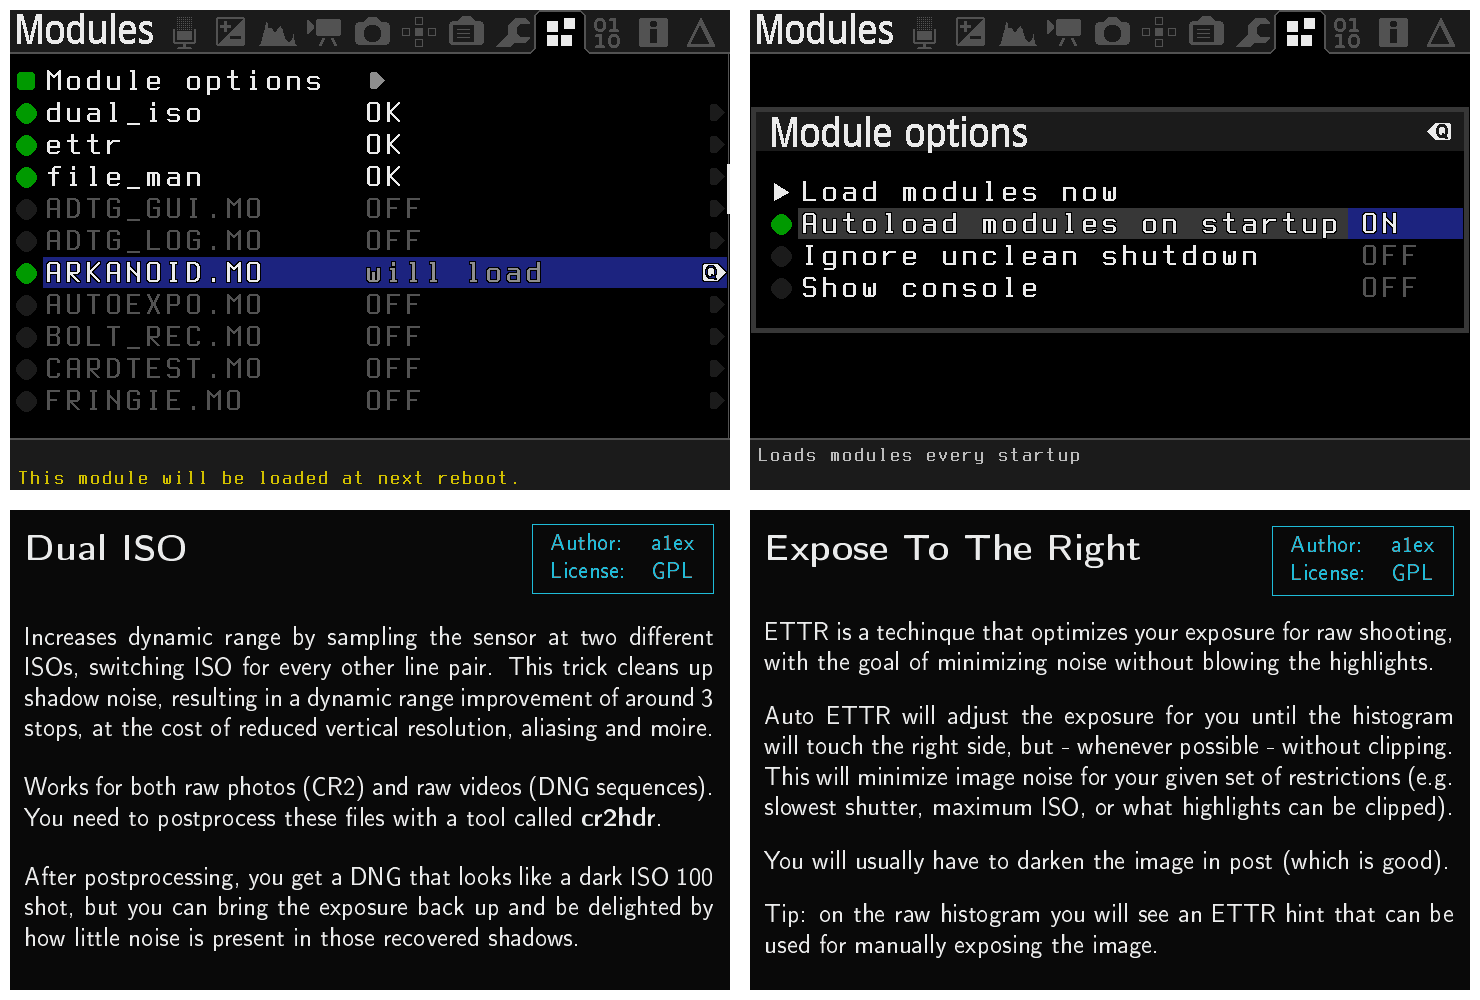
Here's a tool that might be useful for troubleshooting dead cameras. It blinks all Canon debug messages via card LED, and you can point another camera at that LED to decode them.

Blinker source: blink.c
Decoder source: deblink.c
Decoder binary: deblink.mo

Usage:

For the inspected camera:
- compile the dm-spy-experiments branch with CONFIG_DEBUG_INTERCEPT_STARTUP_BLINK=y in Makefile.user, and (optional) define PRINT_EACH_MESSAGE in dm-spy.c
- you may want to tweak the message format to reduce verbosity (LED blink communication is not very fast)
- load the autoexec, and it should start blinking
- first 5 blinks are for synchronization, and to give you some time to position the other camera towards its LED

For the camera used to decode the blinks:
- load the deblink module
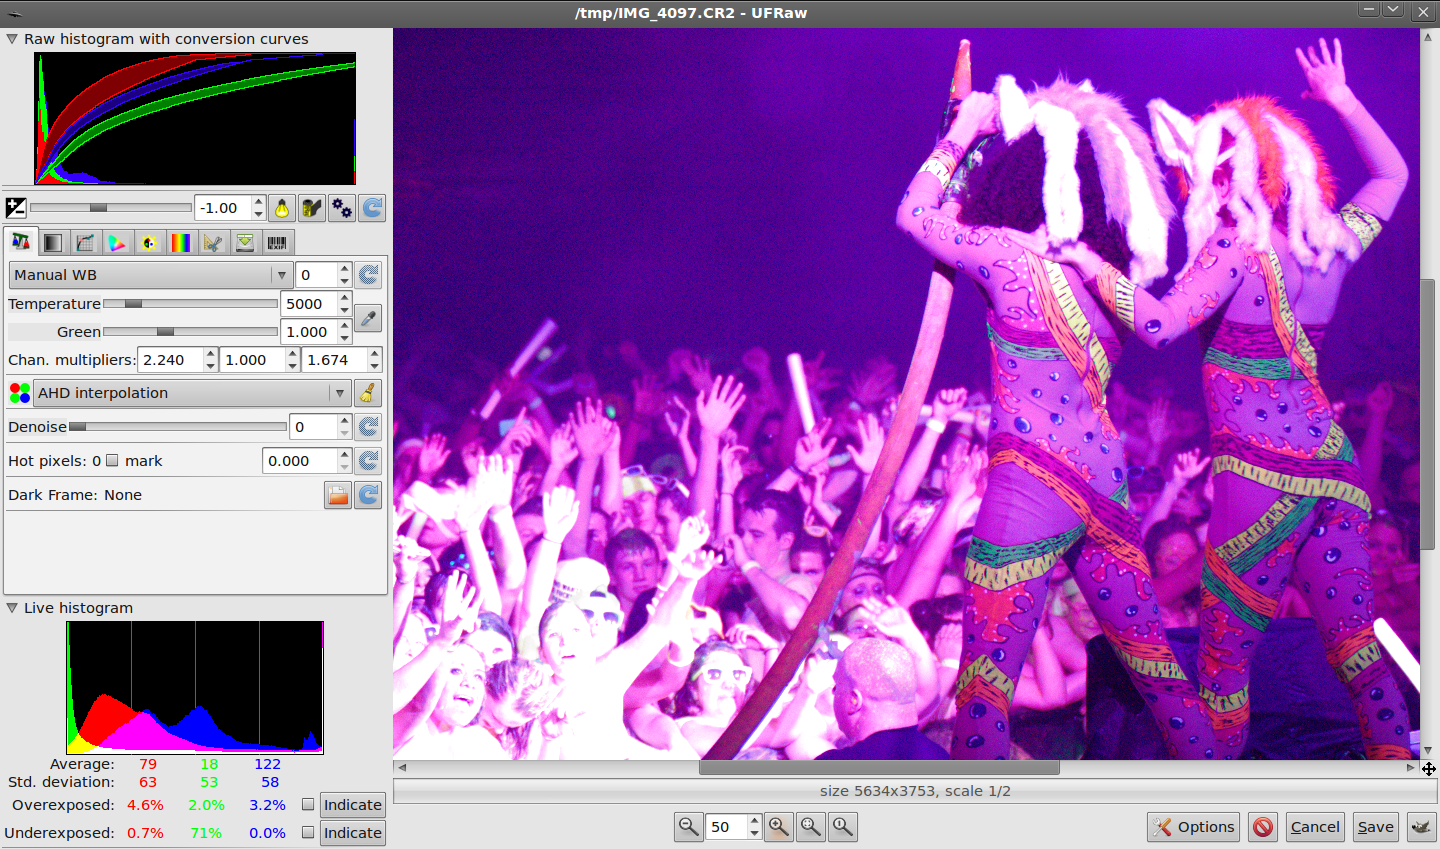
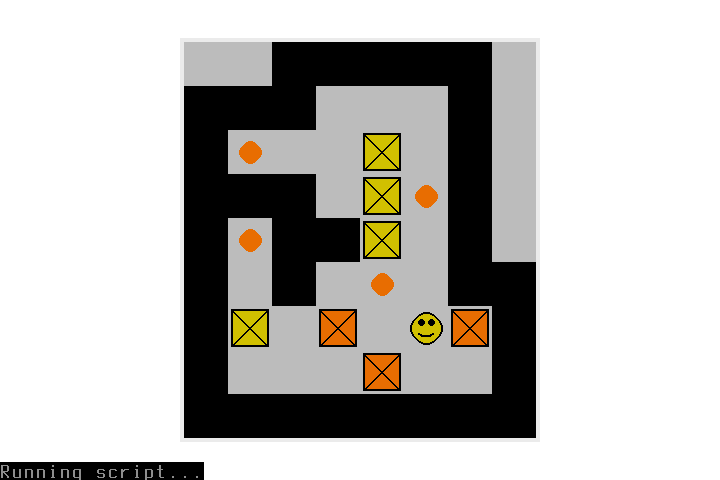
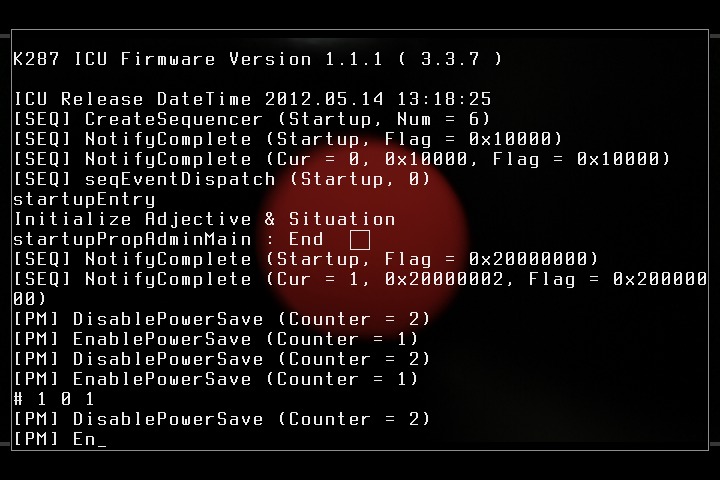
- switch it to movie mode, 60fps, looking at the LED of the other one, as in the screenshot
- you should see the LED in the center of the screen; defocus your lens so you can see it bigger
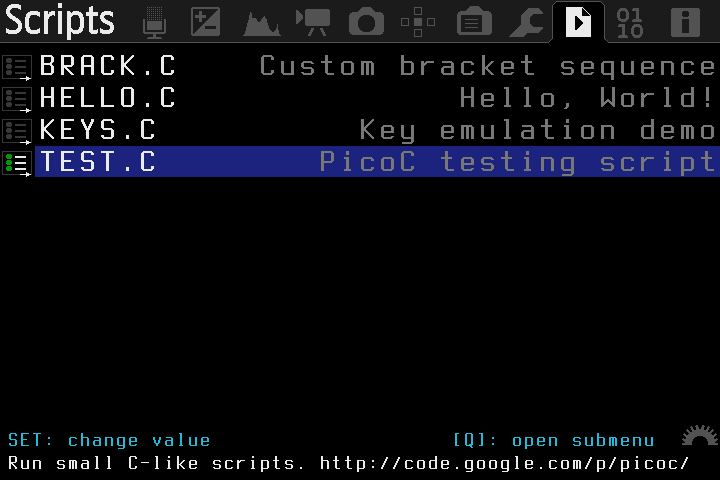
- start the decoder from Debug -> Decode LED blinks
- expose so you can see the LED clearly when it's on, and nearly black when it's off
- make sure the good camera's LED blinks in the same way as the bad one's (if not, adjust exposure until it does)

How it works:
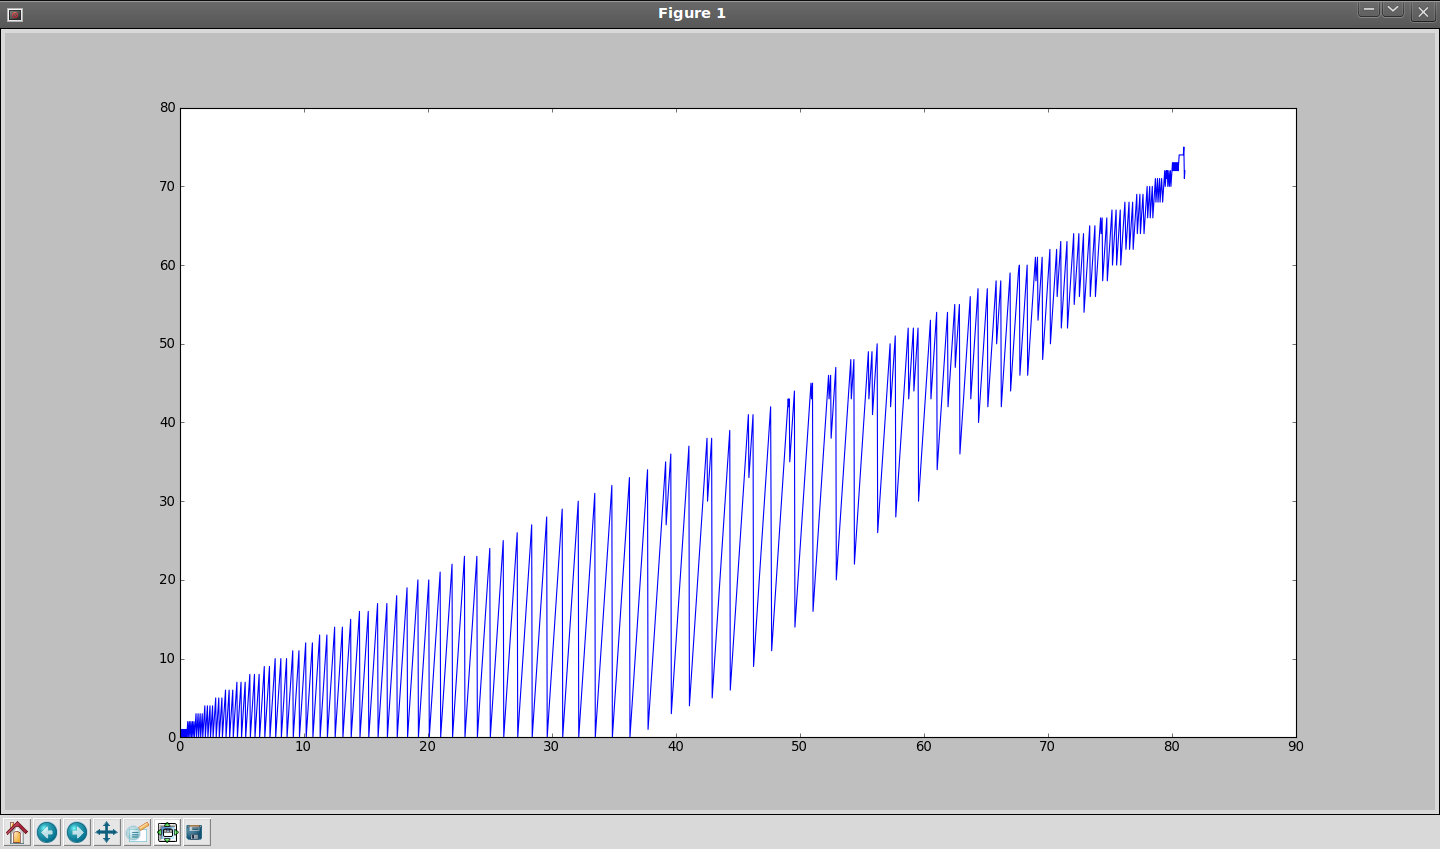
- it simply encodes 0 as a short blink and 1 as a long blink
- each byte is sent with LSB first
- at startup, it sends 0xA5 5 times, with some delay, for synchronization
- from these sync bytes, the decoder attempts to autodetect the threshold for long/short blinks
- no further sync attempts or error checks are done

Caveats:
- the protocol is neither very fast, nor very robust (once it loses sync, it can't recover and you should restart)
- to restart the de-blinker, you need to restart both cameras


If the messages are not detailed enough, add custom hooks in dm-spy-extra.c (more info here).
#52
General Development / FIO_SeekSkipFile testing
July 28, 2014, 01:40:28 PM
After seeing the problems with FIO_SeekFile on large files (greater than 2 GB) and discussing the issue with g3gg0, I've removed the FIO_SeekFile stub and replaced all the calls with FIO_SeekSkipFile (which should handle large files).

To make sure all cameras will get the correct behavior, I've added some testing routines for this function in Debug -> Burn-in tests -> Stubs API tests; credits go to g3gg0 (he told me exactly what I should test for, to make sure large files are handled correctly). Please run the tests and paste the log file in this thread.

Here's how a successful test looks like:

...
[Pass] FIO_GetFileSize_direct("test.dat") => 0x82000000
[Pass] f = FIO_OpenFile("test.dat", O_RDWR | O_SYNC) => 0x3
[Pass] FIO_SeekSkipFile(f, 0, SEEK_END) => 0x82000000
[Pass] FIO_WriteFile(f, buf, 0x10) => 0x10
[Pass] FIO_SeekSkipFile(f, -0x20, SEEK_END) => 0x81fffff0
[Pass] FIO_WriteFile(f, buf, 0x30) => 0x30
[Pass] FIO_SeekSkipFile(f, 0x20, SEEK_SET) => 0x20
[Pass] FIO_SeekSkipFile(f, 0x30, SEEK_CUR) => 0x50
[Pass] FIO_SeekSkipFile(f, -0x20, SEEK_CUR) => 0x30
[Pass] FIO_GetFileSize_direct("test.dat") => 0x82000020
...


Here's how a failed test may look like (I've ran the test on 5D3 123 with the FIO_SeekFile address instead of FIO_SeekSkipFile, to make sure this mistake is caught).

...
[Pass] FIO_GetFileSize_direct("test.dat") => 0x82000000
[Pass] f = FIO_OpenFile("test.dat", O_RDWR | O_SYNC) => 0x3
[FAIL] FIO_SeekSkipFile(f, 0, SEEK_END) => 0x20a
[Pass] FIO_WriteFile(f, buf, 0x10) => 0x10
[FAIL] FIO_SeekSkipFile(f, -0x20, SEEK_END) => 0xffffffff
[Pass] FIO_WriteFile(f, buf, 0x30) => 0x30
[FAIL] FIO_SeekSkipFile(f, 0x20, SEEK_SET) => 0xffffffff
[FAIL] FIO_SeekSkipFile(f, 0x30, SEEK_CUR) => 0xffffffff
[FAIL] FIO_SeekSkipFile(f, -0x20, SEEK_CUR) => 0xffffffff
[FAIL] FIO_GetFileSize_direct("test.dat") => 0x82000000
...


To minimize the situations where broken core functionality enters the nightly builds, and a bug is reported after 5 months, I'll break all the nightly builds for which I don't receive a testing log within the next 5 days.

Some usage notes:
- FIO_SeekSkipFile always returns the absolute position after seeking
- old FIO_SeekFile was able to seek past the end of the file on 5D2, but FIO_SeekSkipFile is not
- on 5D3 and 60D, FIO_SeekSkipFile can seek past the end of the file, but it's very slow (5D3 was fairly fast, but 60D could not finish creating a 2GB file in 30 minutes)
=> please avoid seeking past the end of the file; even if it may work on your camera, it's not portable; use FIO_WriteFile instead.

TODO:
- make sure all the stubs we use are covered by such tests (especially new and recent ones)
- move these tests to a module, because they are pretty large for some cameras (currently 25KB)
- improve the tests (both more thorough and more readable - because these tests also serve as documentation on how these stubs are expected to behave)
- merge the memory checking module into this one, to have all the internal tests in one place
- move the existing tests from "don't click me" in the menu
#53
General Development / Rolling shutter measurements
July 15, 2014, 03:46:27 PM
When doing some timing analysis from the full-res silent picture thread, I think I've found the formula for measuring the rolling shutter in video mode.

https://bitbucket.org/hudson/magic-lantern/commits/5d0db9024bab25649bfcbde58e0849e0817ab902

Since the formula is based on FPS timers (VerticalRawResolution * TimerA / MainClock), I've added a menu entry for displaying it in the FPS override submenu. I chose to display it in microseconds per line, so it's up to you to know your vertical resolution and find the total distortion per frame. ML tries to do some guessing, which should be a good starting point (it guesses the captured resolution for a 16:9 frame in H.264 1080p - which is slightly lower - but fails at 720p because it doesn't know the exact stretching factor).

Results from 5D3, at Canon default FPS:


24p, 30p : 18.3 µs/line  => 19.6ms in H.264 (1904x1070 captured pixels)
25p      : 20.0 µs/line  => 21.4ms in H.264
50p      : 20.0 µs/line  => 13.4ms in RAW at max res (672 vertically); the menu gets it wrong in H.264
60p      : 18.3 µs/line  => 12.3ms in RAW


Samuel H measured 20.5 ms for 5D3, but he didn't specify the setting. Either way, the numbers are close.

Decreasing timer A will decrease the rolling shutter. There isn't a mode for minimizing timer A in newer cameras, but in many cases, exact FPS will chose a very low value for it. You can also fine-tune timer A manually (push it to the left until it stops decreasing), and with these settings, the "overcranked" rolling shutter values are:


24p,25p,30p : 16.6 µs/line  => 17.7ms in H.264
50p, 60p    : 17.1 µs/line  => 11.5ms in RAW


This feature will be in nightly builds starting from tomorrow. It's just a display thing - the behavior was not changed. Please post screenshots.
#54
General Development / SRM job memory buffers
July 02, 2014, 08:55:00 AM
Interesting find: if you call FA_CreateTestImage more than once, you need to call FA_DeleteTestImage in the same order (otherwise it will fail):

So, this is OK:

    struct JobClass * job1 = (void*) call("FA_CreateTestImage");
    struct JobClass * job2 = (void*) call("FA_CreateTestImage");

    call("FA_DeleteTestImage", job1);
    call("FA_DeleteTestImage", job2);


but this will fail:

    struct JobClass * job1 = (void*) call("FA_CreateTestImage");
    struct JobClass * job2 = (void*) call("FA_CreateTestImage");

    call("FA_DeleteTestImage", job2);
    call("FA_DeleteTestImage", job1);


Another nice trick: each job object has a contiguous raw image buffer, usually more than 32MB. With shoot_malloc, the maximum contiguous size is less than 32MB (depending on your camera). To access this buffer:


    struct JobClass * job = (void*) call("FA_CreateTestImage");
    void* buf = (void*) call("FA_GetCrawBuf", job);
   
    /* use your buffer */

    call("FA_DeleteTestImage", job);


So, it looks like we have a way to allocate some more memory, which is very useful for raw video. How much, I don't know yet.
#55
Update: now available in the nightly builds!

Another pipe dream came true :)

- are you afraid to waste shutter clicks on timelapse or focus stacks?
- do you need to take pictures in quiet environments?
- do you have problems with mirror vibration (e.g. at very long focal lengths)?
- your shutter is worn out so badly that you can no longer take pictures (ERR20)?
- old silent picture mode's resolution was too low for these tasks?

I believe I've just found the solution to all of the above.


How it works?

I've tried to call a factory test routine: FA_CaptureTestImage (helped by FA_CreateTestImage and FA_DeleteTestImage). At first sight, it did not do anything visible (g3gg0 already tried it years ago), but the diagnostic log and the EDMAC info box revealed the magic: the sensor was sampled at full resolution, without shutter actuation!

So, to take an useful image, I went to LiveView first to open the shutter and raise the mirror, then I've paused LiveView (from ML powersave routines, or by going to PLAY mode or Canon menu from LiveView). Then I've called the above routines, and after that, all I had to do was to fill the raw_info structure and save the DNG.

If you call these routines without going to LiveView first, the result will be a dark frame (interesting for astro - you can take 300 dark frames without wearing the shutter mechanism).

For more details, take a look at this changeset.

Limitations

- The fastest shutter speed I've got is around 1/10 seconds (very rough estimation by comparing brightness from a regular picture). With regular pictures, faster speeds are done via mechanical shutter actuation.
- Long exposures are fine up to 15 seconds (longer exposures will crash the camera).
- Fastest capture speed: 220ms on 5D3, 320ms on 5D2. This includes a dummy readout, which is probably a bias frame.
- So, at least for now, the usefulness is limited to timelapse and medium-long exposures (no moving subjects).
- If you use the intervalometer, I recommend taking a picture every 10 or 15 seconds (not faster). Saving DNGs from the camera is slow.
- In photo mode, aperture will be most likely wide open, regardless of the setting, because of exposure simulation (enable Expo Override to fix it).

4K video?

Too early to ask. Find a way to speed up the capture process first (see the research section below).

However, I don't really expect more than 10 fps (in LV crop mode on 5D3, 1/3.6 of the total sensor area is sampled at 30fps). If you implement a burst mode from the current code base, you'll get up to 5 fps.

Is it safe?

You'll have to judge yourself; I'll just give you some details.
- I've discovered this the day before yesterday
- I took less than 100 pictures, on 4 different cameras (5D3, 5D2, 550D and 60D)
- The functions I'm calling were meant for factory testing (see these comments from silent.c for some details on what they do)
- The functions I'm calling will change some properties back and forth, e.g. PROP_FA_ADJUST_FLAG (you know, properties are usually persistent settings, and a mistake there may soft-brick the camera)
- The sensor is sampled in the same way as in photo mode, just without mechanical shutter actuation
- I won't include it in the nightly builds at this stage; early adopters will have to compile it themselves.

How do I install it?

Download the latest nightly build and enable silent.mo.

Research

- log file from 5D2: FA_CaptureTestImage.log
- some of my experiments on 5D2: http://pastebin.com/6Lyhrqtj
- http://magiclantern.wikia.com/wiki/ADTG
- http://magiclantern.wikia.com/wiki/Register_Map
- How does the camera take a picture?
- ADTG registers thread and classic adtg_gui
- enhanced adtg_gui from the iso-research branch
- analyze Canon debug messages with the code from the dm-spy-experiments branch
- figure out how to speed up the capture process (maybe without the dummy capture step, or find out how to trigger the continuous readout mode)
- figure out how to get fast shutter speeds, as in LiveView (electronic shutter)
- implement a fast bracketing, exposure stacking or other funky capture modes
- compare the dynamic range with regular photo mode, with raw_diag (check the ISO research thread)
- don't burn your sensor ;)


Please do not ask for builds in this thread.  This thread is for development related feedback only.

If you would like a build compiled, so you can help the Magic Lantern development team by testing this feature and providing feedback, please see this thread.
#56
General Chat / XYlab Videomhacking Workshop
June 28, 2014, 12:13:11 AM
The guys from xylab (Castrignano de' Greci, Italy) are going to organize a workshop (July 17-31) covering both programming and filmmaking, Arduino, Magic Lantern, and other cool stuff. The workshop will be in English, so don't worry if you don't understand much Italian.

If you are interested, you should apply here: http://xylab.org/subscription/ (no later than next week, most likely July 6th, hit F5 on their website to be sure)
Some more info: http://xylab.org/call_y_eng.pdf


You'll meet Maqs there; here's a rough sketch of what he would like to cover:
Quote
* What is ML? How does it work?
* Writing ML modules (API basics)
* "My first module" (talk-through module development)
* Picture Transfer Protocol (PTP)
* ARM Assembler
* Tasks / Message Queues / State Objects
* Cache Hacking / Memory Layout
* File I/O API, Network API
* Reverse Engineering (basics)

Suggestions welcome, and happy hacking!
#57
With the recent developments regarding ML emulation in QEMU, it's possible to generate visual diffs of ML interface (automated). This could highlight changes in menu, overlays, or even run automated self-tests for ML in order to spot bugs.

Proof of concept: I've renamed some menu items just to check how it would look like.


The script used to compare the two images:

compare a.png b.png -compose src -highlight-color yellow - | convert - -morphology Erode:2 Disk:5 -negate diff.jpg
composite a.png -compose Plus diff.jpg x.jpg
composite b.png -compose Plus diff.jpg y.jpg
montage x.jpg y.jpg -geometry 50%x50%+5+5 z.jpg


Interested in integrating this tool on the nightly builds page?

The biggest advantage IMO will be that you will no longer risk downloading untested builds; they will be self-tested. Of course, only on the feature subset that runs in the emulator, but still, much better than nothing.
#58
Reverse Engineering / Tutorial: finding stubs
June 03, 2014, 02:35:25 PM
Quick tutorial for finding stubs using the GPL tools from CHDK (very easy to get started under Linux).

Background

These stubs are functions from Canon firmware, that can be called from ML code. To use them, one needs to know:
- the function address in Canon code (that's the stub you need to find). The exact address is unique for each camera.
- the function declaration (what parameters it accepts?) - declared in some header file, and usually common for all cameras.
- what does it do (if it's not obvious from its name and usage context, a comment is welcome)

0) Preparation
- make sure you can compile ML yourself
- take a look at http://magiclantern.wikia.com/wiki/ASM_introduction

1) Downloading the tools
- grab disassemble.pl [DIGIC 2...8] and disassemblev7.pl [DIGIC 6..8]
- make the following changes (your paths may be different; these are the paths for the default ML toolchain):


@@ -25,14 +25,14 @@
 
# adjust these for your needs (note final slash):
#$path = "$ENV{'HOME'}/gcc-4.1-arm/bin/";
-$path = "";
+$path = "$ENV{'HOME'}/gcc-arm-none-eabi-4_8-2013q4/bin/";  # or gcc-arm-none-eabi-5_4-2016q3 or gcc-arm-none-eabi-7-2017-q4-major etc
 
# note on "strings": default is a minimum length of 4 chars.
# So if u are hunting for e.g. "FI2" add -n3
# However, it gives a lot of false positive.
$strdump = "strings -t x";
-$objdump = "${path}arm-elf-objdump";
-$objcopy = "${path}arm-elf-objcopy";
+$objdump = "${path}arm-none-eabi-objdump";
+$objcopy = "${path}arm-none-eabi-objcopy";
 
if (@ARGV != 2) {
die("Usage: $0 0x<offset> <dump.bin>");


2) Disassembling

You can find a ROM dump from your camera under ML/LOGS, on your card. For DIGIC 4/5, the one containing code is ROM1 and loads at 0xFF000000 (see here for other models). So, run the script with:


perl disassemble.pl 0xFF000000 ROM1.BIN


This script saves two interesting files: ROM1.BIN.strings and ROM1.BIN.dis. For finding stubs, you are interested in the disassembled code, ROM1.BIN.dis. Open that in a text editor.

3) Identifying stubs

Most ML stubs can be found from strings. Most of them are functions, so they start with a PUSH instruction (or STMFD in IDA). The PUSH usually indicates a start of a function, but not always; there may be one or two instructions before it. If in doubt, look for other code calling your function (code references to it, usually BL instructions).

Some common patterns:


- a function referencing the string inside its body (for example, GUI_Control):


GUI_Control:
   push ...
   ...
   DebugMsg(..., ..., "GUI_Control: ...");
   ....
   pop ...


which, in pure ASM, looks like this:

loc_ff0ded1c: ; 21 refs
ff0ded1c: e92d40f8 push {r3, r4, r5, r6, r7, lr}  ; ff0ded1c is the address you are looking for; notice there are a few references to it (other Canon code calling it)
...
ff0ded34: e28f2e16 add r2, pc, #352 ; ff0dee9c: (5f495547)  *"GUI_Control:%d 0x%x"
ff0ded38: e3a01003 mov r1, #3
ff0ded3c: e3a00085 mov r0, #133 ; 0x85
ff0ded40: eb3c9b92 bl loc_5b90 ; this must be DebugMsg (aka DryosDebugMsg in stubs.S)


- another function calling the function you are looking for, and printing an error message if it fails. For example, if you look for GetSizeOfMaxRegion:


AllocateMemory:
   ...
   BL GetSizeOfMaxRegion
   if (returned_value != 0)
   {
       DebugMsg(..., ..., "[MEM] ERROR GetSizeOfMaxRegion [%#x]", returned_value);
   }


which, in pure ASM, looks like this:


ff9fa1c0: ebffff39 bl loc_ff9f9eac ; this is GetSizeOfMaxRegion you are looking for
ff9fa1c4: e3500000 cmp r0, #0
ff9fa1c8: 11a03000 movne r3, r0
ff9fa1cc: 128f20d0 addne r2, pc, #208 ; ff9fa2a4: (4d454d5b)  *"[MEM] ERROR GetSizeOfMaxRegion [%#x]"
ff9fa1d0: 13a01016 movne r1, #22
ff9fa1d4: 13a00000 movne r0, #0
ff9fa1d8: 1bfff05c blne loc_ff9f6350 ; this must be DebugMsg (aka DryosDebugMsg in stubs.S)


Repeat the process for other stubs, until you get comfortable with the workflow.

Other stubs may not be easy to find for strings; in this case, you may look for the context (other functions calling it, which are identifiable from strings). Comparing with a dump from another camera, which has these stubs, is helpful.

Other stubs are not functions, but data structures. You will need to find some functions using those structures first.

A very useful hint: the differences between related stubs may be constant, or at least helpful to get you within the ballpark. For example, the offset between FIO_SeekFile and FIO_SeekSkipFile is usually 0xD0. Check the stub files for more cameras, and look for such similarities. It's not a hard rule though, but it helps in many cases.

A note about DIGIC V cameras: they copy a section from the ROM, starting from assert_0 (string "Assert: File %s,  Expression %s,  Line %d"), to 0x1900. So, there will be a difference between the address where your function may run, and the address where it's placed in the ROM. This difference is called RAM_OFFSET (it's declared in stubs.S). So, if say AllocateMemory is at 0xFF9FA160 in ROM (5D3.123), its RAM copy will be at 0xFF9FA160 - RAM_OFFSET = 0xFF9FA160 - 0xFF9F07C0 = 0x99a0. So, you will find many BL calls to 0x99a0, for example:

ff0e7644: eb3c88d5 bl loc_99a0
...
ff0e7658: e59f20e8 ldr r2, [pc, #232] ; ff0e7748: (ff0e5904)  **"%s : AllocateMemory(READ_ONE_PARAM)"


Function calls are usually relative to the program counter. Therefore:
- if the code calls a RAM function from another RAM function, and you look at the ROM copy of the caller, you will see BL rom_address
- if the code calls a RAM function from a ROM function, and you look at the caller code (the ROM function), you will see BL ram_address
- if the code calls a ROM function from a RAM one, and you look at the ROM copy of the caller, you are screwed :) (I'll let you do the math for this one)

4) Testing out

Once you have guessed a stub, put it in ML's stubs file (platform/camera.version/stubs.S), look it up in ML code to see where it's used (so you know what exactly to test), compile and test it out. There is also a stub testing routine under Debug menu, and running it is always a good idea. If the stub test routine does not contain yet a test for your stub, consider adding one.

Double-check that your stub is indeed at the beginning of the function. Jumping in the middle of a function may have undesired consequences ;)

Also double-check that you are not calling EraseSectorOfRom or other stuff like that.

Other tools:

You may prefer to use Pelican's ARMu (freeware, but not free software) or IDA (commercial, with demo version available). You can find some hints for these programs here and here, but tutorials are welcome.

I still use ARM-console for browsing around and decompling, but it may be a little difficult to install. If you don't need a decompiler, browsing the ASM from disassemble.pl or ARMu should be enough.
#59
5D3: found 3 interesting ADTG registers by comparing 1080 24p vs 30p in ADTG GUI.


          24p    25p    30p    50p    60p
ADTG2[8179] = ADTG4[8197]      0x891  0x784  0x6CA  0x39c  0x33c
ADTG2[82F9]                    0x8E2  0x7CF  0x71B  0x3e7  0x38D


Right now, if you remove the safety limits in FPS override, lock timer A at default value (440) and try to get 25 fps from 24 using only timer B, you will get a black screen. If you first copy the values of ADTG2[8179] and ADTG4[8197] from 30p, then FPS override will all the way to 31 (from 24 just as well as from 30, which is a small breakthrough). If you decrease this value a little more, FPS override will go to 32 (before, the max value on 5D3 was 31). If you decrease it even more, FPS override will not go beyond 32, but you will get a cropped image.

The second register has no obvious effects (I don't know what it does), but seems correlated to the first one.

With ADTG2[8179/8197] = 0x535 (from 0x6CA), I could keep timerA at 398, pushed timerB at 1490, and got 40.470 fps, in 1080p (at least printed on the screen, with LiveView still working).

Of course, trying to record that crashed right away :D

To research this, I recommend using ADTG GUI from the iso-research branch, and use FPS override to slowdown LiveView. Make sure you understand the existing code (fps-engio.c) and read g3gg0's notes from http://magiclantern.wikia.com/wiki/Register_Map and http://magiclantern.wikia.com/wiki/VideoTimer .

Have fun and take care, don't fry your sensor!
#60
Camera-specific Development / Canon 500D / T1i
May 14, 2014, 03:09:19 PM
As you know, a while ago I've got a used 500D for the purpose of studying how to reflash it (that is, brick it somehow and then attempt to recover it). I'm not exactly there yet with understanding Canon's startup process (some progress here and here), so meanwhile I've ironed out some ML bugs.

The new installer is working (starting from April 22, 2014), so you can install it directly from nightly builds. Therefore, the install process is now as simple as:


Installation:
1) Format the card from the camera.
2) Make sure you are running Canon firmware 1.1.1.
3) Copy ML files on the card and run Firmware Update.

Uninstallation:
1) Run Firmware Update from your ML card.
2) Follow the instructions.


Raw video (the old-style raw_rec) is also working (starting from today, May 14). Please discuss raw recording usage in the Raw Video section, not here.

You should not expect ML for 500D to be as polished as on the larger cameras, but it's pretty good as a development platform, and fairly cheap if you want to do dangerous experiments on it.

Don't just report issues. Go ahead and fix them!

(start here, and once you fix or improve something, follow this tutorial to submit your contribution)
#61
Please discuss raw recording issues in the Raw Video section of the forum.

Raw recorders (mlv_rec, raw_rec) are just apps that run on top of Magic Lantern core, just like Auto ETTR, Arkanoid, Dot-Tune and many other modules. This thread is for issues specific to the 5D Mark III port (in particular, problems introduced in 1.2.3 that did not exist in 1.1.3).

Any messages about RAW/MLV from this thread will be deleted without notice.


It's out!

Not alpha, not beta, nor zeta, just a bleeding edge that happens to work for me. It might work for you or it might not.

(note that my standards are fairly high, so what I call bleeding edge, others may call semi-stable or whatever)


Installation:
1) Format the card from the camera.
2) Make sure you are running Canon firmware 1.2.3.
3) Copy ML files on the card and run Firmware Update.

Uninstallation:
1) Run Firmware Update from your ML card.
2) Follow the instructions.

What's hot:
- bootflag issue solved! (p.s. some bloggers got it wrong, you still enable it in the camera, but you can disable it by uninstalling)
- installation is really easy (simply unzip the files on the card, update firmware and you are ready to go)
- uninstallation is equally easy (update firmware and follow the instructions)
- EosCard is now optional
- ML restores itself after formatting the card (man, that komputerbay card is fast!)
- you may install on any card combination you may think of
- over 300.000 downloads in the last two months :)

What's not:
- unlike most firmware updates which fix minor things, this one changed a LOT, especially on the display side (for example, LiveView is now quad-buffered and most of the display registers were changed).
- watch out for corrupted frames (still an issue?)
- fast zebras not working, but can be fixed
- no full-screen magic zoom (I never used it anyway, but was nice)
- no brightness/contrast/saturation adjutments (registers changed)
- [SOLVED!] HDMI issues
- no documentation (yet).

For photo use (raw overlays, ETTR and so on) it should be just fine (that's how I use it).

Source code:
- the 5D3-123 branch in the main repository.
- feel free to merge it locally with unified or experimental branches to get a sneak peek for the future updates.
- I'll merge it to unified when I'll be confident it's at least as good as the 1.1.3 branch (based on your feedback).

Thanks to:
- chris_overseas for initial porting and testing
- horshack for advice about safely toggling the bootflag
- Audionut for early builds and support in the early porting thread
- marekk, pompeiisneaks, jpaana, rufustfirefly, sinubis and others for early feedback and small fixes
- mk11174 for getting the 700D port in sync in this one
- everyone else who volunteeres their time to make a great community project.

Final notes:
- check nightly builds often and stay up to date! I'll do my best to make sure there are no critical issues in the nightly builds.
- there are quirks and bugs waiting to be fixed (please report them properly, with details on how to reproduce).
- grab the ARM toolchain and start hacking! (start with something easy or just tweak/fix whatever you find interesting).
- If anything goes wrong, we don't pay for repairs. Use Magic Lantern at your own risk!

coming soon: a lot of stuff, including a real sensor upgrade, a C compiler that runs on your camera and other geeky stuff like this
#62
Share Your Photos / How to embed Flickr photos
March 03, 2014, 10:37:24 AM
Looks like sharing photos from Flickr isn't exactly straightforward, so here's a quick tutorial.

1) from Flickr, select Share this photo

2) click on the pin symbol => you should get a BBCode which looks like this:

[url=http://flic.kr/p/kDKq9z][img]http://farm4.staticflickr.com/3826/12897959993_a654e00dd2.jpg[/img][/url]


3) paste that BBCode in your message:


Advantages:
- you get a nicely sized image that doesn't force the viewer to scroll a lot
- you get a link back to your Flickr page
- you respect Flickr's guidelines

Reference: Flickr FAQ
Quote
Where is the HTML code and photo file link?

The HTML code to embed a photo in a web page that you used to find on the All Sizes page is now only in the Share menu on the photo, to the left of the More menu. We now also include BBCode! (standard message board code)

There are a few cases where the code may not be available: 1) If the photo is restricted. 2) If that person has turned off "Share this" or access to original files.

The direct link to a photo file is no longer shown on the page. Per the Flickr Community Guidelines "pages on other websites that display content hosted on flickr.com must provide a link from each photo or video back to its page on Flickr." Linking directly to the photo file doesn't do this.
#63
General Development / Mini burst
February 19, 2014, 04:12:50 PM
I was just browsing around Canon Rumors and found this idea from Marsu42.

Here's a quick code snippet (coded in 5 minutes) that implements it, maybe somebody can turn it into something a little more useful. You may call it from shoot_task.

static void mini_burst_step()
{
    int hs = get_halfshutter_pressed();
    static int phs;
   
    /* did you just press the shutter? (well, halfway, since that's what we can check) */
    if (hs && !phs)
    {
        /* limit the burst to X pictures */
        int number = 3;
       
        /* keep monitoring while you keep the shutter pressed; one you took X pictures, stop */
        int f0 = get_shooting_card()->file_number;
        while (mod(f0 + number - get_shooting_card()->file_number + 10, 10000) > 10 && get_halfshutter_pressed()) {
            msleep(10);
        }
       
        /* if you are still keeping shutter halfway pressed, force a fake "unpress", which will stop taking pictures */
        if (get_halfshutter_pressed())
        {
            SW2(0,100);
            SW1(0,100);
        }
    }
   
    /* update previous half-shutter state */
    phs = hs;
}
#64
Modules Development / Proposal for managing modules
February 17, 2014, 09:14:05 AM
1) Thinking to add a :Category: field to module metadata (in the README files). Something along these lines:

raw-video:
mlv_rec mlv_snd mlv_play raw_rec bolt_rec

raw-photo:
dual_iso deflick ettr pic_view silent (mini_iso?)

// well... ettr, dual iso, mini_iso work for video too, but I'd say the primary target is photo; other ideas?

debug:
mem_chk mem_prot trace raw_diag (benchmrk? selftest?)

research:
adtg_log adtg_gui cf_acc iso_test iso_regs lv_rec mem_spy mrc_dump smpte

input:
ime_base ime_rot ime_std ime_null (ime_morse?)

misc:
file_man io_crypt tr_wifi (bitrate?)

misc-photo:
adv_int autoexpo auto_iso dot_tune filepref (fstack?)

games:
arkanoid

scripting:
script tcc fpu_emu tinypy

Let me know if you can think of better categories, or I've missed something. I've also included modules that are not yet done, but might appear in the near (or far) future.

I'm also considering tags instead of categories (so one module might have more than one tag). Advantages? Disadvantages?

2) What about treating modules like apps from users? That means, provide a central place for users to download these modules without requiring them to be included in the main ML repo.

This way, Marsu can keep developing auto_iso without me dissecting his code, Pravdomil can tweak autoexpo without having to submit a pull request to get it updated in the nightly builds, 1% can share his bitrate code as a module that can run on top of normal ML, dmilligan can continue his work on adv_int without pressure and so on. We can setup the nightly builds page to build each module from its own repository.

Of course, whenever you require core changes to support these modules, these are much easier to review when you submit them via pull requests.

3) To further lower the entry barrier for development, I'm also thinking about source modules, besides scripts (that is, just drop the .c source file in the camera in the modules directory, like you are doing now with .mo files, and have it compiled on the fly by TCC). I'm not 100% sure it's doable, but I'd like to know if there is interest in this direction. With this implemented, anybody with basic C skills can tweak their modules without requiring an ARM toolchain. It will probably cause confusion (as in, what's the difference between these source modules and scripts?), and the source modules will probably run a bit slower than current .mo files, but it's just an idea for discussion.

Thoughts?
#65
Modules Development / Post Deflicker (deflick.mo)
February 15, 2014, 12:40:48 PM
Audionut refactored the post deflicker feature as a module, with the help from nanomad (will be in next nightly). Please let me know if it works on all cameras (there should be no change in functionality).

An interesting trick: Marsu42 is using it not for timelapse, but for photo shooting (exposure normalization). Can you share some more details about this workflow?

Tutorial: http://www.magiclantern.fm/forum/index.php?topic=5705

Alternatives:
- For timelapse, deflickering is best done when postprocessing (try dmilligan's deflicker script, based on the same algorithm, but requires proprietary software).
- For regular photo shooting (exposure normalization, including natural-looking HDR), you can try my script: uniform_exposure.py (based on enfuse and ufraw). Don't try it for timelapse.

Once we'll have a fully open source post-processing tool that uses this algorithm, I believe this feature can be removed completely from ML (and free the resources for things that can't be done in post).
#66
General Development / Fix for pink frames
February 11, 2014, 03:29:48 PM
Having some major problems with pink frames with 5D3 123 (also reported by pompeiisneaks), I took a closer look and I believe I've fixed them for good (at least on this camera).

So, besides the well-known pink frame problem (let's call it issue #1), 5D3 123 had a new kind of corruption: all frames were geometrically correct, but colors were scrambled (examples in the link from pompeiisneaks; let's call this one issue #2). I believe I've fixed both of them (but to be sure, it needs lots of testing).


How I've reproduced the issues:

- raw_rec grayscale preview: there was a flicker very similar to the pink frames (half of frame was good, the other half was shifted to the right). This was clearly issue #1. In crop mode, there was roughly a corrupted frame every 5 seconds.

- silent pictures in burst mode corrupted. This was mostly issue #2, but I've also got instances of #1. I've got corruption in roughly one out of 3 burst sequences in "best shots" mode. Downgraded to 1.1.3 to test the same code, all clean.

- silent pictures in slit-scan mode corrupted (clearly issue #2). Harder to reproduce (say one corrupted picture out of 20), but this gave a very clear hint about the source of the problem. Since in this mode I don't use any kind of EDMAC trickery (just plain memcpy), it was clear that issue #2 was from Canon's lv_save_raw code (which, if you remember, is just a debugging flag for LiveView, and it's not used in normal operation of the stock firmware - thus, it probably didn't get much testing coverage from Canon).

The behavior from raw_rec preview confirmed the hint from silent pictures (while raw recorder was idle, there was no EDMAC trickery either - the preview was displayed from Canon's buffer). So... the corruption was there in Canon's raw buffer, and was not caused by our EDMAC calls. I've smelled this a while ago here: http://www.magiclantern.fm/forum/index.php?topic=6567.0

How I've fixed it:

So, I took the edmac_memcpy routine, remembered a hint from g3gg0's first lv_rec implementation where he said the raw buffer can be extracted by attaching a write EDMAC channel to connection #0, and implemented just that.

Had a small surprise to notice that using EDMAC channel #18 (the one used by Canon's lv_save_raw) with my code resulted in issue #2 present (exactly the same corruption). I now use EDMAC channel #4 and it seems fine at first sight. Luckily, issue #1 seems completely gone (with both channels).

Result: a new raw backend, codenamed CONFIG_EDMAC_RAW_SLURP, that no longer relies on Canon's lv_save_raw. So far, I've got no corrupted silent pics (out of a few hundred) and raw_rec's preview had zero flicker for several minutes (tried all 3 modes - 1080p, 720p and crop). I didn't record much, but so far it seems clean even with Magic Zoom enabled at 60fps. Of course, MZ didn't flicker at all and there were no corrupted frames.

Relevant changesets:

The fix itself:
https://bitbucket.org/chris_miller/magic-lantern/commits/0c5c1c5683dfa7e15dba3024b8fdf7c7fde89f6c

Preparing for the fix (apply in reverse order):
https://bitbucket.org/chris_miller/magic-lantern/commits/5ba68a12e0c6969286c3d21d269d7574b1aa294c
https://bitbucket.org/chris_miller/magic-lantern/commits/61424cefadc03affe647eeb51d786ac22a981469
https://bitbucket.org/chris_miller/magic-lantern/commits/00647042c11a8f764b0c91ce7e825ee27e3e0f0b

Notes:
- I had to hardcode the raw resolutions in all video modes. Fortunately, on 5D3 there are only 3 of them.
- The raw buffer is now allocated by ML. I actually see this as an advantage, because the memory backend does some sanity checks. Sure, right now you lose a few MB of RAM, but you can always recover the old buffer (hopefully allocated by Canon code, but unused) and have it managed by the memory backend. Nanomad knows what I'm talking about.
- I've only tried it on 5D3 123 raw_rec. Trying on 113 is straightforward. To port on other camera, you need to find another free write channel (find_free_edmac_channels is there to help you with that) and hardcode the resolution (must be exact, copy it from Debug->EDMAC and don't forget to add 1 to height).
- There were no changes in the raw recorder code, so I expect mlv_rec to work out of the box.
- TODO: ensure thread safety in raw.c, maybe try some other EDMAC channels, and if this approach proves rock solid, I hope to replace the old code completely.

May the pink frames be gone :D

P.S. If you remember this animation, now it should be a lot less likely to drop useful data (even on full CPU load).
#67
General Development / Menu usability guidelines
February 10, 2014, 06:12:04 PM
Now that menu API is more or less solid, I thought it's time to write down some guidelines. Should be useful both for developing new stuff and for polishing old features.

Feel free to come up with better suggestions, or post some screenshots that I could reuse to illustrate the points below. However, if you feel like suggesting some facelift or a new keybinding, it may be a good idea to use this thread: http://www.magiclantern.fm/forum/index.php?topic=4386.325

Clutter:
- (I start with this because I think it's the biggest usability problem right now)
- Think twice before adding YAMLMO (yet another ml menu option). There are already hundreds (if not one thousand).
- Try to avoid vertical scrolling (otherwise you can no longer see at a glance what settings are enabled).
- If you end up with a menu with lots of items, hide less-common options under the Advanced option, or in a submenu.

Submenus: (now we have multi-level submenus too)
- Prefer a top-level boolean option that turns your feature on and off, and put all the settings in the submenu.
- Sometimes you need a submenu just for grouping some items (e.g. benchmarks, or some general preferences), but there's no feature to be turned on and off. That's fine too. Try to put these items at the end of the menu though.
- Try to summarize the important submenu settings in the top-level menu (so you can tell at a glance what setting you are using). Example: most items from Shoot and Overlay menus.
- Do not abuse multi-level submenus: unrolled menu structures are generally quicker to navigate and easier to survey.

Values:
- Prefer pickboxes whenever possible (tip: use the CHOICES macro).
- Try to provide reasonable default settings (make your feature usable out of the box).
- When the toggled variable (.priv) is 0, try to interpret this setting as "OFF" (of course, only if it makes sense).
- Make sure your setting appears on the Delta menu when you change it from default, and also make sure it disappears from there when you go back to default value.
- Use reasonable .min and .max limits (e.g. instead of providing 1000 choices, try to select 5 or 10 choices that will make a difference).

Icons:
- in most cases, the icon type is autodetected (you may override it if autodetection is not smart enough)
- IT_ACTION: when you click on the item and something starts running (e.g. a task); do not use it for things that can be toggled on or off, for example.
- IT_BOOL: simplest setting (you toggle it on or off)
- IT_PERCENT: a scalar value (quantity)
- IT_PERCENT_OFF: a scalar value with an OFF position (zero is interpreted as OFF)
- IT_DICE: a set of discrete choices without an OFF position (historically this was represented by a dice icon)
- IT_DICE_OFF: a set of discrete choices with an OFF position.
- IT_SUBMENU: on submenus without top-level value.

Colors:
- green: something that can be turned off
- light blue: something that can't be turned off
- if an item is turned off, its value should be grayed out (but not its name)
- if an item can't be used in the current context, gray it out completely (see below)

Warnings:
- if an item can't be used (e.g. a photo-only feature in movie mode), gray it out (MENU_WARN_NOT_WORKING) and explain what to do in order to use it.
- use depends_on to check for some common things like LiveView or movie/photo mode, and use a MENU_UPDATE_FUNC for more complex logic.
- you can provide usage tips (MENU_WARN_INFO), especially non-obvious stuff.

Alignment:
- Try to keep the menus nicely aligned (just like you do with code indentation)
- Extend submenu_width as needed (so your menu feels neither too cramped nor too loose - just right)

Ordering:
- Try to group similar items (avoid things like boolean/action/boolean/action/scalar, try boolean/boolean/scalar/action/action instead)
- Try to move action items at the end of the menu
- Same for grouping submenus (try to place them at the end of the menu)

Help:
- Each item should include a short description (.help, optionally .help2).
- For items with multiple choices, help2 can be used to describe every single choice (simply describe one choice per line).
- Make sure the help text actually fits on the screen!
- For modules: also include a short description in the README.rst file (details here). Make sure your description fits in the ML menu!
#70
So, what's all this stuff about "sensor update"?


Just a small improvement in dynamic range in photo mode (around 0.3...0.5 0.8 stops). We were able to fine-tune the amplifier gains in order to squeeze a little more highlight detail.


Graphs for the other cameras can be found here: http://www.magiclantern.fm/forum/index.php?topic=10111.msg97780#msg97780

[February 23] 5D3 reaches nearly 0.8 stops of improvement: 11.77 EV at ISO 115, and also a new ISO 66.
[January 17] 5D2 reaches 11.92 EV of dynamic range at ISO 81.

Only 0.5 EV? That's way too small!


Yes. You may take a look at Dual ISO (which will get an additional 0.3...0.5 stop boost with this "sensor update"; also resolution issues were largely solved), or you may consider switching to Nikon.

Wait a minute, that means less noise, right?


Well, it means you get a little more detail in highlights. This doesn't mean less noise per se (the new ISOs will be just as noisy in shadows as the old ones), but it will let you shift the exposure to the right by 1/3 ... 2/3 EV and collect more photons. This will result in lower noise.

For example, on 5D Mark III I could lower the ISO by 0.37 stops from 100, resulting a new ISO 77. After some more tweaking, I've got 0.6 stops below ISO 100 => ISO 66.

Sample images?


No relevant samples yet, sorry.

How exactly are you getting more highlight detail compared to Canon firmware?


The signal from the sensor seems to be amplified in 2 stages: a CMOS amplifier (which operates in full stops - powers of 2 - and we have tweaked it when implementing Dual ISO) and an ADTG amplifier which can be configured in finer increments. After these two stages, the signal is digitized (with an ADC), probably tweaked digitally, and saved to CR2. We have noticed the ADTG amplifier tends to run a little "hot" (that means, it gets saturated a little too early - nothing to do with temperature).

To get the extra highlight detail, one has to reduce the gain for the ADTG amplifier until the ADC will no longer be saturated. At this point, the white level (maximum recorded level in the raw file) will begin to decrease and no more detail will be recovered (since now the CMOS itself or the CMOS amplifiers will get saturated instead).

To play with these gains, scroll down to the research tools section.

Does this mean Canon did not fully optimize their sensor for low noise?


I'd say they simply left a safety margin in their code to make sure the ADC is always saturated (that is, to make sure white is always recorded as white).

How are intermediate ISOs implemented in Canon cameras?


I will try to answer this question in a detailed paper (including how exactly I've reached the conclusion).

For now, you may take a look at these graphs: https://www.dropbox.com/sh/onppbwy44fqomxa/P75rs6pgTW


What's with that message about f1.2 lenses?


According to DxO, Canon applies a digital ISO boost at wide apertures (about 0.5 stops on APS-C cameras, and 0.2 stops on FF from my findings) to compensate for light loss. Since the digital gain is burned into the CR2 files, at wide apertures you will lose a small amount of highlight details (under 0.1 stops on FF, did not check on APS-C). Also you may get some extra noise from round-off errors, and if your raw editor does not handle white level properly, you may lose even more highlights (details here).

We are going to fix this by turning off the digital gain.

Any side effects?


None yet.

What about Dual ISO?


You will be able to use both tweaks (it will just work).

What about video?


I've got only 0.1 stops of improvement on 5D3, but didn't try too hard.

What's the current state?


Research. We are trying to optimize the parameters that influence ISO, understand their effects (did we really gain 0.5 stops of DR or are we just daydreaming?) and port the results on other cameras. Scroll down for some research tools.

Will it work on my camera?


- If you have a 550D or newer camera, it will most likely work.
- If you have a 7D, no idea yet.
- If you have a 5D Mark II, 50D or 500D, don't get too excited. I've barely got 0.15 stops of improvement on 5D2. Mystery solved!
- Confirmed working on 5D3, 550D, 600D, 650D, 700D, 60D, 6D, 5D2, 50D and 500D.

How can I help?


- Play with the research tools below and report your findings.
- If you have access to laboratory equipment and you can measure the real ISO, you can help us check the validity of our ISO theory.

Where's the download link?!??!?!!??!!!!!!!!!!!!!!!!!!?!?!?!?!?!


Take it easy, the current state is research. As in, "If we knew what it was we were doing, it would not be called research, would it?"

But if you have some basic coding/math skills - enough so you can follow the entire discussion without getting dizzy - I have some nifty research tools for you:

raw_diag.mo (source)- cross-platform, anyone can run it

This tool does technical analysis on the raw image data (black/white levels, noise, dynamic range, SNR curve):


Alternative: RawDigger (proprietary, nonfree).

iso_regs.mo - 5D3 only, requires either the crop_rec_4k build, or a custom ML build from the iso-research branch:

A research tool (or hacker's tool if you prefer) that lets you change most ISO-related parameters on 5D Mark III only and study their effect. Details here.


adtg_gui.mo - cross-platform, requires CONFIG_GDB=y a custom ML build from the iso-research branch (on 5D3, the crop_rec_4k build works fine as well):

The good old ADTG/CMOS tool updated to also intercept DIGIC (ENGIO) registers.


For sources, please check the branch iso-research on the main repository.

When it will be released?


When it's ready. I also want to summarize the findings in a small paper (like the Dual ISO PDF), so I need a little time.

Any recommended reading?


http://theory.uchicago.edu/~ejm/pix/20d/tests/noise/index.html
http://www.clarkvision.com/articles/evaluation-canon-5diii/index.html (main site: http://www.clarkvision.com/articles/ )
http://www.dxomark.com/About/In-depth-measurements/Measurements/ISO-sensitivity


Original message:
Quote
Now some fun stuff:

Compile ML with CONFIG_GDB=y and load the adtg_gui module. Override the column gain registers (0x8882-0x8888) to roughly half the original value.

My results (with 978bf96 and these changes; shutter 1/30):
Unaltered ISOs:

ISO    ADTG default   white level    noise stdev    DR
100    0x41b          15282          6.62           10.96
160    0x435          13306          5.53           10.99
200    0x54c          15282          6.83           10.92
250    0x435          15282          8.55           10.60
1600   0x454          15282          11.87          10.12


ISOs altered with ADTG gain overriden to 0x250:

ISO    ADTG overriden white level    noise stdev    DR
100    0x250          11911          3.68           11.38
160    0x250          9935           3.25           11.24
200    0x250          11924          3.88           11.31
250    0x250          11917          3.84           11.33
1600   0x250          11915          6.46           10.58


So... we can get almost half-stop of DR just by tweaking some registers?! Looking forward to see the RawDigger results.
#71
General Development / Easy Coding tasks
December 22, 2013, 12:19:13 PM
Inspired from darktable. These things require minimal C skills and can be solved in roughly 5-10 lines of code => good for beginner developers looking for something easy to jump in.

Look for "easy coding task" around the forum or the issue tracker
That's how we used to mark them lately.

Minor typos
https://bitbucket.org/hudson/magic-lantern/issue/1742/typo-in-menu solved by pompeiisneaks

(keep looking for these things; we are not native English speakers)


Benchmark fonts (solved in 3aba2ce)

Cropmarks in photo mode solved by 1% and merged by pompeiisneaks

Cold pixel fix in raw2dng (solved by escho)

Bad pixel fix from a .badpixel file (solved by bouncyball)

File join support in raw2dng (autodetect and merge .RAW, .R00, .R01...) (solved by bouncyball)


Missing indicators in the LiveView info bars

Solving one indicator from this list should fit as a EasyCoding task. Solving all of them will take more than 10 lines of code.

https://bitbucket.org/hudson/magic-lantern/issue/1741/50d-maybe-others-no-longer-displays
https://bitbucket.org/hudson/magic-lantern/issue/1687/exposure-compensation-missing-from-lv (solved by ayshih)
https://bitbucket.org/hudson/magic-lantern/issue/1715/no-aperture-stop-indication-sincenightly (solved by ayshih)
http://www.magiclantern.fm/forum/index.php?topic=9282
and the API you should use is described here: http://www.magiclantern.fm/forum/index.php?topic=8539.msg79753#msg79753

Happy coding!
#72
I decided to throw all my UFRaw patches in a repository, so you guys can try them until they will be - hopefully - integrated in the official version.

Source code on Bitbucket (with changelog and issue tracker)
Windows binaries (ufraw.exe and ufraw-batch.exe, plus a bunch of DLLs)

Tip: if you are on Mac/Linux and don't feel like typing "./configure && make && make install", you can run my executable under Wine.

The patches:
- custom soft-film curve with nicer highlight rolloff
- overexposure fixes (hopefully solves these issues)
- white balance on skintones (work in progress, hardcoded for 5D3 for now)
- experimental support for 32-bit floating point DNG files created by CeroNoice (exposure slider extended until +20 EV; be careful, it can be slow)

Note that I don't use the Windows version myself (I use a Linux binary compiled from the same source, but the versions of the underlying libraries may differ). I've opened it under Wine, dragged some sliders, saved a jpeg, but that was it. If it behaves weird, please report it to my issue tracker on Bitbucket. Of course, if your issue is also present in stock ufraw, report it there.

Here I'd like to see feedback on the above modifications, difficult test cases where they either helped or made things worse, comparisons with stock UFRaw, stuff like that.

Some pictures and screenshots:


Happy pixel peeping!
#73
After having some trouble getting ZeroNoise working, I coded my own version of the algorithm (well, only the part I understood) and ran a little experiment to check whether you should really take as many brackets as you can, or whether you can get away with just 2 or 3 pictures spaced at 4 EV or more.

I've called my program CeroNoice, pronounced pretty much like ZeroNoise, with a Spanish "ce" ("hay que sacar la lengua").

Download: CeroNoice.exe. It requires dcraw (get it from cr2hdr.zip) and outputs 32-bit float DNGs (I know, it's overkill, but 16-bit float is not a native C data type).


Greg sent me a 6x2 EV bracketed sequence (thanks!):
IMG_5826.CR2 IMG_5827.CR2 IMG_5828.CR2 IMG_5829.CR2 IMG_5830.CR2 IMG_5831.CR2


The test script and results (warning: the files are huge, don't jump to download without reading what is what):

# 1 image, exposed for highlights
sh test.sh IMG_5826.CR2 && mv out.dng 26.dng && convert a.tif 26.jpg

# 2 images, 2 stops apart
sh test.sh IMG_5826.CR2 IMG_5827.CR2 && mv out.dng 26-27.dng && convert a.tif 26-27.jpg

# 2 images, 4 stops apart
sh test.sh IMG_5826.CR2 IMG_5828.CR2 && mv out.dng 26-28.dng && convert a.tif 26-28.jpg

# 2 images, 6 stops apart
sh test.sh IMG_5826.CR2 IMG_5829.CR2 && mv out.dng 26-29.dng && convert a.tif 26-29.jpg

# 2 images, 8 stops apart
sh test.sh IMG_5826.CR2 IMG_5830.CR2 && mv out.dng 26-30.dng && convert a.tif 26-30.jpg

# 2 images, 10 stops apart (!)
sh test.sh IMG_5826.CR2 IMG_5831.CR2 && mv out.dng 26-31.dng && convert a.tif 26-31.jpg

# 3 images, 4 and 6 stops apart (total 10)
sh test.sh IMG_5826.CR2 IMG_5828.CR2 IMG_5831.CR2 && mv out.dng 26-28-31.dng && convert a.tif 26-28-31.jpg

# 3 images, 6 and 4 stops apart (total 10)
sh test.sh IMG_5826.CR2 IMG_5829.CR2 IMG_5831.CR2 && mv out.dng 26-29-31.dng && convert a.tif 26-29-31.jpg

# 6 images, 2 stops apart (total 10)
sh test.sh IMG_5826.CR2 IMG_5827.CR2 IMG_5828.CR2 IMG_5829.CR2 IMG_5830.CR2 IMG_5831.CR2 && mv out.dng 26-27-28-29-30-31.dng && convert a.tif 26-27-28-29-30-31.jpg

Other scripts you may need to review or reproduce my experiment:
dngfloat_hdr.py (requires dng_validate.exe from Adobe DNG SDK v1.4, not earlier)
test.sh

Now it's your turn to look at these images, try my program and draw the conclusions.

Happy pixel peeping!
#74
Post-processing Workflow / White balance on skintones
December 06, 2013, 07:18:46 AM
From http://www.magiclantern.fm/forum/index.php?topic=7139.msg90883#msg90883 :

Quote from: a1ex on December 06, 2013, 04:31:54 AM
If it's daylight, it's easy (something around 5500 in sunlight, 6500 in shadow). A little magenta boost when shooting grass with older lenses. Indoors, I found balancing on something white a bit too harsh (I prefer to go a little warmer from there). Sometimes I get much better results if I do the white balance directly on skintones.

I have a small modification to ufraw that lets me do spot WB on skintones; if anyone is interested I can share it.

Quote from: budafilms on December 06, 2013, 06:50:31 AM
Share it!

Alright; before doing this, I'd like a little help from you:

1) before reinventing the wheel, let me know how are you doing white balance on skin tones in your favorite image editor.

2) then, upload a few sample pictures with really difficult WB that I can use as test material (of course, the pictures should contain skin tones). If you have an image where you did WB with a grey card, but skin tones look wrong, that's the perfect candidate. Formats accepted: CR2 or DNG. If you have some reference images with the same skin tones in daylight (how they should look like in the final output), upload them too. Formats accepted: CR2/DNG + rendered JPG + white balance info (Kelvin or RGB multipliers).

Basically, my method is a modification to ufraw, where instead of doing white balance on a gray card, I can select a reference color.

Related: https://discussions.apple.com/thread/4705311

Download: http://www.magiclantern.fm/forum/index.php?topic=9597
#75
Modules Development / MLV PLAY (mlv_play.mo)
October 28, 2013, 12:07:15 PM
Quote from: g3gg0 on October 26, 2013, 11:22:14 PM
i added mlv_play.mo to the pre-built binaries.
if you install file_man.mo, you can browse your card's file system and open .mlv and .raw files for playback

Added color playback support. If it's too slow, press SET to switch back to grayscale.

Do we need a separate thread for mlv_play.mo?
#77
General Development / Config presets
September 25, 2013, 06:45:08 PM
I've tried to implement the much-requested config presets, and almost got them working:

Backend:

* A preset is a subfolder under ML/SETTINGS
* It contains ML settings, module settings, pretty much any kind of settings except Canon ones.
* To choose a preset, you just change the settings directory. As long as code requiring some files with settings does not hardcode ML/SETTINGS, but uses get_config_dir() instead, it should work out of the box.
* Special preset names: <keyname>.KEY and <modename>.MOD (see below)

Frontend:

* You can choose a preset in 3 ways:
    - From menu (select it by name)
    - Linked to a key that you press and hold at startup (currently MENU, PLAY and INFO/DISP)
    - Linked to the shooting mode (from the mode dial) selected at startup (so you have a preset for M, another for Av and so on).
* You can create up to 13 named presets by creating subfolders under ML/SETTINGS/ (just "new folder" is enough; copying an existing folder is also fine)
* The preset name is always displayed in the menu, in a corner.
* If it sounds complicated, you have built-in help in the camera ;)

Caveats:

* Changing the preset requires reboot (to keep things simple and robust).
* You may want to move ML/MODULES/*.CFG and *.EN to ML/SETTINGS (or just delete them and start fresh).
* Right now there's no way to create new named presets from menu (you need to do this on the PC).
* 5D2/50D do not have a dedicated switch for movie mode (they always start in photo mode). This means you can't have a preset for movie and another one for photo on these cameras (even if the menu may suggest you can). It might work if you press LiveView fast enough at startup (didn't try this).
#78
General Development / New memory backend
September 17, 2013, 05:51:03 PM
Just finished something that I had in mind for a long time: a new unified memory backend.

https://bitbucket.org/hudson/magic-lantern/src/tip/src/mem.h
https://bitbucket.org/hudson/magic-lantern/src/tip/src/mem.c

Background: in each camera, there are a bunch of memory pools which have some unused space (Canon code allocates memory from there, but they are not fully used - there's a bit of free space left, and ML uses it).

Of course, Canon code doesn't know about ML (so it expects there's enough RAM for whatever it wants to do), and ML should be careful not to take away all that RAM (otherwise Canon code will fail and will usually throw ERR70).

Until now, we have used malloc and AllocateMemory for general-purpose stuff, and shoot_malloc for very large stuff (e.g. raw video frames, or storing ML files for restoring them after format). The decision whether to use malloc or AllocateMemory was hardcoded (most cameras have more free RAM in AllocateMemory, but some of them have more in malloc). A table with free RAM for each memory pool is here: https://docs.google.com/spreadsheet/ccc?key=0AgQ2MOkAZTFHdFFIcFp1d0R5TzVPTVJXOEVyUndteGc#gid=2

Now, we can just call "malloc" and the backend will decide what buffer to use (based on free space in each of them).

Advantages:
- you just call malloc without thinking too much about it (the backend decides what pool to use; you will only see a large heap of RAM that just works)
- traceable: you can see in menu how much RAM was allocated, current/peak usage, a list of blocks that also shows source file, line, task, also a history of RAM usage...
- extensible: if you find some more methods for allocating RAM, simply create a malloc-like interface and add it to the list of allocators
- you can run huge modules if you really want that (didn't try, but should work)

More RAM sources that were not used: task stack space (most cameras have 500K free, some have 1MB) and unused RscMgr memory (e.g. on 60D). For these, you can take PicoC's heap routines (that behave like malloc), add them to the allocator list in mem.c, and the existing code will start using them right away.

Notes:
- shoot_malloc is a bit special: Canon code expects it to be free when you change certain settings (e.g. noise reduction on 60D). Therefore, if we use it, we must free it quickly, before the user goes to Canon menu).
- error handling: malloc always returns 0
- for new code and refactoring existing code, I suggest using:
    - plain malloc/free for most cases
    - fio_malloc/fio_free if the memory is used for reading files (this goes to alloc_dma_memory or shoot_malloc)
    - tmp_malloc/tmp_free if the memory will be freed quickly (so the backend will prefer shoot_malloc)

A bit related: after loading modules, TCC will be unloaded. This will free another big chunk of RAM.

Screenshots:

5D3, after loading a bunch of modules:


60D, no modules loaded:


(the peak is still from module backend btw - turn it off in debug menu and it will disappear)

Caveat: all ports will require renaming the malloc stubs (add an underscore); otherwise, compiling will fail (so nightly builds will be broken until somebody with code skills will take a look at each port, update the stub names and see if it works). I know, it's not very nice, but I prefer a completely broken build (because the users can just download an older build) instead of a something that compiles and has a big chance to fail.

So, all you have to do is to:
- rename malloc-related stubs in stubs.h
- get the two screenshots and upload them here
- create a pull request (so I shouldn't have to edit each stubs file)

Now you have enough memory to run OpenCV on the camera ;)

Credits go to g3gg0 for memcheck (this code is based on it).
#79
General Development / Proportional fonts
September 07, 2013, 11:51:30 AM
Bitbucket discussion here: https://bitbucket.org/hudson/magic-lantern/pull-request/222/added-rbf-font-support/diff
Source code here: https://bitbucket.org/g3gg0/magic-lantern-rbf

If you don't see major issues (like significant slowdown, much higher memory usage, completely unreadable fonts on some displays, or everybody likes the old fonts), I'd say it can be merged (and g3gg0 said the same).

History:

[aug26] stevefal suggests (once again) to use proportional fonts.

[sep03] g3gg0 ported RBF font format from CHDK.

[sep07] proportional fonts are already usable (of course, ther's still a bunch of things to fine-tune)


Screenshots (may change, since stevefal is still fine-tuning the fonts)


New printing API:

Centered text (example from spotmeter):

        bmp_printf(
            fnt | FONT_ALIGN_CENTER,
            xcb, ycb,
            "#%02x%02x%02x",
            R,G,B
        );


Right-aligned text, clipped if it exceeds some maximum width (example from module name in Modules tab):

int fg = COLOR_GRAY(40);
int bg = COLOR_BLACK;
int fnt = SHADOW_FONT(FONT(FONT_MED, fg, bg));
bmp_printf(fnt | FONT_ALIGN_RIGHT | FONT_TEXT_WIDTH(300), 690, info->y+5, name);


Justified text with manual line breaking (example from module README):

big_bmp_printf(FONT_MED | FONT_ALIGN_JUSTIFIED | FONT_TEXT_WIDTH(690), 10, 60, "%s", desc);


Special characters (ISO, small 1/ or f/, degree symbol)

bmp_printf( font, x, y,"T=%d"SYM_DEGREE"C", EFIC_CELSIUS);

-bmp_printf(..., "ISO %d 1/%d f/%d.%d %dK", iso, shutter, aperture, kelvin)
+bmp_printf(..., SYM_ISO"%d "SYM_1_SLASH"%d "SYM_F_SLASH"%d.%d %dK", iso, shutter, aperture, kelvin


#define SYM_DOTS        "\x7F"
#define SYM_ISO         "\x80"
#define SYM_F_SLASH     "\x81"
#define SYM_1_SLASH     "\x82"
#define SYM_DEGREE      "\x83"
#define SYM_MICRO       "\x84"     /* maybe not needed */
#define SYM_PLUSMINUS   "\x85"
#define SYM_LV          "\x86"
#define SYM_BULLET      "\x87"
#define SYM_EM_DASH     "\x88"


Expanded/condensed text (not yet implemented):

FONT_EXPAND(x) /* range: -4 ... +3 pixels per character */

#80
Starting from this idea from Marsu42 that modules should have a longer description, I've experimented with something that looks like this:


Juicy details: https://bitbucket.org/hudson/magic-lantern/pull-request/213/modules-with-embedded-readme-page

Also a few UI tweaks (where I'm sure stevefal has something to say, and some of them are already in the main repo):

* modules should opt-in, not opt-out (autoload is on by default, but all modules are off - you choose what you want to load)
Rationale:
  - I use 2 or 3 modules out of more than 10 on the card. When formatting the card, most modules had to be turned off manually, and it takes many clicks.
  - Things that you don't need shouldn't be loaded IMO (saves memory, reduces clutter etc).
  - It encourages people to be aware of what they are loading

* toggle modules on/off with a single click (like all other boolean options in ML)
   (I've been toggling things on and off a lot lately, mostly for troubleshooting, and it required too many clicks)

* modules sorted by name, and loaded modules are always at the top
   (so you can see quickly what's loaded, instead of having to scroll)

* press Q to see more info about the module (for example you will know whether you should load it or not).
   (I wanted to map this to INFO, but the menu code requires some non-trivial changes)

* moved module options in a submenu (since you don't touch them all day long)

Thoughts?
#81
I was looking for a easy way to rotate a bunch of images with some small angle, and crop them to the same aspect ratio, in batch mode. Since I couldn't find one, I wrote a little script to do that.


#!/usr/bin/python

# Rotate images and crop with aspect ratio (just like Gimp's "crop with aspect")
# (C) 2013 a1ex. License: GPL.

# Usage: python rotate_with_aspect.py input.jpg output.jpg angle

# The aspect ratio is hardcoded in fix_roll (default 3:2)

from __future__ import division
import sys, os
from math import *

def rot(x, y, ang):
    c = cos(ang * pi / 180)
    s = sin(ang * pi / 180)
    return c*x - s*y, s*x + c*y

def fix_roll(pic, roll, out):

    w0 = w = 3000
    h0 = h = 2000

    if roll > 45:
        w0,h0 = h0,w0
        w,h = h,w
        roll = -90 + roll
    if roll < -45:
        w0,h0 = h0,w0
        w,h = h,w
        roll = 90 + roll
   
    w1,h1 = rot(w, h, -roll)
    w2,h2 = rot(w, -h, -roll)
    w = max(abs(w1),abs(w2))
    h = max(abs(h1),abs(h2))

    crop_x = 100 * w0 / w;
    crop_y = 100 * h0 / h;
   
    s = 1
    for x in range(-w0, w0):
        wx,hx = rot(x, h0, abs(roll))
        wx,hx = abs(wx),abs(hx)
        s = min(s, max(wx/w0, hx/h0))

    for y in range(-h0, h0):
        wy,hy = rot(w0, y, abs(roll))
        wy,hy = abs(wy),abs(hy)
        s = min(s, max(wy/w0, hy/h0))

    s *= 1.001
    crop_x *= s
    crop_y *= s
   
    cmd = "convert %s -gravity Center -rotate %g -crop %g%%x%g%% %s" % (pic, -roll, crop_x, crop_y, out);
    os.system(cmd)

try:
    jpg = sys.argv[1]
    out = sys.argv[2]
    ang = float(sys.argv[3])
except:
    print "Usage: python rotate_with_aspect.py input.jpg output.jpg angle"

fix_roll(jpg, ang, out)


Note: the aspect ratio is hardcoded to 3:2 (well, 3000:2000). You can change it as you wish.

If I've reinvented the wheel, please point me in the right direction ;)
#82
General Development / Modified settings menu
August 25, 2013, 11:25:55 PM
Here's a little experiment that should help with usability: a dynamic menu that shows only the settings that you have modified. You can use it to review the settings before a shoot, for example (e.g. to make sure you don't have some esoteric setting enabled by mistake).

https://bitbucket.org/hudson/magic-lantern/commits/12faa2c544c7

@stevefal: what do you think about it? maybe you can suggest a better icon?
#83
I was playing with the display registers and found some false color effects that may be useful:

- Swap UV (already implemented on some cameras as video effects)
- Extreme saturation (e.g. if you have set your white balance a little bit on the magenta side, the entire image will be strong magenta). So, just dial WB until you get rid of the color cast.

Any use for them? or are they just cluttering the menu? Try them tomorrow in the nightly builds, or today if you compile yourself.

https://bitbucket.org/hudson/magic-lantern/commits/155dca0de492
#84
http://www.math-info.univ-paris5.fr/~moisan/papers/2010-10r.pdf

Who's going to decipher and implement this?
#85
Time for the first real image quality improvement in ML history :)

Here's a trick that samples half of the sensor at ISO 100 and the other half at ISO 1600, for example. If you mix these two, you can get almost the entire dynamic range the sensor is capable of (around 14 stops). 5D3/7D only. Now it works on most cameras!

There are no motion artifacts; not even a difference in motion blur for the two exposures. So, it works well for fast moving subjects.


Please post your samples here -> Thread photos dual ISO

More samples on Flickr (tag: Dual-ISO)
Tutorial - Guide to using Dual ISO Mode on your Canon 5D Mark III
Open Source Brings High-End Canon 5D MK III Dynamic Range Closer to Nikon D800
Dual ISO vs Exmor: on CanonRumors, reddit, POTN and FredMiranda.

Code
- dual_iso module
- recent nightly builds should have this working on most cameras

Technical doc
- dual_iso.pdf (in-depth description of how it works)
- See also: ADTG and CMOS discussion

Warning
This code changes low-level sensor parameters. In the technical doc you can see how this method messes with the feedback loop for optical black, for example. Since the original implementation, many people have tried it (including timelapse), with very few side effects reported (e.g. more hot pixels than usual on long exposures). However, that's not a guarantee.

We don't pay for repairs. Use it at your own risk.


Usage
- Select one ISO from Canon menu, the other from Dual ISO submenu.
- Expose to the right for the lower ISO (usually ISO 100). Maybe darken 1 stop from there.
- Start at ISO 100/800.
- Try a larger gap for really extreme situations, or a smaller gap for better midtone detail (less aliasing).

Histograms, ETTR, playback tricks

- ETTR integrates with dual ISO (just enable both). It will use dual ISO only in high dynamic range scenes. Adjust the SNR limits to let the algorithm know what exactly is a "high dynamic range scene" and to fine-tune the balance between midtone/shadow noise and highlight aliasing.

- Raw zebras: weak markers appear where only one of the two ISOs is overexposed (likely to get aliasing), strong markers appear where both ISOs are overexposed (there's no more detail in these areas).  See here for examples.

- Raw histogram will use the darker exposure. Consider the brighter one as some sort of shadow recovery.
- JPEG zebras/histogram are totally unreliable.
- In photo LiveView you will see the ISO from Canon menu. In movie mode, you will see horizontal lines.
- Playback in 1x will show some sort of HDR preview. At certain zoom levels, you'll be able to see only one of the two exposures, at very low resolution.
- The dynamic range indicator from the histogram is not accurate. (solved!)

Postprocessing

- Reference converter: cr2hdr.c (Windows: cr2hdr.exe). It requires dcraw and (optional) exiftool in your executable path (they are in the zip). Drag and drop the CR2 files over cr2hdr.exe.

- For RAW video files, use the following commands in a terminal:

mlv_dump clip.mlv --dng --no-fixcp --no-stripes
cr2hdr --same-levels *.DNG


- GUI frontends:
   - Lightroom plugin (WIN/MAC)
   - BarracudaGUI (WIN)
   - Script for multiple instances of cr2hdr (WIN, VBScript)
   - Mac GUI for cr2hdr: OSX_cr2hdr_app.zip and OSX_cr2hdr.zip
   - MLV to DNG Batch Converter (WIN, video only)
   - MLP (MAC)

- To get a natural HDR look: try my automatic color grading script.

Price to pay
- Half resolution in highlights and shadows
- Aliasing and moire - of course, in highlights and shadows
- You can no longer check critical focus when zooming in

Samples

This is actually a video frame from 5D Mark III. Here's the DNG.
Bottom-left: ISO 100. Top-right: ISO 100/1600.
Credits: Luke Neumann.


The next one is a still photo from 5D Mark III. Here's the DNG and the original CR2. ISO 100/1600.


Questions? Read the pdf first. The mystery should clear up, I hope.

That's it. Looking forward to your samples.
#86
Most of the time I'm too lazy to adjust colors in my photos, so I wrote a script that does this exactly the way I want. It gets roughly 80-90% of pics just right for my taste; for the others I can do manual adjustments.

The script is a few months old, so it was fine-tuned over the time. It's similar to the "Post Deflicker" feature from ML, but optimized for regular photos, not for timelapse.

What it does:
- applies exposure compensation to all photos (so the end result looks consistent)
- performs shadow and highlight recovery, with the "HDR from a single RAW" tonemapping trick and enfuse

Download: uniform_exposure.py or browse the Mercurial repository.

Usage: look in the comments. There are no command-line params; edit the script to tweak stuff.

Dependencies: python, numpy, dcraw, ufraw, enfuse and ImageMagick.

Sample photo developed with the script, from this DNG, without any post-processing after running the script:


How I've got that DNG, I'll tell you later these days.

Caveats:
- By default it develops at half-res, for speed. To use full resolution, set --shrink=1 instead of 2.
- I use a modified ufraw, so you may not get exactly the same result for this sample DNG.
- I didn't try it for timelapse. It may flicker a bit more than ML post deflicker, but you can try it.
- Don't expect it to be a speed demon. It will spend several seconds on a raw file. So, first select your shots that you want to keep, then fire the script and let it crunch your pics.
- For Windows, see this step-by-step guide.

Tips & tricks:
- To re-develop a picture with different settings, just delete that jpeg and run the script again.
- You can use any kind of raw files recognized by dcraw (not just Canon). I've tried only CR2 and DNG.

You can post sample pics here, I'd like to see how well it works for you.

Enjoy!
#87
Reverse Engineering / ADTG and CMOS registers
June 25, 2013, 11:01:20 AM
Code: https://bitbucket.org/hudson/magic-lantern/src/tip/modules/adtg_log/

Notes: http://magiclantern.wikia.com/wiki/ADTG

Logs:
Quote from: g3gg0 on June 08, 2013, 11:05:46 PM
read, compare and understand:
http://upload.g3gg0.de/pub_files/f00fa2c2cea01ee32408009b6e02fcc6/ADTG_CMOS_Writes.7z

this is only the data written to ADTG and CMOS.
try to find out as much about the registers as you can.

if all that is understood, then we have about 10% of the necessary stuff for custom resolutions.

good luck ;)
#88
If you ever looked in the comments from raw_rec.c, you have noticed that I've stated a little goal: 1920x1080 on 1000x cards (of course, 5D3 at 24p). Goal achieved and exceeded - even got reports of 1920x1280 continuous.

During the last few days I took a closer look at the buffering strategy. While it was near-optimal for continuous recording (large contiguous chunks = faster write speed), there was (and still is) room for improvement for those cases when you want to push the recording past the sustained write speed, and squeeze as many frames as possible.

So, I've designed a new buffering strategy (I'll call it variable buffering), with the following ideas in mind:

* Write speed varies with buffer size, like this (thanks to testers who ran the benchmarks for hours on their cameras)

* Noticing the speed drop is small, it's almost always better to start writing as soon as we have one frame captured. Therefore, the new strategy aims for 100% duty cycle of the card writing task.

* Because large buffers are faster than small ones, these are preferred. If the card is fast enough, only the largest buffers will be touched, and therefore the method is still optimal for continuous recording. Even better - adding a bunch of small buffers will not slow it down at all.

* This algorithm will use every single memory buffer that can contain at least one frame (because small buffers are no longer slowing it down).

* Another cause of stopping: when the buffer is about to overflow, it's usually because the camera is trying to save a huge buffer (say a 32MB one), which will take a long time (say 1.5 seconds on slow SD cameras, 21MB/s). So, I've added a heuristic that limits buffer size - so, in this case, if we predict the buffer will overflow after only 1 second, we'll save only 20MB out of 32, which will finish at 0.95 seconds. At that moment, the capturing task will have a 20MB free chunk that can be used for capturing more frames.

* Buffering is now done at frame level, not at chunk level. This finer granularity allows me to split buffers on the fly, in whatever configuration I believe it's best for the situation.

* The algorithm is designed to adjust itself on the fly; for this, it does some predictions, such as when the buffer is likely to overflow. If it predicts well, it will squeeze a few more frames. If not... not :P

* More juicy details in the comments.


This is experimental. I've ran a few tests, played back a few videos on the camera, but that was all. I didn't even check whether the frames are saved in the correct order.

Build notes

- This breaks bolt_rec. Buffering is now done at frame level, not at chunk level, so bolt_rec has to be adjusted.
- The current source code has debug mode enabled - it prints funky graphs. You'll find them on the card.
- The debug code will slow down the write speed.
- I'd like you to run some test recordings and paste the graphs - this will allow me to check if there's any difference between theory and practice (you know, in theory there isn't any).
- I did not run any comparison with the older method on the camera (I did only in simulation). Would be very nice if you can do this.
- It may achieve lower write speeds. This is normal, because it also uses smaller buffers. If you also consider the idle time, it should be better overall.
- For normal usage, disable the debug code (look at the top of raw_rec.c).

History

[2013-05-17] Experiment about checking the optimal buffer sizes. People ran the benchmarks for hours on their cameras and posted a bunch of logs. They pretty much confirmed my previous theory, that any buffer size between 16MB and 32MB should result in highest speeds.

[2013-05-30] Noticed that file writes aligned at 512 bytes are a little faster (credits: CHDK). Rounded image size to  multiples of 64x32 or 128x16 to ensure 512-byte rounding.

[2013-08-06] Figured out that I could just add some padding to each frame to ensure 512-byte rounding and keep the high write speeds without breaking the converters too hard. Also aligned everything at 4096 bytes, which solved some mysterious lockups from EDMAC and brought back the highest speed in benchmarks (over 700MB/s).

[2013-05-30] speedsim.py - First attempt to get a mathematical model of the recording process. Input: resolution, fps and available buffers. Output: how many frames you will get, with detailed graphs. Also in-camera estimation of how many frames you will get with current settings.

[2013-06-18] Took a closer look at these logs and fitted a mathematical model for the speed drop at small buffer sizes.

[2013-06-18] Does buffer ordering/splitting matter? 1% experimented with it before, but there was no clear conclusion.
* is it better to take the highest one first or the smallest one first? there's no clear answer, each one is best for some cases and suboptimal for others.
* since some cameras had very few memory chunks (e.g. 550D: 32+32+8 MB), what if each of the 32MB buffer is divided in 2x16 or 4x8 MB? This brought a significant improvement for resolutions just above the continuous recording threshold, but lowered performance for continuous recording.
* optimization: updated speedsim.py so it finds the best memory configuration for one particular situation. Xaint confirmed the optimization results on 550D.
* problem: there was no one-size-fits-all solution.

[2013-06-19] Simulation now matches perfectly the real-world results. So, the mathematical model is accurate!

[2013-06-19] Started to sketch the variable buffering algorithm and already got some simulation results. There was a clear improvement for borderline cases (settings that require just a little more write speed that your camera+card can deliver).

Example: 550D, 1280x426, 23.976fps, 21.16MB/s, simulation:


- 8MB + 2x32MB (current method) - 317 frames
- 9x8MB - 1566 frames
- Variable buffering, starting from 8MB + 2x32MB - 1910 frames

[2013-06-20] Ran a few more tests and noticed that it meets or exceeds the performance of the old algorithm with sort/split optimization. There are still some cases where the sort/split method gives 2-3 more frames (no big deal).

Got rid of some spikes, which squeezed a few more frames (1925 or something).


Implemented the algorithm in camera. It's a bit simplified, I didn't include all the optimizations from the simulated version, but at least it sems to work.

Took me two hours just to write this post. Whooo :D


Enjoy and let me know if the theory actually works!


Fixed broken link - Audionut
#89
I don't have a solution yet, just an observation that will make it easier to reproduce.

1) enable raw video
2) enable grayscale preview
3) don't click me

60D: grayscale preview has distorted images (same as recorded)
5D2: all OK
5D3: distorted images every now and then

So, while edmac_memcpy is active, it can interfere with writing the source raw image to RAM. You can check this by calling edmac_memcpy in a while(1) loop.

If grayscale preview is not active, the LiveView image may stutter (though it has no distortion).

If raw flag is not enabled, running while(1) edmac_memcpy doesn't seem to have any side effects.
#90
I need some help with a little experiment.

Source: https://bitbucket.org/hudson/magic-lantern/commits/3046238719b2
5D3 113 binary: autoexec.bin

Run it from Debug menu, "Card buffer benchmark (infinite)". It will write a 256MB file with random buffer sizes, which should help us find the optimal ones. The results will be saved in BENCH.LOG on your card - send me these files and I'll post some nice graphs.


You can run the test for as long as you can (1 minute, 1 hour, until the battery runs flat, or leave it during the night if you have an AC adapter).

Be careful:
- BENCH.LOG is overwritten every time you run the test.
- Don't forget about Canon power saving.
- LiveView will shutdown after 30 minutes no matter what, so it's probably best to run it in photo mode.

I know the file size is a bit small, but I'm trying to find the repeatability of this process. Also I want to see if the variations are white noise or there's a clear pattern (e.g. if there are any preferred buffer sizes). Current hypothesis: best buffer sizes are from 16 to 30 MB, with a small speed drop at 32MB.

If you are worried about card wear, don't run the test ;)

You can also post results from other cameras.

Here's an Octave script that you can use to parse BENCH.LOG. It might work in Matlab too.


d = dlmread('BENCH.LOG', ' ', 4, 0);
bufsize = d(:,1);
speed = d(:,2) / 10;
plot(bufsize, speed, '*')
#91
Just fixed a bug in UFRAW in highlight handling (seems to be some sort of overflow and it's present in 0.18 and current CVS). Before reporting it to the UFRAW bug tracker, I'd like you to try it and help me find a test case where the bug is really obvious.

matrix.patch (updated)

Here's my first try:

bug (posterize effects on hands; blown-out magenta):


fixed:


bug (magenta halo; harsh transition from overexposed highlight to background):


fixed:


bug (magenta cast; the LED was blue):


fixed:


If you have some really blown out RAW shot that you'd like to try recovering, let me know.
#92
To have a better overview of the memory that we can use in ML, I'd like to ask you to fill this table:

https://docs.google.com/spreadsheet/ccc?key=0AgQ2MOkAZTFHdFFIcFp1d0R5TzVPTVJXOEVyUndteGc#gid=2

(you can take those numbers from the latest nightly build, for example)
#93
General Development / PicoC -> TCC
March 18, 2013, 10:36:14 PM
This thingie (TCC) can compile C programs to ARM code directly on the camera, so you will be able to run your C scripts at native speed. Image processing anyone?

First test: https://bitbucket.org/hudson/magic-lantern/commits/f8aab146bf6c

I've also ran this image processing script. It was almost instant, whereas picoc took around 1 minute.

Quote
// 5D Mark II only
// for others, look in platform/YOUR.CAMERA/consts.h for YUV422_LV_BUFFER_DISPLAY_ADDR
short * buf = *(short**)0x2900;

for (int i = 0; i < 480; i++)
{
    for (int j = 0; j < 720; j++)
    {
        // for each pixel, keep chroma, set luma to 0x80
        buf[i*720+j] = (buf[i*720+j] & 0x00FF) | 0x8000;
    }
}

RAM usage: the compiler takes 150K as ARM and 115K as Thumb. It's probably needed only at the compilation stage, so I think it can be loaded as a plugin, and unloaded as soon as compilation is done. If that's true, it will be a lot more memory-friendly than PicoC.

On desktop, tcc seems to be roughly as fast as gcc -O0. Didn't ran any benchmarks yet.

Stay tuned ;)
#94
General Chat / Google Code Jam 2013
March 12, 2013, 11:23:05 PM
Just registered to Code Jam. Anyone else will be competing?

[countdown]

;)
#95
Scripting Q&A / First game in PicoC - Sokoban
February 24, 2013, 10:47:55 PM
Since PicoC has now functions for simple graphics and can detect button presses, why not try to write a small game?

Source - sokoban.c

Don't expect fancy graphics; it's just a basic demo from which - I hope - you can learn some nice scripting tricks.


Feel free to add some new levels.
#96
[DONE] - The feature was requested and it was implemented. You can already use it.

[ALREADY DONE] - The feature was already present in ML, so why requesting it again? In most cases, the user did not read the manual, or did not try the nightly builds, or did not even try to run ML (!).

[IMPOSSIBLE] - We can prove that it can't be done (e.g. lack of CPU power, or requiring extra hardware, or we would have to break the laws of physics). Or, we just have no idea where to start.

[WONTFIX] - We believe it might be technically possible, but we don't think it's worth spending development time on it. Feel free to investigate the problem yourself and submit a patch if you succeed.

[SCRIPTING] - It's a better idea to write a Lua script that does what you need. Give it a try!
#98
Rationale: http://www.magiclantern.fm/forum/index.php?topic=4386
Code: http://bitbucket.org/hudson/magic-lantern/commits/fe375866712147f48a15db87d94acf87e8aff988

Quote


Major menu API change - separating content for presentation. Please review it before converting all menu code.

- idea: let display functions sprintf to strings, let menu.c do all drawing
- we will have to convert ALL .display functions to new ones (.update). See the examples from shoot.c.
- convert bmp_printf's to MENU_SET_VALUE (keep the same string logic, remove the fonts, x, y, and feature name).
- override feature name with MENU_SET_NAME (should not needed; don't abuse this)
- replace menu_draw_icon to MENU_SET_ICON (same args, without x,y)
- replace *(int*)priv with CURRENT_VALUE
- set warnings regardless of current value (only look at other settings). e.g. for trap focus, if autofocus is enabled, issue a warning (even if trap focus is off). The menu backend will choose when and how to display the warning.
- MENU_SET_TRUTH_VALUE(value): set this to 1 if the feature is enabled, 0 if disabled (value field grayed out). Default setting: see entry_guess_truth_value.
- MENU_SET_HELP - set a custom help text (not currently used). The passive way is to have a multiline help2 string - a help line for each choice.
- custom_drawing: should provide a way for user code to draw the item, or to draw the entire menu (e.g. for flexinfo or task info).
- .select functions are declared as: static MENU_SELECT_FUNC(name). No changes to current definition.
- .update functions are declared as: static MENU_UPDATE_FUNC(name). They will get called before displaying the item, so you can override things if needed.
- .display functions are still there for now; will be deprecated and removed after all of them are converted to .update functions
- should be extensible (e.g. easy to add things to menu_display_info)
- conversion effort should be minimal (existing string logic, icons and warnings should be straightforward to convert)
- attention: issue warnings even if feature is off (for graying out). Old code only sends warnings if the feature is true; remove those if's.

As this change will require converting all menu code, please review the new API before continuing. Thanks.
#99
Archived scripts / PicoC scripting API
January 26, 2013, 01:24:01 AM
Current nightly builds can now run PicoC scripts :)


General-purpose functions
[spoiler]

void sleep(float seconds);                            // sleep X seconds
void beep();                                          // short beep sound
void beeps(int num);                                  // short consecutive beeps
void console_show();                                  // show the script console
void console_hide();                                  // hide the script console
void cls();                                           // clear the script console
void screenshot();                                    // take a screenshot (BMP+422)
unsigned int rand();                                  // random numbers


[/spoiler]

Date/time
[spoiler]


struct tm
{
     int hour;
     int minute;
     int second;
     int year;
     int month;
     int day;
}

struct tm * get_time();                               // get current date/time
float get_uptime();                                   // get uptime, in seconds, 1ms resolution (from DIGIC clock)


[/spoiler]

Picture taking
[spoiler]

void takepic();                                       // take a picture
void bulbpic(float seconds);                          // take a picture in bulb mode
void take_fast_pics(int number);                      // take N pictures in burst mode

void wait_pic();                                      // waits until you take a picture (e.g. for starting a custom bracket sequence)


[/spoiler]

Video recording
[spoiler]

void movie_start();                                   // start recording
void movie_end();                                     // stop recording


[/spoiler]

Key press emulation
[spoiler]


Available button codes:
     LEFT, RIGHT, UP, DOWN, SET, MENU, PLAY, ERASE, LV, INFO, ZOOM_IN
     SHOOT_FULL, SHOOT_HALF, AF_ON
     Q, ZOOM_OUT (if present on your camera)
     UNPRESS (for key input only)

void press(int button);                               // "press" a button
void unpress(int button);                             // "unpress" a button
void click(int button);                               // "press" and then "unpress" a button


[/spoiler]

Key input
[spoiler]


Two methods:
- blocking:      int key = wait_key();      // waits for key to be pressed, then returns the key code
- non-blocking:  int key = last_key();     // returns the last key code without waiting (or -1)

Keys are trapped when you call one of those, and also 1 second after. This lets you write loops like:

while(1)
{
    int key = wait_key();

    // process the key
    if (key == SET) { ... }
}

or

while(1)
{
    int key = last_key();

    // process the key
    if (key == SET) { ... }

    sleep(0.1);
}

int wait_key();                                       // waits until you press some key, then returns key code
int last_key();                                       // returns last key pressed, without waiting


[/spoiler]

Exposure settings
[spoiler]


// APEX units
float get_tv();                                       
float get_av();                                       
float get_sv();                                       
void set_tv(float tv);                               
void set_av(float av);                               
void set_sv(float sv);                               

// Conventional units ( ISO 100, 1.0/4000, 2.8 )
int get_iso();                                       
float get_shutter();                                 
float get_aperture();                                 
void set_iso(int iso);                               
void set_shutter(float s);                           
void set_aperture(float s);                           

// Raw units (1/8 EV steps)
int get_rawiso();                                     
int get_rawshutter();                                 
int get_rawaperture();                               
void set_rawiso(int raw);                             
void set_rawshutter(int raw);                         
void set_rawaperture(int raw);                       


[/spoiler]

Exposure compensation (in EV)
[spoiler]

float get_ae();                                       
void set_ae(float ae);                               


[/spoiler]

Flash functions
[spoiler]

int get_flash();                                      // 1=enabled, 0=disabled, 2=auto
int set_flash(int enabled);                           
int pop_flash();                                      // pop-up built-in flash
float get_flash_ae();                                 
void set_flash_ae(float ae);                          // flash exposure compensation


[/spoiler]

White balance
[spoiler]

int get_kelvin();                                     
int get_green();                                     
void set_kelvin(int k);                               // from 1500 to 15000
void set_green(int gm);                               // green-magenta shift, from -9 to 9


[/spoiler]

Focus
[spoiler]

void focus(int steps);                                // move the focus ring by X steps
void focus_setup(int stepsize, int delay, int wait);  // see Focus -> Focus Settings menu
int get_focus_confirm();                              // return AF confirmation state (outside LiveView, with shutter halfway pressed)

void set_af(int af);                                  // enable or disable AF for half-shutter press
void reset_af(int af);                                // restore the original setting from Canon menu (CFn) (auto-called when script finishes)

int get_afma(int mode);                               // get AF microadjust value
void set_afma(int value, int mode);                   // set AF microadjust value

struct dof
{
     char* lens_name;
     int focal_len;
     int focus_dist;
     int dof; int far;
     int near;
     int hyperfocal;
}

struct dof * get_dof();                               


[/spoiler]

Low-level I/O
[spoiler]

void mic_out(int value);                              // digital output via microphone jack, by toggling mic power
void set_led(int led, int value);                     // set LED state; 1 = card LED, 2 = blue LED


[/spoiler]

Graphics
[spoiler]

Graphics constants:

Colors:
    COLOR_EMPTY, COLOR_BLACK, COLOR_WHITE, COLOR_BG,
    COLOR_RED, COLOR_DARK_RED, COLOR_GREEN1, COLOR_GREEN2, COLOR_BLUE, COLOR_LIGHT_BLUE,
    COLOR_CYAN, COLOR_MAGENTA, COLOR_YELLOW, COLOR_ORANGE,
    COLOR_ALMOST_BLACK, COLOR_ALMOST_WHITE,
    COLOR_GRAY(percent)

Fonts:
    FONT_LARGE, FONT_MED, FONT_SMALL
    FONT(fnt, fg, bg)
    SHADOW_FONT(fnt)
    e.g. FONT(FONT_LARGE, COLOR_YELLOW, COLOR_BLACK) or SHADOW_FONT(FONT_MED)

void clrscr();                                        // clear screen
int get_pixel(int x, int y);                         
void put_pixel(int x, int y, int color);             
void draw_line(int x1, int y1, int x2, int y2, int color);
void draw_line_polar(int x, int y, int radius, float angle, int color);
void draw_circle(int x, int y, int radius, int color);
void fill_circle(int x, int y, int radius, int color);
void draw_rect(int x, int y, int w, int h, int color);
void fill_rect(int x, int y, int w, int h, int color);


[/spoiler]

Text output
[spoiler]

void bmp_printf(int fnt, int x, int y, char* fmt, ...);
void notify_box(float duration, char* fmt, ...);     


[/spoiler]

Interaction with Canon GUI
[spoiler]

void set_canon_gui(int enabled);                      // allow disabling Canon graphics
void set_gui_mode(int mode);                          // set Canon GUI mode (current dialog, 0=idle, 1=play, 2=menu, others camera-specific)
int get_gui_mode();                                   


[/spoiler]

Interaction with ML menus
[spoiler]

// Tip: to get a list with menus and possible values, go to Prefs -> Config File -> Export as PicoC script
// You can also use these functions to create custom presets.
void menu_open();                                     // open ML menu
void menu_close();                                    // close ML menu
void menu_select(char* tab, char* entry);             // select a menu tab and entry (e.g. Overlay, Focus Peak)
int menu_get(char* tab, char* entry);                 // return the raw (integer) value from a menu entry
int menu_set(char* tab, char* entry, int value);      // set a menu entry to some arbitrary value; 1 = success, 0 = failure
char* menu_get_str(char* tab, char* entry);           // return the displayed (string) value from a menu entry
int menu_set_str(char* tab, char* entry, char* value); // set a menu entry to some arbitrary string value (cycles until it gets it); 1 = success, 0 = failure


[/spoiler]

Image analysis
[spoiler]


Don't expect too much; it's quite slow to operate at pixel level due to interpreter overhead.
Consider using plain C for this task.

Functions that operate on larger data sets (e.g. spotmeter, histogram analysis) should be fast enough.

struct yuv
{
     int Y; // 0...255
     int U; // -128...127
     int V; // -128...127
}

struct rgb
{
     int R; // 0...255
     int G; // 0...255
     int B; // 0...255
}

// The following functions operate on normalized coordinates (720x480)
// This means they should work on external monitors without extra care, for example.
// Details: http://magiclantern.wikia.com/wiki/VRAM/Geometry
struct yuv * get_pixel_yuv(int x, int y);             // get the YUV components of a pixel from LiveView buffer
struct rgb * get_pixel_rgb(int x, int y);             // similar for RGB
struct yuv * get_spot_yuv(int x, int y, int size);    // spotmeter: average pixels from a (small) box and return average YUV.
struct rgb * get_spot_rgb(int x, int y, int size);    // similar for RGB

For low-level image processing

struct vram
{
     void* buffer;
     int width;
     int pitch;
     int height;
}
struct vram * get_lv_vram();                          // get LiveView image buffer
struct vram * get_hd_vram();                          // get LiveView recording buffer


[/spoiler]

Powersaving
[spoiler]

void display_on();                                   
void display_off();                                   
int display_is_on();                                 

void lv_pause();                                      // pause LiveView without dropping the mirror
void lv_resume();                                     


[/spoiler]

Cache hacking
[spoiler]

unsigned int cache_locked();                         
void cache_lock();                                   
void cache_unlock();                                 
void cache_fake(unsigned int address, unsigned int data, unsigned int type);


[/spoiler]

Camera info
[spoiler]

char* get_model();                                   
char* get_firmware();                                 

[/spoiler]


Sample scripts
hello.c - first steps
brack.c - custom bracketing sequence
keys.c - key press demo
test.c - API tests, and usage example for each function
sokoban.c - a simple game

To create a script, just place it in the ML/SCRIPTS directory, with the C extension, and they will be autodetected. Use short 8.3 names. You can place max 15 scripts there.

Startup script
If one of the scripts is named AUTORUN.C, it will be executed at startup, automatically.

Looking forward to see what you can do with these scripts. You can use this forum section to share them.

TODO:
- Extend the API (and keep it clean). Here I'd like to see your suggestions. Feel free to implement the todo list (commented APIs) from picoc/library_ml.c.
- [DONE] Edit script parameters (like CHDK).
- In-camera script editing (so you can change small things in the field).
- Compile a desktop PicoC interpreter (so you can try the scripts offline). ML will run in QEMU
- etc
#100
Remember the table from the old wiki, which was showing what features were enabled on what cameras, and was impossible to maintain?

Here's a script that generates such a table from features.h files:

https://bitbucket.org/hudson/magic-lantern/src/tip/features/features.py


                               1100D  40D   500D  50D   550D  5D2   5D3   5DC   600D  60D   650D   6D    7D   EOSM
                   AF_PATTERNS   *     *     *     *     *     *                 *     *     *           *         
                    AGC_TOGGLE                           *     *                 *     *                           
                   ANALOG_GAIN               *           *     *                 *     *                           
            ANAMORPHIC_PREVIEW   *                       *     *     *           *     *     *     *               
               ARROW_SHORTCUTS   *           *     *     *     *     *           *     *     *     *               
                  AUDIO_METERS   *           *           *     *     *           *     *           *     *         
             AUDIO_REMOTE_SHOT               *           *     *     *           *     *           *     *         
               AUTO_BURST_PICQ               *           *                                                         
           AUTO_MIRRORING_HACK                                                   *     *                           
                          BEEP   *           *           *     *     *           *     *     *     *     *     *   
                  BULB_RAMPING   *           *     *     *     *     *           *     *     *     *     *     *   
                    BULB_TIMER   *           *     *     *     *     *           *     *     *     *     *     *   
                CLEAR_OVERLAYS   *           *     *     *     *     *           *     *     *     *     *     *   
                  COLOR_SCHEME   *           *     *     *     *     *           *     *     *     *     *     *   
                     CROPMARKS   *           *     *     *     *     *           *     *     *     *     *     *   
                   CUSTOM_ICON   *           *     *     *     *     *           *     *     *     *     *     *   
             DEFISHING_PREVIEW   *                       *     *     *           *     *     *     *               
                  DIGITAL_GAIN                           *     *                 *     *                           
    DIGITAL_ZOOM_SHORTCUT_600D                                                   *                                 
                 DONT_CLICK_ME   *           *     *     *     *     *     *     *     *     *     *     *     *   
                 EXPO_APERTURE   *           *     *     *     *     *           *     *     *     *     *     *   
                      EXPO_ISO   *           *     *     *     *     *           *     *     *     *     *     *   
                EXPO_ISO_DIGIC   *           *     *     *     *     *           *     *     *     *           *   
                  EXPO_ISO_HTP   *           *     *     *     *     *           *     *     *     *     *     *   
                     EXPO_LOCK   *           *     *     *     *     *           *     *     *     *     *     *   
                 EXPO_OVERRIDE   *           *     *     *     *     *           *     *     *     *     *     *   
                   EXPO_PRESET   *           *     *     *     *     *           *     *     *     *     *     *   
                  EXPO_SHUTTER   *           *     *     *     *     *           *     *     *     *     *     *   
                        EXPSIM               *     *     *     *     *                 *           *     *         
                  EYEFI_TRICKS   *                                               *     *     *                     
                   FALSE_COLOR   *           *     *     *     *     *           *     *     *     *     *     *   
                  FLASH_TWEAKS   *           *     *     *     *           *     *     *     *           *     *   
                    FOCUS_PEAK   *           *     *     *     *     *     *     *     *     *     *     *     *   
        FOCUS_PEAK_DISP_FILTER                                                                     *               
                FOCUS_STACKING   *           *     *     *     *     *           *     *     *     *     *         
                  FOLLOW_FOCUS   *           *     *     *     *     *           *     *     *     *     *         
                FORCE_HDMI_VGA   *           *     *     *     *     *           *     *     *     *     *     *   
                FORCE_LIVEVIEW   *           *     *     *     *     *           *     *     *     *     *         
                  FPS_OVERRIDE   *           *     *     *     *     *           *     *     *     *           *   
                   FPS_RAMPING   *           *     *     *     *     *           *     *     *     *           *   
                FPS_WAV_RECORD   *           *           *     *     *           *     *     *     *           *   
                   GHOST_IMAGE   *           *     *     *     *     *           *     *     *     *     *         
                   GLOBAL_DRAW   *     *     *     *     *     *     *     *     *     *     *     *     *     *   
              GRADUAL_EXPOSURE   *                 *     *     *     *           *     *     *     *               
                HDR_BRACKETING   *           *     *     *     *     *     *     *     *     *     *     *     *   
                  HDR_EXTENDED                                                                     *               
                     HDR_VIDEO   *                 *     *     *     *           *     *     *     *               
          HEADPHONE_MONITORING                           *     *                 *     *           *               
       HEADPHONE_OUTPUT_VOLUME                           *     *                 *     *           *               
                     HISTOGRAM   *     *     *     *     *     *     *     *     *     *     *     *     *     *   
                 IMAGE_EFFECTS   *           *     *     *     *                 *     *     *           *     *   
             IMAGE_ORIENTATION                                                   *     *                           
                IMAGE_POSITION   *           *     *     *     *                 *     *     *     *           *   
             IMAGE_REVIEW_PLAY   *           *     *     *     *           *     *     *     *           *     *   
                  INPUT_SOURCE                           *     *                 *     *                           
INTERMEDIATE_ISO_INTERCEPT_SCR                           *                                                         
INTERMEDIATE_ISO_PHOTO_DISPLAY               *           *                       *           *                     
                INTERVALOMETER   *     *     *     *     *     *     *     *     *     *     *     *     *     *   
         KEN_ROCKWELL_ZOOM_5D3                                       *                                             
             LCD_SENSOR_REMOTE               *           *                                                         
               LEVEL_INDICATOR                                                         *           *     *         
            LV_3RD_PARTY_FLASH   *           *           *                       *           *                     
        LV_BRIGHTNESS_CONTRAST   *           *     *     *     *     *           *     *     *     *     *     *   
             LV_BUTTON_PROTECT   *                             *                 *     *     *     *     *         
                LV_BUTTON_RATE   *                                               *     *     *     *     *         
               LV_DISPLAY_GAIN   *           *     *     *     *     *           *     *     *     *     *     *   
            LV_DISPLAY_PRESETS   *           *     *     *     *     *           *     *     *     *     *     *   
         LV_FOCUS_BOX_AUTOHIDE   *           *     *     *     *     *           *     *     *     *     *         
             LV_FOCUS_BOX_FAST   *           *     *     *     *     *           *     *     *     *     *         
             LV_FOCUS_BOX_SNAP   *           *     *     *     *     *           *     *     *     *     *         
                 LV_SATURATION   *           *     *     *     *     *     *     *     *     *     *     *     *   
              LV_ZOOM_SETTINGS   *           *     *     *     *     *           *     *     *     *     *     *   
                    MAGIC_ZOOM   *           *     *     *     *     *           *     *     *     *     *     *   
                     MIC_POWER                           *     *                 *     *                           
                           MLU               *     *     *     *     *     *     *     *     *     *     *         
     MLU_DIRECT_PRINT_SHORTCUT                                             *                                       
                  MLU_HANDHELD               *     *     *     *                 *     *     *     *     *         
                   ML_AUTO_ISO   *           *     *     *     *     *           *     *     *     *     *     *   
                      MONO_MIC   *           *                                                                     
                 MOTION_DETECT   *           *     *     *     *     *           *     *     *     *     *     *   
                 MOVIE_LOGGING   *           *     *     *     *     *           *     *     *     *     *     *   
           MOVIE_RECORDING_50D                     *                                                               
MOVIE_RECORDING_50D_SHUTTER_HA                     *                                                               
                 MOVIE_REC_KEY   *           *     *     *     *                 *     *     *     *     *     *   
                 MOVIE_RESTART   *           *     *     *     *     *           *     *     *     *     *     *   
                       NITRATE   *           *     *     *     *     *           *     *     *     *     *     *   
            NITRATE_WAV_RECORD                                                                     *               
     OVERLAYS_IN_PLAYBACK_MODE   *     *     *     *     *     *     *     *     *     *           *     *         
                      PICSTYLE   *           *     *     *     *     *           *     *     *     *     *     *   
                      PLAY_422   *           *     *     *     *     *           *     *     *     *     *         
           PLAY_COMPARE_IMAGES   *           *     *     *     *     *           *     *     *     *     *         
          PLAY_EXPOSURE_ADJUST   *           *     *     *     *     *     *     *     *     *     *     *         
          PLAY_EXPOSURE_FUSION   *           *     *     *     *     *           *     *     *     *     *         
                PLAY_TIMELAPSE   *           *     *     *     *     *     *     *     *     *     *     *         
            POWERSAVE_LIVEVIEW   *           *     *     *     *     *           *     *     *     *     *     *   
                   QUICK_ERASE   *           *     *     *     *           *     *     *     *     *     *         
                    QUICK_ZOOM   *           *     *     *     *           *     *     *     *           *         
                    RACK_FOCUS   *           *     *     *     *     *           *     *     *     *     *         
                 REC_INDICATOR   *           *     *     *     *     *           *     *     *     *     *     *   
                    REC_NOTIFY   *           *     *     *     *     *           *     *     *     *     *     *   
               REC_NOTIFY_BEEP                           *     *                       *                           
                  REC_PICSTYLE   *           *     *     *     *     *           *     *     *     *     *     *   
                    SCREENSHOT   *           *     *     *     *     *     *     *     *     *     *     *     *   
                SCREENSHOT_422   *           *     *     *     *     *           *     *     *     *     *     *   
                 SCREEN_LAYOUT   *           *     *     *     *     *           *     *     *     *     *     *   
                  SET_MAINDIAL   *           *     *     *     *     *     *     *     *     *     *     *         
         SHOW_CMOS_TEMPERATURE   *           *     *     *     *     *           *     *     *     *     *     *   
                SHOW_CPU_USAGE   *           *     *     *     *     *           *           *           *     *   
              SHOW_FREE_MEMORY   *           *     *     *     *     *     *     *     *     *     *     *     *   
               SHOW_GUI_EVENTS   *           *     *     *     *     *           *           *           *     *   
       SHOW_IMAGE_BUFFERS_INFO   *           *     *     *     *     *           *     *     *     *     *     *   
            SHOW_SHUTTER_COUNT   *           *     *     *     *     *           *     *     *     *     *     *   
                    SHOW_TASKS   *           *     *     *     *     *     *     *           *           *     *   
                  SHUTTER_LOCK   *           *     *     *     *                 *     *     *     *           *   
                    SILENT_PIC   *           *     *     *     *     *           *     *     *     *     *     *   
              SILENT_PIC_HIRES                           *                       *                 *               
                      SNAP_SIM   *           *     *     *     *     *     *     *           *           *     *   
                     SPOTMETER   *     *     *     *     *     *     *     *     *     *     *     *     *     *   
                    STICKY_DOF   *           *     *     *     *     *           *     *     *     *     *         
            STICKY_HALFSHUTTER   *           *     *     *     *     *           *     *     *     *     *     *   
               SWAP_MENU_ERASE                                                         *                           
                    TRAP_FOCUS   *           *     *     *     *     *           *     *     *     *     *         
              UNIWB_CORRECTION   *           *     *     *     *     *     *     *     *     *     *     *     *   
                   UPSIDE_DOWN   *           *     *     *     *     *           *     *     *     *     *     *   
                   VECTORSCOPE   *     *     *     *     *     *     *     *     *     *     *     *     *     *   
                   VIDEO_HACKS                                                                     *     *         
                    VOICE_TAGS   *           *           *     *     *           *     *           *     *         
     WARNINGS_FOR_BAD_SETTINGS   *           *     *     *     *     *           *     *     *     *     *     *   
                      WAVEFORM   *     *     *     *     *     *     *     *     *     *     *     *     *     *   
                 WAV_RECORDING   *           *           *     *     *           *     *     *     *     *     *   
                 WHITE_BALANCE   *           *     *     *     *     *           *     *     *     *     *     *   
                   WIND_FILTER                           *     *                 *     *                           
                         ZEBRA   *     *     *     *     *     *     *     *     *     *     *     *     *     *   
                    ZEBRA_FAST   *     *     *     *     *     *     *           *     *     *     *     *     *   
                ZOOM_TRICK_5D3                                       *                                             


What about making this look a bit better (html) and place it on a web page (maybe on nightly build page)?

0xAF has some more nice ideas about this, so I'll let him update the post.