Menu

Show posts

This section allows you to view all posts made by this member. Note that you can only see posts made in areas you currently have access to.

Show posts Menu

Topics - Danne

#1
DOWNLOADS:
https://bitbucket.org/Dannephoto/magiclantern_hg_02/downloads/

Code:
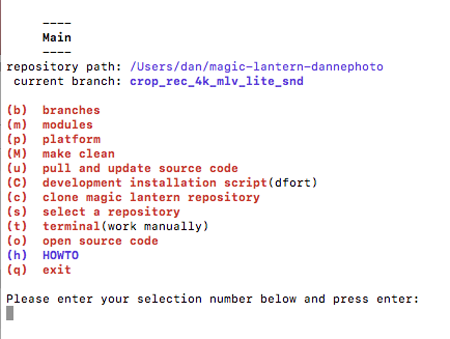
https://bitbucket.org/Dannephoto/magiclantern_hg_02/src/master/


Is there any reason to have halfshutter button switch to framing when real-time preview is selected now when all presets are realtime? This is causing some overhead while recording. I´d suggest changing in mlv_lite.c:

    if (PREVIEW_AUTO)
    {
        /* half-shutter overrides default choice */
        if (preview_broken) return 1;
        return prefer_framing_preview ^ long_halfshutter_press;
    }
    else if (PREVIEW_CANON)
    {
        return long_halfshutter_press = 0;
    }
    else if (PREVIEW_ML)
    {
        return !long_halfshutter_press;
    }
    else if (PREVIEW_HACKED)
    {
        if (preview_broken) return 1;
        return (RAW_IS_RECORDING || prefer_framing_preview)
            ^ long_halfshutter_press;
    }
   
    return 0;

Also a suggestion if working with auto focus. By not enabling aewb_enableaewb in small_hacks and more hacks auto focus will still work with those hacks on. Maybe possible to detect if cam af is on and unselect:

        /* disable auto exposure and auto white balance */
        //call("aewb_enableaewb", unhack ? 1 : 0);  /* for new cameras */
        call("lv_ae",           unhack ? 1 : 0);  /* for old cameras */
        call("lv_wb",           unhack ? 1 : 0);


and here:

        if (!video_mode_crop && !use_h264_proxy()) /*  Exlude Movie Crop Mode and H.264 Proxy from these hacks  */
        {
            if (!unhack) /* hack */
            {
                WillSuspendAeWbTask = 1; // we are going to suspend AeWb task (check code around shutter_blanking_idle in crop_rec.c)
                wait_lv_frames(1);

                if (small_hacks == 2)
                {
                    lvfaceEnd();
                    //aewbSuspend();
                }

                if (small_hacks == 3 && CartridgeCancel_works) // CartridgeCancel_works: calling CartridgeCancel(); freezes LiveView in some models
                {
                    lvfaceEnd();
                    //aewbSuspend();
                    CartridgeCancel();
                    wait_lv_frames(2); /* In some cases the first frame would be corrupted when calling CartridgeCancel */
                }
            }


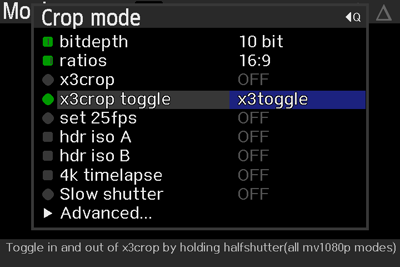
Also curious. Is it not possible to get 16:9 in 1:1 crop modes?
#2
Raw Video Postprocessing / raw2mlv processing
November 10, 2019, 03:45:44 PM
Ilia3101 is building a raw2mlv conversion tool. Very cool. Now we are actually able to wrap CR2 files and dng files back to our beloved MLV format. Well, more raw formats are possible but for now I focused on CR2 and dng files.

This automator app has only one purpose. To utilize Ilia3101 raw2mlv conversion tool, code here:
https://github.com/ilia3101/LibMLV

Forum post:
https://www.magiclantern.fm/forum/index.php?topic=24386.0
https://github.com/ilia3101/LibMLV


raw2mlv.app(Mac only!)
https://bitbucket.org/Dannephoto/raw2mlv/src/master/
Instructions and source code

Download:
https://bitbucket.org/Dannephoto/raw2mlv/downloads/raw2mlv.dmg

regarding gatekeeper
To supress gatekeeper hold ctrl button down(macOS Sierrra, Mojave, Catalina) while opening the application the first time. You can also change permissions from within privacy/security settings.


Good for? You tell me but I use it as follows:
1 - Transcode dualiso CR2 files into MLV files accessible in Mlv App
2 - Wrap timelapse CR2 file sequences into one chained MLV file accessible in Mlv App
3 - Wrap dng files back into MLV format

TODO:
Adding more options
Adding more raw format options
Add folder support. (Drag n´ drop only atm)

#3
Maybe a possible feature. Was wondering if it would be possible to keep mirror up while toggling the switch between photo and movie mode(eos 100D for instance)? As for now switching modes will release and close the mirror causing an extra step opening the mirror again. Usage could be focusing capabilities in photo mode while idle  and then switch back into movie mode for filming for instance.
#4
Latest:
https://bitbucket.org/Dannephoto/magic-lantern_jip_hop_git/downloads/

Source code here atm(temp git solution):
https://bitbucket.org/Dannephoto/magic-lantern_jip_hop_git/src/master/

Todo:
https://www.magiclantern.fm/forum/index.php?topic=9741.msg229863#msg229863


branch:
https://bitbucket.org/Dannephoto/magic-lantern_jip-hop/branch/crop_rec_4k_mlv_snd_raw_only

Been working hard with Jip-Hop to refine presets and all around movie handling approaching the eosm more like a movie cam. Some of the things done recently:

- reworked Movie tab menu(Jip-Hop)
- fast preset access by simply tapping display
- corruption free 4k anamorphic modes(slightly reduced height in raw.c)
- shutter coherency. Same shutter across all presets(fixed a bug introduced by myself)
- Movie Restart for raw recordings(Jip-Hop)
- autoenabling modules(refined by Jip-Hop)
- gain buttons up for higher iso. push down for lower iso, also working while recording
- aperture + ISO(up/down buttons will open or close aperture when max/min iso is reached)(Jip-Hop)
- h264 mov preset, working with x3 digital gain(SET button) and gain buttons(up/down)
- toggling between photo and movie mode working better

Upon install buttons will be reassigned as follows:
SET x3 crop and back to x1.6 mode
Up/Down gain increasing/decreasing(iso)
Tap display startoff preset list
Halfshutter press x10 zoom aid(release for normal view)

For newcomers and for people who just wants to get down to recording do following:
1 - Install above build onto your eosm and start film. Camera will be set to mv1080p 2.39:1 24 fps
Or...
2 - Set your camera into manual focus mode and tap your display to get into the fast access preset list:

Select a preset after tapping your display. Done!:


Reworked Movie tab menu(thanks Jip-Hop):


Movie Restart feature(thanks Jip-Hop)


customize buttons:


h264 mov. Select it from tap display options:


Missing 3K, 4K? Still there. Reach them by tapping "presets" from Movie tab section:


cine 2.39:1 script still there(refined by Jip-Hop)


OLDER STUFF BELOW. NOT SUPPORTED ANY LONGER


branch:
https://bitbucket.org/Dannephoto/magic-lantern/branch/crop_rec_4k_mlv_snd_isogain_1x3_presets

I focused on getting rid of corrupted images in 5K anamorphic mode. And also to complete a set up that will record all the presets continuously when a certain set up is performed. To enable continuous recordings do following:
sd_uhs hack on
bitrate to 10bit
ratios set to 2.35:1
(will scale down or reduce bitrate depending on preset chosen)

For instance. 5K anamorphic 1736x2150 will be set to 1504x1920 when ratios 2.35:1 is set. Still a stellar file since upsampled in Mlv App you will export a file that´s 4512x1920 in size.
3k will run with reduced fps and so will 5k setting. Most other presets will still keep original frame rate. All presets will record with 2.35:1.
If you want full manual control just skip the 2.35:1 ratios setting and do whatever tweaks in other menus instead.

Enjoy and don´t forget to post what´s working or not...


From here:
https://www.magiclantern.fm/forum/index.php?topic=9741.msg211572#msg211572

- Cleaned out scripts, kept two. One is new. "eosm cinema 2:35.1". The script will through lua add all necessary parameters to get into anamorphic 4.5K preset. Once the script has finished you can use any of the crop rec presets and they will all run in 2:35.1 and continuous. A fast sd card will be needed. The script also enables the sd_uhs script "sd overclock engine" and sets it to auto. The script is good as starting point instead of fiddling around for 10 minutes before getting into filming.
Why 2:35.1? Easy. Eosm has it´s limitations and restriction and this ratio seems like sweet spot for most presets on this cam.


- The other feature(also added though "eosm cinema 2:35.1" script) is "Crop rec preview" in mlv_lite menu. Once this is set to auto mode The crop rec presets will work either with framing or real time preview depending on what works better. Reason for this is that it takes a little too long to switch both preset and preview mode for every preset changed. Watch out. This auto mode setting overrides any Preview mode setting aready set from before. Disable auto mode when not in use.
All modes and settings can of course be set manually without the scripts.


Additional stuff:
3xcrop toggle


All of this is of course experimental, bleeding edge and out here for tests and feedback. As always thanks to a1ex, g3gg0, dmilligan for code and lua api.

A lot of tutorials from this guy and eos m enthusiast:
https://www.youtube.com/channel/UCCn0RQHYheA41EudwmLnYKA

Also check this thread:
https://www.eoshd.com/comments/topic/28526-5k-raw-24p-video-for-150-magic-lantern-making-great-strides-on-canon-eos-m/#comments


Also check in my work on the 5DIII here:
https://www.magiclantern.fm/forum/index.php?topic=23041.msg216899#msg216899
#5
crop_rec and derived builds / Danne's crop_rec_4k, 5DIII
November 09, 2018, 05:11:37 PM
Moved builds and to first post instead from today 20210127:

Latest:
https://bitbucket.org/Dannephoto/magic-lantern_dannephoto_git/downloads/

Source atm before leaving bitbucket:
https://bitbucket.org/Dannephoto/magic-lantern_dannephoto_git/src/master/


Worked on my 5D3 crop_rec.c code in this branch:
https://bitbucket.org/Dannephoto/magic-lantern_dannephoto_git/src/master/


- Refined anamorphic presets so it now gives continuous:
1808x2300(2:35.1) = 5425 x 2300
1360x2300(16:9)    = 4080 x 2300

- Also adressed the battery pull issue happening when in 48fps or mv720p 3x3 mode. Workaround allows for looping through x5,x10 and back into x1 mode.

- cine.lua included
- set_25fps in crop mode sub menu working with anamorphic mode
- bitdepth modes in crop mode sub menu working for all presets
- not included sd_uhs(don´t see why sd patching would be needed with mlv_lite anyway)

In terms of image quality and performance the anamorphic mode on this camera outruns anything coming from eosm, 100d etc...

EDIT:
sd_uhs module:
Included as a module. Enable it in Modules tab. Beware that this module is extremely experimental. Use at own risk.


Below info saved for future/historical reference
Due to misassumptions let us move on!
https://www.magiclantern.fm/forum/index.php?topic=23041.msg208432#msg208432

From crop_rec thread:
https://www.magiclantern.fm/forum/index.php?topic=19300.msg208429#msg208429


In case anyone missed this:
https://www.magiclantern.fm/forum/index.php?topic=10111.msg208136#msg208136

A special ML build here for 5D3113:
https://bitbucket.org/Dannephoto/magic-lantern/downloads/crop_rec_4k_mlv_snd_isogain_1x3_5D3113_presets.zip

build for 5D3123(Not tested! bleeding edge, be careful)
https://bitbucket.org/Dannephoto/magic-lantern/downloads/crop_rec_4k_mlv_snd_isogain_1x3_5D3123_presets.zip

commit:
https://bitbucket.org/Dannephoto/magic-lantern/commits/75b6e5aedbbb23c22b5055ddea6712f662681955

I added a few items to the crop_rec menu and also rearranged a few things which makes it possible to get cleaner output. Thanks to a1ex crop_rec.c code it´s possible for a player like myself to get some decent workflow out of this.

How does it work?
Pretty straight forward. If you want to shoot regular 14bit or use the regular 12/10 bit menu in RAW video you can use Crop mode menu as before. However, if you want to get cleaner iso and lowering analog gain to get 12/10bit output a different way do following:

1 - Enable crop rec and select any setting in Crop mode menu. Be sure to start off in 14bit-lossless


2 - Press q on Crop mode menu and select any iso in there. This will result in a 13bit iso which will get you cleaner files than the regular iso. You won´t see the change by eye in liveview but comparing files recorded you´ll see the difference in shadows. By enabling iso in this submenu you will override any analog iso already set before. Set chosen iso to off if you want to get back to old iso settings


3 - You can now choose to add 12bit or 10bit on top of your chosen iso to further lower analog gain registers


Original iso 100


10bit iso 100 More or less same as iso 1600. Let´s work the other bits if you not after lowering bitrate.


12bit iso 100


13bit iso 100


Have fun! And be careful. It´s bleeding edge...


Noticed two bugs on the way when testing:
1 - When 1080p45/1080p48 3x3 is set you will get stuck in 10x zoom mode if you go there.
2 - adtg_gui.mo will interfere with slowish "framing" previewing. You need to disable adtg_gui.mo altogether to have framing mode working again.

Thanks A1ex, Levas, bilal, 70MM13 and others for contributions.


#6
Share Your Photos / Postimages domain changed
April 12, 2018, 11:47:11 AM


Think there´s a post or two with this becoming an issue.
Maybe grep throug all posts/imagelinks containing:
postimg.org
replace it with:
postimg.cc
?
#7
Compiler.app


Compiler.app is an automation tool aiming to be an easy one click solution setting up a magic lantern development environment on a mac. Main purpose is to get fast access into som basic functions such as changing branches, compile on a platform, module etc. Hopefully this also will encourage newcomers to get straight into compiling and testing. The tool can be used even if you already have a development environment installed.

Source
https://bitbucket.org/Dannephoto/ml_compiler-git/src/master/
Download
https://bitbucket.org/Dannephoto/ml_compiler-git/downloads/ml-compiler.dmg

Howto:

  • Download Compiler.app then Double click Compiler.app and follow instructions(link above)
    (Bypass gatekeeper by holding down ctrl when clicking the application the first time)
  • To change or add a repository just drag your magic-lantern repository onto Compiler.app

Most of the stuff is a continuation of what is brought into this thread by dfort. Bigger part of dfort quick installation script is included into Compiler.app.
(license gpl)


Example usage:
Here are some steps if you want to use my fork and the branch used for bleeding edge eosm:

Once you double clicked compiler.app and installed all dependencies do this:

1 - Download my repository. In terminal do:
hg clone https://[email protected]/Dannephoto/magic-lantern magic-lantern_dannephoto
This will download my repo and rename it to magic-lantern_dannephoto. It should land in your user folder

2 - Drag the repository named magic-lantern_dannephoto onto Compiler.app. Once the menu opens choose:
(b)  branches

3 - You´ll see at the top that your branch right now is:
current branch: default.
What you want is to be in:
current branch: crop_rec_4k_mlv_snd_isogain_1x3_presets

The top of source tree should look like this right now:
1   crop_rec_4k_mlv_snd_isogain_1x3_presets
2   digic6-dumper
3   recovery
4   crop_rec_4k_mlv_snd_isogain_1x3_presets_EOSM2
5   crop_rec_4k_5D2_rd_stuff

4 - So to get there simply print 1 at the bottom since the branch you want is the first one(hg source tree always keeps latest first) like this:
Please enter your selection number below and press enter:
1

If it a the top looks like this all has worked:
current branch: crop_rec_4k_mlv_snd_isogain_1x3_presets

5 - Now go back to:
(m)  main

6 - To compile select platform first in main menu:
(p)  platform

7 - select 17 for eosm:
17   EOSM.202

8 - Choose c for compiling and just wait until it´s done. When ready Compiler.app will open up the platform folder that you compiled from:
(c)  compile
#8
license: GPL

HDR_CR2_JPG_TIF.command
Download:
https://bitbucket.org/Dannephoto/hdr_cr2_jpg_tif.command/downloads/HDR_CR2_JPG_TIF.command
Source:
https://bitbucket.org/Dannephoto/hdr_cr2_jpg_tif.command/overview

Lately I´ve been testing various ways of creating HDR images by creating an automated workflow which aims for minimal work from anybody running the script. It´s possible to process CR2, jpg and tif files bash menu.

How it works:

HDR_CR2_JPG_TIF.command will start by grouping files automated by checking the time gap between each photograph. Brackets will be sent to a "match" list which will be used for further processing(hugin align then sent to either enfuse or FFmpeg if not HDRmerge is used). If using CR2 files exiv2 will grab the included jpg thumbnail and work with those instead of with the CR2 fie. You can use jpg or tif files as well as starting point. When processing is done files created will be in tif format.

USAGE:
By downloading HDR_CR2_JPG_TIF.command  and double clicking it in a folder containing either CR2, jpg or tif files you simply need to choose something from the presented bash menu for further processing:


If programs are missing the script will ask the user if you want to install what´s missing
e.g:


Access permissions:
Make sure you are adding the correct access permissions to HDR_CR2_JPG_TIF.command:
In terminal write following and hit enter:
chmod u=rwx HDR_CR2_JPG_TIF.command
enter
Double clicking HDR_CR2_JPG_TIF.command should now work.

Copy paste:
The content in HDR_CR2_JPG_TIF.command can be pasted straight into terminal window to bypass any access permission issues. Make sure you are inside a folder containing files(CR2,jpg,tif).


Script breakdown:
The script is multiprocessing(up to 4 processes in parallell) and works with subscripts created on the fly when running HDR_CR2_JPG_TIF.command. When all is processed subscripts and other files will be cleaned from the folder the script is running from. Merged tif or dng files and files not processed as hdr files are what will be left inside your folder. Processed file originals files will be moved into A_ORIGINALS folder.

Programs used(dependencies):

align_image_stack(Hugin)
all preprocessing and will align files before merging.
http://macappstore.org/hugin/
Enfuse
to merge into tif files
HDRmerge
to process CR2 files into mergd dng files
http://jcelaya.github.io/hdrmerge/
FFmpeg
tblend averaging filter to create merged tif files
https://www.ffmpeg.org/
Exiv2
for extracting jpg preview files from CR2 files. Exiv2 is also constantly adding back original metadata from the CR2 file during processing.
http://www.exiv2.org/
Exiftool
https://www.sno.phy.queensu.ca/~phil/exiftool/
to fetch metadata in multiple places

Comparison between enfuse and FFmpeg(HDRmerge not included here):

Enfuse


FFmpeg


Enfuse


FFmpeg


Enfuse


FFmpeg


Enfuse


FFmpeg


Enfuse


FFmpeg


#9
Scripting Corner / mlv_dump function checker
February 07, 2018, 04:00:18 PM
Been doing tests of mlv_dump(g3gg0,A1ex) version in crop_rec_4k branch which contains all the stuff from dmilligan mlvfs version and a lot of refined functions such as bits option, fixed cold pixel fix handling for 10/12bit files along with a croprec function and much more all put together very nicely by bouncyball in his mlv_dump on steroids and now also merged into crop_rec_4k branch.

To speed up testing I put up a multiprocessing script which do following:
Spits out single dng files testing most functions in mlv_dump and then creates tif previews for manual pixelpeeping. The script also tests compress and decompress functions on MLV and dng files, darkframe, flatframe functions etc.

How to use the script:
Place a sample MLV in a folder along with a version of mlv_dump from crop_rec_4k branch and then run the script in that folder.
Out comes dng files and other test related info and also a folder containing tiff previews.

Script here:
cat <<'EOF' > MLV_test_Script

#multiprocessing mlv_dump overall function checker

#first check for dependencies

#check for homebrew
if ! [ -f "/usr/local/bin/brew" ]
then
/usr/bin/ruby -e "$(curl -fsSL https://raw.githubusercontent.com/Homebrew/install/master/install)"
fi

#check for dcraw
if ! [ -f "/usr/local/bin/dcraw" ]
then
brew install dcraw
fi

#check for exiftool
if ! [ -f "/usr/local/bin/exiftool" ]
then
brew install exiftool
fi


#!/bin/bash
workingDir=`dirname "$0"`
cd "${workingDir}"

export PATH="${workingDir}":$PATH

########################Output simple dng file#############################
#start with a pass through file
  mlv_dump -p --dng -f 0 -o 000_-p "$(ls *.MLV | head -1)" && mv 000_-p000000.dng 000_-p.dng && exiftool 000_-p.dng > 000_-p.txt &
  mlv_dump --dng -f 0 -o 001_--dng "$(ls *.MLV | head -1)" && mv 001_--dng000000.dng 001_--dng.dng && exiftool 001_--dng.dng > 001_--dng.txt &
  mlv_dump --dng --no-cs -f 0 -o "002_--dng --no-cs" "$(ls *.MLV | head -1)" && mv "002_--dng --no-cs000000.dng" "002_--dng --no-cs.dng" && exiftool "002_--dng --no-cs.dng" > "002_--dng --no-cs".txt &
  mlv_dump --dng --cs2x2 -f 0 -o "003_--dng --cs2x2" "$(ls *.MLV | head -1)" && mv "003_--dng --cs2x2000000.dng" "003_--dng --cs2x2.dng" && exiftool "003_--dng --cs2x2.dng" > "003_--dng --cs2x2".txt &
  mlv_dump --dng --cs3x3 -f 0 -o "004_--dng --cs3x3" "$(ls *.MLV | head -1)" && mv "004_--dng --cs3x3000000.dng" "004_--dng --cs3x3.dng" && exiftool "004_--dng --cs3x3.dng" > "004_--dng --cs3x3".txt &
  mlv_dump --dng --cs5x5 -f 0 -o "005_--dng --cs5x5" "$(ls *.MLV | head -1)" && mv "005_--dng --cs5x5000000.dng" "005_--dng --cs5x5.dng" && exiftool "005_--dng --cs5x5.dng" > "005_--dng --cs5x5".txt &
  mlv_dump --dng --no-fixfp -f 0 -o "006_--dng --no-fixfp" "$(ls *.MLV | head -1)" && mv "006_--dng --no-fixfp000000.dng" "006_--dng --no-fixfp.dng" && exiftool "006_--dng --no-fixfp.dng" > "006_--dng --no-fixfp".txt &
  mlv_dump --dng --no-fixcp -f 0 -o "007_--dng --no-fixcp" "$(ls *.MLV | head -1)" && mv "007_--dng --no-fixcp000000.dng" "007_--dng --no-fixcp.dng" && exiftool "007_--dng --no-fixcp.dng" > "007_--dng --no-fixcp".txt &
  mlv_dump --dng --no-fixcp --no-fixfp -f 0 -o "008_--dng --no-fixcp --no-fixfp" "$(ls *.MLV | head -1)" && mv "008_--dng --no-fixcp --no-fixfp000000.dng" "008_--dng --no-fixcp --no-fixfp.dng" && exiftool "008_--dng --no-fixcp --no-fixfp.dng" > "008_--dng --no-fixcp --no-fixfp".txt &
  mlv_dump --dng --fixcp2 -f 0 -o "009_--dng --fixcp2" "$(ls *.MLV | head -1)" && mv "009_--dng --fixcp2000000.dng" "009_--dng --fixcp2.dng" && exiftool "009_--dng --fixcp2.dng" > "009_--dng --fixcp2".txt &
  mlv_dump --dng --no-stripes -f 0 -o "010_--dng --no-stripes" "$(ls *.MLV | head -1)" && mv "010_--dng --no-stripes000000.dng" "010_--dng --no-stripes.dng" && exiftool "010_--dng --no-stripes.dng" > "010_--dng --no-stripes".txt &
  mlv_dump --dng --force-stripes  -f 0 -o "011_--dng --force-stripes " "$(ls *.MLV | head -1)" && mv "011_--dng --force-stripes 000000.dng" "011_--dng --force-stripes.dng" && exiftool "011_--dng --force-stripes.dng" > "011_--dng --force-stripes".txt &
  mlv_dump --dng --is-dualiso -f 0 -o "012_--dng --is-dualiso" "$(ls *.MLV | head -1)" && mv "012_--dng --is-dualiso000000.dng" "012_--dng --is-dualiso.dng" && exiftool "012_--dng --is-dualiso.dng" > "012_--dng --is-dualiso".txt &
  mlv_dump --dng --is-croprec -f 0 -o "013_--dng --is-croprec" "$(ls *.MLV | head -1)" && mv "013_--dng --is-croprec000000.dng" "013_--dng --is-croprec.dng" && exiftool "013_--dng --is-croprec.dng" > "013_--dng --is-croprec".txt &
  mlv_dump --dng --fixpn -f 0 -o "014_--dng --fixpn" "$(ls *.MLV | head -1)" && mv "014_--dng --fixpn000000.dng" "014_--dng --fixpn.dng" && exiftool "014_--dng --fixpn.dng" > "014_--dng --fixpn".txt &
  mlv_dump --dng --deflicker=3000 -f 0 -o "015_--dng --deflicker=3000" "$(ls *.MLV | head -1)" && mv "015_--dng --deflicker=3000000000.dng" "015_--dng --deflicker=3000(will look bad).dng" && exiftool "015_--dng --deflicker=3000(will look bad).dng" > "015_--dng --deflicker=3000(will look bad)".txt &
  mlv_dump --dng --no-bitpack -f 0 -o "016_--dng --no-bitpack" "$(ls *.MLV | head -1)" && mv "016_--dng --no-bitpack000000.dng" "016_--dng --no-bitpack.dng" && exiftool "016_--dng --no-bitpack.dng" > "016_--dng --no-bitpack".txt &
  mlv_dump --dng --fpi 0 -f 0 -o "017_--dng --fpi 0 MLVFS" "$(ls *.MLV | head -1)" && mv "017_--dng --fpi 0 MLVFS000000.dng" "017_--dng --fpi 0 MLVFS.dng" && exiftool "017_--dng --fpi 0 MLVFS.dng" > "017_--dng --fpi 0 MLVFS".txt &
  mlv_dump --dng --fpi 1 -f 0 -o "018_--dng --fpi 1 raw2dng" "$(ls *.MLV | head -1)" && mv "018_--dng --fpi 1 raw2dng000000.dng" "018_--dng --fpi 1 raw2dng.dng" && exiftool "018_--dng --fpi 1 raw2dng.dng" > "018_--dng --fpi 1 raw2dng".txt &
  mlv_dump --dng --bpi 0 -f 0 -o "019_--dng --bpi 0 MLVFS" "$(ls *.MLV | head -1)" && mv "019_--dng --bpi 0 MLVFS000000.dng" "019_--dng --bpi 0 MLVFS.dng" && exiftool "019_--dng --bpi 0 MLVFS.dng" > "019_--dng --bpi 0 MLVFS".txt &
  mlv_dump --dng --bpi 1 -f 0 -o "020_--dng --bpi 1 raw2dng" "$(ls *.MLV | head -1)" && mv "020_--dng --bpi 1 raw2dng000000.dng" "020_--dng --bpi 1 raw2dng.dng" && exiftool "020_--dng --bpi 1 raw2dng.dng" > "020_--dng --bpi 1 raw2dng".txt &
  mlv_dump --dng -b 8 -f 0 -o "021_--dng -b 8" "$(ls *.MLV | head -1)" && mv "021_--dng -b 8000000.dng" "021_--dng -b 8.dng" && exiftool "021_--dng -b 8.dng" > "021_--dng -b 8".txt &
  mlv_dump --dng -b 10 -f 0 -o "022_--dng -b 10" "$(ls *.MLV | head -1)" && mv "022_--dng -b 10000000.dng" "022_--dng -b 10.dng" && exiftool "022_--dng -b 10.dng" > "022_--dng -b 10".txt &
  mlv_dump --dng -b 12 -f 0 -o "023_--dng -b 12" "$(ls *.MLV | head -1)" && mv "023_--dng -b 12000000.dng" "023_--dng -b 12.dng" && exiftool "023_--dng -b 12.dng" > "023_--dng -b 12".txt &
  mlv_dump --dng -b 14 -f 0 -o "024_--dng -b 14" "$(ls *.MLV | head -1)" && mv "024_--dng -b 14000000.dng" "024_--dng -b 14.dng" && exiftool "024_--dng -b 14.dng" > "024_--dng -b 14".txt &
  mlv_dump -c --dng -f 0 -o 025_-c "$(ls *.MLV | head -1)" && mv 025_-c000000.dng 025_-c.dng && exiftool 025_-c.dng > 025_-c.txt &
  mlv_dump --dng --relaxed -f 0 -o "026_--dng --relaxed" "$(ls *.MLV | head -1)" && mv "026_--dng --relaxed000000.dng" "026_--dng --relaxed.dng" && exiftool "026_--dng --relaxed.dng" > "026_--dng --relaxed".txt &
  bl=$(mlv_dump -v "$(ls *.MLV | head -1)" | awk '/black_level/ { print $2; exit }')
  wl=$(mlv_dump -v "$(ls *.MLV | head -1)" | awk '/white_level/ { print $2; exit }')
  mlv_dump --dng --black-fix=$bl -f 0 -o "030_--dng --black-fix=$bl" "$(ls *.MLV | head -1)" && mv "030_--dng --black-fix="$bl"000000.dng" "030_--dng --black-fix=$bl.dng" && exiftool "030_--dng --black-fix=$bl.dng" > "030_--dng --black-fix=$bl".txt &
  mlv_dump --dng --white-fix=$wl -f 0 -o "031_--dng --white-fix=$wl" "$(ls *.MLV | head -1)" && mv "031_--dng --white-fix="$wl"000000.dng" "031_--dng --white-fix=$wl.dng" && exiftool "031_--dng --white-fix=$wl.dng" > "031_--dng --white-fix=$wl".txt &
  mlv_dump -a -o "$(ls *.MLV | head -1)dark.MLV" $(ls *.MLV | head -1) && mlv_dump --dng "$(ls *.MLV | head -1)dark.MLV" && mv "$(ls *.MLV | head -1)dark_000000.dng" "027_--dng darkframe(will average all frames into one).dng" && mlv_dump --dng -f 0 -o "028_--dng -s subtract averaged frame" "$(ls *.MLV | head -1)" -s "$(ls *.MLV | head -1)dark.MLV" && mv "028_--dng -s subtract averaged frame000000.dng" "028_--dng -s subtract averaged frame(should look bad).dng" && exiftool "028_--dng -s subtract averaged frame(should look bad).dng" > "028_--dng -s subtract averaged frame(should look bad)".txt && mlv_dump --dng -f 0 -o "029_--dng -t subtract flatfield frame" "$(ls *.MLV | head -1)" -t "$(ls *.MLV | head -1)dark.MLV" && mv "029_--dng -t subtract flatfield frame000000.dng" "029_--dng -t subtract flatfield frame(should look bad).dng" && exiftool "029_--dng -t subtract flatfield frame(should look bad).dng" > "029_--dng -t subtract flatfield frame(should look bad)".txt && rm "$(ls *.MLV | head -1)dark.MLV" && mlv_dump -c -o "032_-c(compress MLV).MLV" "$(ls *.MLV | head -1)" && mlv_dump -d -o "033_-d(decompress MLV).MLV" "032_-c(compress MLV).MLV" &
  mlv_dump -r -o "034_test.RAW" "$(ls *.MLV | head -1)" &

#wait for jobs to end
    wait < <(jobs -p)

  if ls *.wav >/dev/null 2>&1
  then
  rm *.wav
  mlv_dump --dng --no-audio -f 0 -o "035_--dng --no-audio" "$(ls *.MLV | head -1)" && mv "035_--dng --no-audio000000.dng" "035_--dng --no-audio.dng" && exiftool "035_--dng --no-audio.dng" > "035_--dng --no-audio".txt
  if ls *.wav >/dev/null 2>&1
  then
  rm *.wav
  mv "035_--dng --no-audio.dng" "035_--dng --no-audio(not working!).dng" && exiftool "035_--dng --no-audio(not working!).dng" > "035_--dng --no-audio(not working!)"txt
  fi
  else
  audio=$(printf "%s\n" "  --no-audio          for DNG output WAV not saved, for MLV output WAVI/AUDF blocks are not included in destination ML")
  fi

echo "
  --version           print version information
  --batch             format output message suitable for batch processing
  --save-bpm          save bad pixels to .BPM file
  --show-progress     show DNG file creation progress. ignored when -v or --batch is specified
$audio

-- MLV output --
  -b bits             convert image data to given bit depth per channel (1-16)
  -z bits             zero the lowest bits, so we have only specified number of bits containing data (1-16) (improves compression rate)
  -f frames           frames to save. e.g. '12' saves frames 0 to 12, '12-40' saves frames 12 to 40. forces --no-audio switch
  -A fpsx1000         Alter the video file's FPS metadata
  -x                  build xref file (indexing)

-- MLV autopsy --
  --skip-block <block#>        skip given block number, as if it wasn't present
  --skip-type <type>           skip given block type (e.g. VIDF, AUDF, etc), as if they weren't present
  --extract <block#>           extract the block at given position into autopsy file
  --extract-type <type>        extract the block type (e.g. VERS, LENS, etc) into autopsy file
  --replace <block#>           replace block with data from given autopsy file; requires --autopsy-file
  --payload-only               extract/replace affect not the whole block, but only payload
  --header-only                extract/replace affect not the whole block, but only header
  --autopsy-file <file>        extract/replace from this file
  --hex                        extract prints the selected data as hexdump on screen
  --ascii                      extract prints the selected data as ASCII on screen (only suitable for VERS and DEBG)
  --visualize                  visualize block types, most likely you want to use --skip-xref along with it

-- MLV manipulation --
  --skip-xref                  skip loading .IDX (XREF) file, read block in the MLV file's order instead of presorted
  -I <mlv_file>                inject data from given MLV file right after MLVI header
  -X type                      extract only block type int output file" > 036_not_tested

########################Check essential metadata#############################
    date=$(mlv_dump -v "$(ls *.MLV | head -1)" | grep 'Date' | head -1 | awk 'FNR == 1 {print $2; exit}')
    bit=$(mlv_dump -v "$(ls *.MLV | head -1)" | awk '/bits_per_pixel/ { print $2; exit }')
    res=$(mlv_dump -v "$(ls *.MLV | head -1)" | awk '/Res/ { print $2; exit }')
    iso=$(mlv_dump -v "$(ls *.MLV | head -1)" | awk '/ISO:/ { print $2; exit }')
    fra=$(mlv_dump -v "$(ls *.MLV | head -1)" | awk '/FPS/ { print $3; exit }')
    cn=$(mlv_dump -v "$(ls *.MLV | head -1)" | awk '/Camera Name/ { print $3,$4,$5,$6,$7,$8; exit }')
    frames=$(mlv_dump -v "$(ls *.MLV | head -1)" | awk '/Frames/ { print $3; exit}')
    rawc=$(mlv_dump -v "$(ls *.MLV | head -1)" | awk '/sampling/ { print $1,$2,$3,$4,$5,$6,$7,$8,$9,$10; exit}')
    bl=$(mlv_dump -v "$(ls *.MLV | head -1)" | awk '/black_level/ { print $2; exit }')
    wl=$(mlv_dump -v "$(ls *.MLV | head -1)" | awk '/white_level/ { print $2; exit }')

echo "Checking for basic metadata from your MLV file
" > 037_mlv_metadata
echo "###date###" >> 037_mlv_metadata
echo "$date
" >> 037_mlv_metadata
echo "###bit###" >> 037_mlv_metadata
echo "$bit
" >> 037_mlv_metadata
echo "###resolution###" >> 037_mlv_metadata
echo "$res
" >> 037_mlv_metadata
echo "###iso###" >> 037_mlv_metadata
echo "$iso
" >> 037_mlv_metadata
echo "###FPS###" >> 037_mlv_metadata
echo "$fra
" >> 037_mlv_metadata
echo "###Camera model###" >> 037_mlv_metadata
echo "$cn
" >> 037_mlv_metadata
echo "###frames###" >> 037_mlv_metadata
echo "$frames
" >> 037_mlv_metadata
echo "###rawc###" >> 037_mlv_metadata
echo "$rawc
" >> 037_mlv_metadata
echo "###white level###" >> 037_mlv_metadata
echo "$wl
" >> 037_mlv_metadata
echo "###black level###" >> 037_mlv_metadata
echo "$bl
" >> 037_mlv_metadata
echo "Does all look ok?" >> 037_mlv_metadata

#build dcraw tif previews and exiftool files
  find . -maxdepth 1 -mindepth 1 -name '*.dng' -print0 | xargs -0 -P 8 -n 1 dcraw -T
  mkdir -p 038_tifpreviews_exiftool
  mv *.tiff 038_tifpreviews_exiftool
  mv *.txt 038_tifpreviews_exiftool
  cd 038_tifpreviews_exiftool
  open .
  cd -

EOF
. MLV_test_Script && rm MLV_test_Script
clear
echo "
MLV_test_script has finished and you can now check your files"


Typically the folder content should look like this when finished:

000_-p.dng
001_--dng.dng
002_--dng --no-cs.dng
003_--dng --cs2x2.dng
004_--dng --cs3x3.dng
005_--dng --cs5x5.dng
006_--dng --no-fixfp.dng
007_--dng --no-fixcp.dng
008_--dng --no-fixcp --no-fixfp.dng
009_--dng --fixcp2.dng
010_--dng --no-stripes.dng
011_--dng --force-stripes .dng
012_--dng --is-dualiso.dng
013_--dng --is-croprec.dng
014_--dng --fixpn.dng
015_--dng --deflicker=3000(will look bad).dng
016_--dng --no-bitpack.dng
017_--dng --fpi 0 MLVFS.dng
018_--dng --fpi 1 raw2dng.dng
019_--dng --bpi 0 MLVFS.dng
020_--dng --bpi 1 raw2dng.dng
021_--dng -b 8.dng
022_--dng -b 10.dng
023_--dng -b 12.dng
024_--dng -b 14.dng
025_-c.dng
026_--dng --relaxed.dng
027_--dng darkframe(will average all frames into one).dng
028_--dng -s subtract averaged frame(should look bad).dng
029_--dng -t subtract flatfield frame(should look bad).dng
030_--dng --black-fix=512.dng
031_--dng --white-fix=4050.dng
032_-c(compress MLV).MLV
033_-d(decompress MLV).MLV
034_test.RAW
035_--dng --no-audio.dng
036_not_tested
037_mlv_metadata
038_tifpreviews_exiftool
EOSM_12bit_crop_rec.MLV
mlv_dump
#10
Been testing enfuse and align_image to refine some ideas around HDR recording and after some tinkering I managed to get some decent results. For now it works with MOV(H.264) files. The script processes frames in a consecutive manner so the original fps will be kept. Now this doesn´t mean HDR will suddenly work with 24 and 25 fps without ghosting and so on but as the script will use align_image most movement will be aligned so feel free to test lower framerates such as 24, 25 and 30 fps.
The script will actually work three files creating a new one then proceed to the next three files creating the next frame etc. Why three? I can´t combine enfuse and align_image and just process two files after each other without having flicker going on(some interpolation caveat).

The script will create two files. One called HDR_tblend_ and the other one HDR_enfuse_. This is for comparison reasons. The HDR_enfuse should look better. The tblend filter is used with ffmpeg so that one isn´t even touching enfuse/align_image. Recommended to film with 50 or 60 fps but feel free to test slower framerates as well.

You need following installed for the script to work:
Homebrew
/usr/bin/ruby -e "$(curl -fsSL https://raw.githubusercontent.com/Homebrew/install/master/install)"
Exiftool
brew install exiftool
ffmpeg
brew install ffmpeg
enfuse/hugin
brew cask install hugin

Script
Put some HDR MOV files insisde a folder and run following script from within the folder in terminal:
cat <<'EOF' > HDR_script
#!/bin/bash

for FILE in `ls *.MOV 2>/dev/null`; do
ffmpeg -i $(ls *.MOV | head -1) -pix_fmt rgb24 %06d.tif

#First script combines enfused and aligned tif files then exports it to a prores mov file

while grep -E "tif" <<< $(find . -maxdepth 1 -iname '*.tif')
do
/Applications/Hugin/Hugin.app/Contents/MacOS/align_image_stack -a aligned.tif $(find -s . -maxdepth 1 -iname '*.tif' | awk 'FNR == 1') $(find -s . -maxdepth 1 -iname '*.tif' | awk 'FNR == 2') $(find -s . -maxdepth 1 -iname '*.tif' | awk 'FNR == 3') && /Applications/Hugin/tools_mac/enfuse --exposure-optimum=0.5 --exposure-width=0.5 -o $(find -s . -maxdepth 1 -iname '*.tif' | awk 'FNR == 1' | cut -d "." -f2 | tr -d "/").tiff aligned.tif0000.tif aligned.tif0001.tif aligned.tif0002.tif && rm aligned.tif0000.tif aligned.tif0001.tif aligned.tif0002.tif & pid1=$!

/Applications/Hugin/Hugin.app/Contents/MacOS/align_image_stack -a aligned2.tif $(find -s . -maxdepth 1 -iname '*.tif' | awk 'FNR == 2') $(find -s . -maxdepth 1 -iname '*.tif' | awk 'FNR == 1') $(find -s . -maxdepth 1 -iname '*.tif' | awk 'FNR == 3') && /Applications/Hugin/tools_mac/enfuse --exposure-optimum=0.5 --exposure-width=0.5 -o $(find -s . -maxdepth 1 -iname '*.tif' | awk 'FNR == 2' | cut -d "." -f2 | tr -d "/").tiff aligned2.tif0000.tif aligned2.tif0001.tif aligned2.tif0002.tif && rm aligned2.tif0000.tif aligned2.tif0001.tif aligned2.tif0002.tif & pid2=$!

/Applications/Hugin/Hugin.app/Contents/MacOS/align_image_stack -a aligned3.tif $(find -s . -maxdepth 1 -iname '*.tif' | awk 'FNR == 3') $(find -s . -maxdepth 1 -iname '*.tif' | awk 'FNR == 4') $(find -s . -maxdepth 1 -iname '*.tif' | awk 'FNR == 5') && /Applications/Hugin/tools_mac/enfuse --exposure-optimum=0.5 --exposure-width=0.5 -o $(find -s . -maxdepth 1 -iname '*.tif' | awk 'FNR == 3' | cut -d "." -f2 | tr -d "/").tiff aligned3.tif0000.tif aligned3.tif0001.tif aligned3.tif0002.tif && rm aligned3.tif0000.tif aligned3.tif0001.tif aligned3.tif0002.tif & pid3=$!

/Applications/Hugin/Hugin.app/Contents/MacOS/align_image_stack -a aligned4.tif $(find -s . -maxdepth 1 -iname '*.tif' | awk 'FNR == 4') $(find -s . -maxdepth 1 -iname '*.tif' | awk 'FNR == 3') $(find -s . -maxdepth 1 -iname '*.tif' | awk 'FNR == 5') && /Applications/Hugin/tools_mac/enfuse --exposure-optimum=0.5 --exposure-width=0.5 -o $(find -s . -maxdepth 1 -iname '*.tif' | awk 'FNR == 4' | cut -d "." -f2 | tr -d "/").tiff aligned4.tif0000.tif aligned4.tif0001.tif aligned4.tif0002.tif && rm aligned4.tif0000.tif aligned4.tif0001.tif aligned4.tif0002.tif & pid4=$!

/Applications/Hugin/Hugin.app/Contents/MacOS/align_image_stack -a aligned5.tif $(find -s . -maxdepth 1 -iname '*.tif' | awk 'FNR == 5') $(find -s . -maxdepth 1 -iname '*.tif' | awk 'FNR == 6') $(find -s . -maxdepth 1 -iname '*.tif' | awk 'FNR == 7') && /Applications/Hugin/tools_mac/enfuse --exposure-optimum=0.5 --exposure-width=0.5 -o $(find -s . -maxdepth 1 -iname '*.tif' | awk 'FNR == 5' | cut -d "." -f2 | tr -d "/").tiff aligned5.tif0000.tif aligned5.tif0001.tif aligned5.tif0002.tif && rm aligned5.tif0000.tif aligned5.tif0001.tif aligned5.tif0002.tif & pid5=$!

/Applications/Hugin/Hugin.app/Contents/MacOS/align_image_stack -a aligned6.tif $(find -s . -maxdepth 1 -iname '*.tif' | awk 'FNR == 6') $(find -s . -maxdepth 1 -iname '*.tif' | awk 'FNR == 5') $(find -s . -maxdepth 1 -iname '*.tif' | awk 'FNR == 7') && /Applications/Hugin/tools_mac/enfuse --exposure-optimum=0.5 --exposure-width=0.5 -o $(find -s . -maxdepth 1 -iname '*.tif' | awk 'FNR == 6' | cut -d "." -f2 | tr -d "/").tiff aligned6.tif0000.tif aligned6.tif0001.tif aligned6.tif0002.tif && rm aligned6.tif0000.tif aligned6.tif0001.tif aligned6.tif0002.tif & pid6=$!

/Applications/Hugin/Hugin.app/Contents/MacOS/align_image_stack -a aligned7.tif $(find -s . -maxdepth 1 -iname '*.tif' | awk 'FNR == 7') $(find -s . -maxdepth 1 -iname '*.tif' | awk 'FNR == 8') $(find -s . -maxdepth 1 -iname '*.tif' | awk 'FNR == 9') && /Applications/Hugin/tools_mac/enfuse --exposure-optimum=0.5 --exposure-width=0.5 -o $(find -s . -maxdepth 1 -iname '*.tif' | awk 'FNR == 7' | cut -d "." -f2 | tr -d "/").tiff aligned7.tif0000.tif aligned7.tif0001.tif aligned7.tif0002.tif && rm aligned7.tif0000.tif aligned7.tif0001.tif aligned7.tif0002.tif & pid7=$!

/Applications/Hugin/Hugin.app/Contents/MacOS/align_image_stack -a aligned8.tif $(find -s . -maxdepth 1 -iname '*.tif' | awk 'FNR == 8') $(find -s . -maxdepth 1 -iname '*.tif' | awk 'FNR == 7') $(find -s . -maxdepth 1 -iname '*.tif' | awk 'FNR == 9') && /Applications/Hugin/tools_mac/enfuse --exposure-optimum=0.5 --exposure-width=0.5 -o $(find -s . -maxdepth 1 -iname '*.tif' | awk 'FNR == 8' | cut -d "." -f2 | tr -d "/").tiff aligned8.tif0000.tif aligned8.tif0001.tif aligned8.tif0002.tif && rm aligned8.tif0000.tif aligned8.tif0001.tif aligned8.tif0002.tif & pid8=$!

#wait for jobs to end
    wait < <(jobs -p)

mkdir -p tiftmp

mv $(find -s . -maxdepth 1 -iname '*.tif' | awk 'FNR == 1') $(find -s . -maxdepth 1 -iname '*.tif' | awk 'FNR == 2') $(find -s . -maxdepth 1 -iname '*.tif' | awk 'FNR == 3') $(find -s . -maxdepth 1 -iname '*.tif' | awk 'FNR == 4') $(find -s . -maxdepth 1 -iname '*.tif' | awk 'FNR == 5') $(find -s . -maxdepth 1 -iname '*.tif' | awk 'FNR == 6') $(find -s . -maxdepth 1 -iname '*.tif' | awk 'FNR == 7') $(find -s . -maxdepth 1 -iname '*.tif' | awk 'FNR == 8') tiftmp

done

#Command below produces a prores mov file by working the tblend filter in ffmpeg
ffmpeg -i $(ls *.MOV | head -1) -vcodec prores -pix_fmt yuv444p10 -vf tblend=all_mode=average HDR_tblend_$(ls *.MOV | head -1 | cut -d "." -f1).mov

ffmpeg -r $(exiftool $(ls *.MOV | head -1) | grep 'Video Frame Rate' | cut -d ":" -f2) -i %06d.tiff -vcodec prores -pix_fmt yuv444p10 HDR_enfuse_$(ls *.MOV | head -1 | cut -d "." -f1).mov

rm *.tiff
rm -r tiftmp
mkdir -p HDR_ORIGINALS
mv $(ls *.MOV | head -1) HDR_ORIGINALS
done

EOF
sleep 0.2 && clear && echo "Hit enter" &
. HDR_script && rm HDR_script
#11
Decided to split the topic started by a1ex here:
http://www.magiclantern.fm/forum/index.php?topic=20999.0

Inspired by above thread I started exploring enfuse and hugin align_image_stack tool to be able to reduce aliasing and other artifacts when processing movie sequences. Early tests reveals that aliasing, grain and color artifacts can be reduced when stacking/enfusing groups of images producing new cleaned ones. For now I will provide a script which will multiprocess a folder containing dng or tiff files into cleaned tif files. The files will during the process be moved to a dngtmp or tifftmp folder.

Dependencies:
Install following:
brew install dcraw
brew cask install hugin


The provided script will go through a folder with dng or tiff files and build new files by stacking 6 files resulting into one new cleaned one. See to it that you have at least around 10 files in your folder when running the script.

Open up terminal and run following script inside a folder with dng or tiff files:
cat <<'EOF' > mac_ml.sh
#!/bin/sh
if ! grep 'tiff' <<< $(find . -maxdepth 1 -name '*.tiff'); then
dcraw -H 2 -b 1 +M -6 -w -q 3 -T $(find . -maxdepth 1 -iname '*.dng' | awk 'FNR == 1') & pid1=$!
dcraw -H 2 -b 1 +M -6 -w -q 3 -T $(find . -maxdepth 1 -iname '*.dng' | awk 'FNR == 2') & pid2=$!
dcraw -H 2 -b 1 +M -6 -w -q 3 -T $(find . -maxdepth 1 -iname '*.dng' | awk 'FNR == 3') & pid3=$!
dcraw -H 2 -b 1 +M -6 -w -q 3 -T $(find . -maxdepth 1 -iname '*.dng' | awk 'FNR == 4') & pid4=$!
dcraw -H 2 -b 1 +M -6 -w -q 3 -T $(find . -maxdepth 1 -iname '*.dng' | awk 'FNR == 5') & pid5=$!
dcraw -H 2 -b 1 +M -6 -w -q 3 -T $(find . -maxdepth 1 -iname '*.dng' | awk 'FNR == 6') & pid6=$!
dcraw -H 2 -b 1 +M -6 -w -q 3 -T $(find . -maxdepth 1 -iname '*.dng' | awk 'FNR == 7') & pid7=$!
dcraw -H 2 -b 1 +M -6 -w -q 3 -T $(find . -maxdepth 1 -iname '*.dng' | awk 'FNR == 8') & pid8=$!
dcraw -H 2 -b 1 +M -6 -w -q 3 -T $(find . -maxdepth 1 -iname '*.dng' | awk 'FNR == 9') & pid9=$!
echo > tmpfile
#wait for jobs to end
    wait < <(jobs -p)
mkdir -p dngtmp
mv $(find . -maxdepth 1 -iname '*.dng' | awk 'FNR == 1') $(find . -maxdepth 1 -iname '*.dng' | awk 'FNR == 2') $(find . -maxdepth 1 -iname '*.dng' | awk 'FNR == 3') $(find . -maxdepth 1 -iname '*.dng' | awk 'FNR == 4') $(find . -maxdepth 1 -iname '*.dng' | awk 'FNR == 5') $(find . -maxdepth 1 -iname '*.dng' | awk 'FNR == 6') $(find . -maxdepth 1 -iname '*.dng' | awk 'FNR == 6') $(find . -maxdepth 1 -iname '*.dng' | awk 'FNR == 7') $(find . -maxdepth 1 -iname '*.dng' | awk 'FNR == 8') $(find . -maxdepth 1 -iname '*.dng' | awk 'FNR == 9') dngtmp
while grep -E "dng|DNG" <<< $(find . -maxdepth 1 -iname '*.dng')
do
if ! [ -f tmpfile ]; then
dcraw -H 2 -b 1 +M -6 -w -q 3 -T $(find . -maxdepth 1 -iname '*.dng' | awk 'FNR == 1') & pid1=$!
dcraw -H 2 -b 1 +M -6 -w -q 3 -T $(find . -maxdepth 1 -iname '*.dng' | awk 'FNR == 2') & pid2=$!
dcraw -H 2 -b 1 +M -6 -w -q 3 -T $(find . -maxdepth 1 -iname '*.dng' | awk 'FNR == 3') & pid3=$!
dcraw -H 2 -b 1 +M -6 -w -q 3 -T $(find . -maxdepth 1 -iname '*.dng' | awk 'FNR == 4') & pid4=$!
#wait for jobs to end
    wait < <(jobs -p)
mkdir -p dngtmp
mv $(find . -maxdepth 1 -iname '*.dng' | awk 'FNR == 1') $(find . -maxdepth 1 -iname '*.dng' | awk 'FNR == 2') $(find . -maxdepth 1 -iname '*.dng' | awk 'FNR == 3') $(find . -maxdepth 1 -iname '*.dng' | awk 'FNR == 4') dngtmp
fi
if [ -f tmpfile ]; then
rm tmpfile 
fi
/Applications/Hugin/Hugin.app/Contents/MacOS/align_image_stack -a aligned.tiff $(ls *.tiff | awk 'FNR == 1') $(ls *.tiff | awk 'FNR == 2') $(ls *.tiff | awk 'FNR == 3') $(ls *.tiff | awk 'FNR == 4') $(ls *.tiff | awk 'FNR == 5') $(ls *.tiff | awk 'FNR == 6') && /Applications/Hugin/tools_mac/enfuse -o $(ls *.tiff | awk 'FNR == 1' | cut -d "." -f1).tif aligned.tiff0000.tif aligned.tiff0001.tif aligned.tiff0002.tif aligned.tiff0003.tif aligned.tiff0004.tif aligned.tiff0005.tif && rm aligned.tiff0000.tif aligned.tiff0001.tif aligned.tiff0002.tif aligned.tiff0003.tif aligned.tiff0004.tif aligned.tiff0005.tif & pid1=$!

/Applications/Hugin/Hugin.app/Contents/MacOS/align_image_stack -a aligned2.tiff $(ls *.tiff | awk 'FNR == 2') $(ls *.tiff | awk 'FNR == 3') $(ls *.tiff | awk 'FNR == 4') $(ls *.tiff | awk 'FNR == 5') $(ls *.tiff | awk 'FNR == 6') $(ls *.tiff | awk 'FNR == 7') && /Applications/Hugin/tools_mac/enfuse -o $(ls *.tiff | awk 'FNR == 2' | cut -d "." -f1).tif aligned2.tiff0000.tif aligned2.tiff0001.tif aligned2.tiff0002.tif aligned2.tiff0003.tif aligned2.tiff0004.tif aligned2.tiff0005.tif && rm aligned2.tiff0000.tif aligned2.tiff0001.tif aligned2.tiff0002.tif aligned2.tiff0003.tif aligned2.tiff0004.tif aligned2.tiff0005.tif & pid2=$!

/Applications/Hugin/Hugin.app/Contents/MacOS/align_image_stack -a aligned3.tiff $(ls *.tiff | awk 'FNR == 3') $(ls *.tiff | awk 'FNR == 4') $(ls *.tiff | awk 'FNR == 5') $(ls *.tiff | awk 'FNR == 6') $(ls *.tiff | awk 'FNR == 7') $(ls *.tiff | awk 'FNR == 8') && /Applications/Hugin/tools_mac/enfuse -o $(ls *.tiff | awk 'FNR == 3' | cut -d "." -f1).tif aligned3.tiff0000.tif aligned3.tiff0001.tif aligned3.tiff0002.tif aligned3.tiff0003.tif aligned3.tiff0004.tif aligned3.tiff0005.tif && rm aligned3.tiff0000.tif aligned3.tiff0001.tif aligned3.tiff0002.tif aligned3.tiff0003.tif aligned3.tiff0004.tif aligned3.tiff0005.tif & pid3=$!

/Applications/Hugin/Hugin.app/Contents/MacOS/align_image_stack -a aligned4.tiff $(ls *.tiff | awk 'FNR == 4') $(ls *.tiff | awk 'FNR == 5') $(ls *.tiff | awk 'FNR == 6') $(ls *.tiff | awk 'FNR == 7') $(ls *.tiff | awk 'FNR == 8') $(ls *.tiff | awk 'FNR == 9') && /Applications/Hugin/tools_mac/enfuse -o $(ls *.tiff | awk 'FNR == 4' | cut -d "." -f1).tif aligned4.tiff0000.tif aligned4.tiff0001.tif aligned4.tiff0002.tif aligned4.tiff0003.tif aligned4.tiff0004.tif aligned4.tiff0005.tif && rm aligned4.tiff0000.tif aligned4.tiff0001.tif aligned4.tiff0002.tif aligned4.tiff0003.tif aligned4.tiff0004.tif aligned4.tiff0005.tif & pid4=$!
#wait for jobs to end
    wait < <(jobs -p)
rm $(ls *.tiff | awk 'FNR == 1') $(ls *.tiff | awk 'FNR == 2') $(ls *.tiff | awk 'FNR == 3') $(ls *.tiff | awk 'FNR == 4')
done

rm $(ls *.tiff | awk 'FNR == 1') $(ls *.tiff | awk 'FNR == 2') $(ls *.tiff | awk 'FNR == 3') $(ls *.tiff | awk 'FNR == 4') $(ls *.tiff | awk 'FNR == 5') $(ls *.tiff | awk 'FNR == 6')
rm aligned.tiff0000.tif aligned.tiff0001.tif aligned.tiff0002.tif aligned.tiff0003.tif aligned.tiff0004.tif aligned.tiff0005.tif aligned2.tiff0000.tif aligned2.tiff0001.tif aligned2.tiff0002.tif aligned2.tiff0003.tif aligned2.tiff0004.tif aligned2.tiff0005.tif aligned3.tiff0000.tif aligned3.tiff0001.tif aligned3.tiff0002.tif aligned3.tiff0003.tif aligned3.tiff0004.tif aligned3.tiff0005.tif aligned4.tiff0000.tif aligned4.tiff0001.tif aligned4.tiff0002.tif aligned4.tiff0003.tif aligned4.tiff0004.tif aligned4.tiff0005.tif

dcraw -H 2 -b 1 +M -6 -w -q 3 -T $(find dngtmp -iname '*.dng' | tail -10) & pid1=$!
#wait for jobs to end
    wait < <(jobs -p)
mv dngtmp/*.tiff ./
while grep 'tiff' <<< $(find . -maxdepth 1 -iname '*.tiff')
do
/Applications/Hugin/Hugin.app/Contents/MacOS/align_image_stack -a aligned.tiff $(ls *.tiff | awk 'FNR == 10') $(ls *.tiff | awk 'FNR == 9') $(ls *.tiff | awk 'FNR == 8') $(ls *.tiff | awk 'FNR == 7') $(ls *.tiff | awk 'FNR == 6') $(ls *.tiff | awk 'FNR == 5') && /Applications/Hugin/tools_mac/enfuse -o $(ls *.tiff | awk 'FNR == 10' | cut -d "." -f1).tif aligned.tiff0005.tif aligned.tiff0004.tif aligned.tiff0003.tif aligned.tiff0002.tif aligned.tiff0001.tif aligned.tiff0000.tif && rm aligned.tiff0000.tif aligned.tiff0001.tif aligned.tiff0002.tif aligned.tiff0003.tif aligned.tiff0004.tif aligned.tiff0005.tif & pid=$!

/Applications/Hugin/Hugin.app/Contents/MacOS/align_image_stack -a aligned1.tiff $(ls *.tiff | awk 'FNR == 9') $(ls *.tiff | awk 'FNR == 8') $(ls *.tiff | awk 'FNR == 7') $(ls *.tiff | awk 'FNR == 6') $(ls *.tiff | awk 'FNR == 5') $(ls *.tiff | awk 'FNR == 4') && /Applications/Hugin/tools_mac/enfuse -o $(ls *.tiff | awk 'FNR == 9' | cut -d "." -f1).tif aligned1.tiff0005.tif aligned1.tiff0004.tif aligned1.tiff0003.tif aligned1.tiff0002.tif aligned1.tiff0001.tif aligned1.tiff0000.tif && rm aligned1.tiff0000.tif aligned1.tiff0001.tif aligned1.tiff0002.tif aligned1.tiff0003.tif aligned1.tiff0004.tif aligned1.tiff0005.tif & pid1=$!

/Applications/Hugin/Hugin.app/Contents/MacOS/align_image_stack -a aligned2.tiff $(ls *.tiff | awk 'FNR == 8') $(ls *.tiff | awk 'FNR == 7') $(ls *.tiff | awk 'FNR == 6') $(ls *.tiff | awk 'FNR == 5') $(ls *.tiff | awk 'FNR == 4') $(ls *.tiff | awk 'FNR == 3') && /Applications/Hugin/tools_mac/enfuse -o $(ls *.tiff | awk 'FNR == 8' | cut -d "." -f1).tif aligned2.tiff0005.tif aligned2.tiff0004.tif aligned2.tiff0003.tif aligned2.tiff0002.tif aligned2.tiff0001.tif aligned2.tiff0000.tif && rm aligned2.tiff0000.tif aligned2.tiff0001.tif aligned2.tiff0002.tif aligned2.tiff0003.tif aligned2.tiff0004.tif aligned2.tiff0005.tif & pid2=$!

/Applications/Hugin/Hugin.app/Contents/MacOS/align_image_stack -a aligned3.tiff $(ls *.tiff | awk 'FNR == 7') $(ls *.tiff | awk 'FNR == 6') $(ls *.tiff | awk 'FNR == 5') $(ls *.tiff | awk 'FNR == 4') $(ls *.tiff | awk 'FNR == 3') $(ls *.tiff | awk 'FNR == 2') && /Applications/Hugin/tools_mac/enfuse -o $(ls *.tiff | awk 'FNR == 7' | cut -d "." -f1).tif aligned3.tiff0005.tif aligned3.tiff0004.tif aligned3.tiff0003.tif aligned3.tiff0002.tif aligned3.tiff0001.tif aligned3.tiff0000.tif && rm aligned3.tiff0000.tif aligned3.tiff0001.tif aligned3.tiff0002.tif aligned3.tiff0003.tif aligned3.tiff0004.tif aligned3.tiff0005.tif & pid3=$!

/Applications/Hugin/Hugin.app/Contents/MacOS/align_image_stack -a aligned4.tiff $(ls *.tiff | awk 'FNR == 6') $(ls *.tiff | awk 'FNR == 5') $(ls *.tiff | awk 'FNR == 4') $(ls *.tiff | awk 'FNR == 3') $(ls *.tiff | awk 'FNR == 2') $(ls *.tiff | awk 'FNR == 1') && /Applications/Hugin/tools_mac/enfuse -o $(ls *.tiff | awk 'FNR == 6' | cut -d "." -f1).tif aligned4.tiff0005.tif aligned4.tiff0004.tif aligned4.tiff0003.tif aligned4.tiff0002.tif aligned4.tiff0001.tif aligned4.tiff0000.tif && rm aligned4.tiff0000.tif aligned4.tiff0001.tif aligned4.tiff0002.tif aligned4.tiff0003.tif aligned4.tiff0004.tif aligned4.tiff0005.tif & pid4=$!
#wait for jobs to end
    wait < <(jobs -p)
rm $(find . -maxdepth 1 -name '*.tiff' | head -10)
done
exit 0

else
while grep 'tiff' <<< $(find . -maxdepth 1 -name '*.tiff')
do
mkdir -p tifftmp
/Applications/Hugin/Hugin.app/Contents/MacOS/align_image_stack -a aligned.tiff $(ls *.tiff | awk 'FNR == 1') $(ls *.tiff | awk 'FNR == 2') $(ls *.tiff | awk 'FNR == 3') $(ls *.tiff | awk 'FNR == 4') $(ls *.tiff | awk 'FNR == 5') $(ls *.tiff | awk 'FNR == 6') && /Applications/Hugin/tools_mac/enfuse -o $(ls *.tiff | awk 'FNR == 1' | cut -d "." -f1).tif aligned.tiff0000.tif aligned.tiff0001.tif aligned.tiff0002.tif aligned.tiff0003.tif aligned.tiff0004.tif aligned.tiff0005.tif && rm aligned.tiff0000.tif aligned.tiff0001.tif aligned.tiff0002.tif aligned.tiff0003.tif aligned.tiff0004.tif aligned.tiff0005.tif & pid1=$!

/Applications/Hugin/Hugin.app/Contents/MacOS/align_image_stack -a aligned2.tiff $(ls *.tiff | awk 'FNR == 2') $(ls *.tiff | awk 'FNR == 3') $(ls *.tiff | awk 'FNR == 4') $(ls *.tiff | awk 'FNR == 5') $(ls *.tiff | awk 'FNR == 6') $(ls *.tiff | awk 'FNR == 7') && /Applications/Hugin/tools_mac/enfuse -o $(ls *.tiff | awk 'FNR == 2' | cut -d "." -f1).tif aligned2.tiff0000.tif aligned2.tiff0001.tif aligned2.tiff0002.tif aligned2.tiff0003.tif aligned2.tiff0004.tif aligned2.tiff0005.tif && rm aligned2.tiff0000.tif aligned2.tiff0001.tif aligned2.tiff0002.tif aligned2.tiff0003.tif aligned2.tiff0004.tif aligned2.tiff0005.tif & pid2=$!

/Applications/Hugin/Hugin.app/Contents/MacOS/align_image_stack -a aligned3.tiff $(ls *.tiff | awk 'FNR == 3') $(ls *.tiff | awk 'FNR == 4') $(ls *.tiff | awk 'FNR == 5') $(ls *.tiff | awk 'FNR == 6') $(ls *.tiff | awk 'FNR == 7') $(ls *.tiff | awk 'FNR == 8') && /Applications/Hugin/tools_mac/enfuse -o $(ls *.tiff | awk 'FNR == 3' | cut -d "." -f1).tif aligned3.tiff0000.tif aligned3.tiff0001.tif aligned3.tiff0002.tif aligned3.tiff0003.tif aligned3.tiff0004.tif aligned3.tiff0005.tif && rm aligned3.tiff0000.tif aligned3.tiff0001.tif aligned3.tiff0002.tif aligned3.tiff0003.tif aligned3.tiff0004.tif aligned3.tiff0005.tif & pid3=$!

/Applications/Hugin/Hugin.app/Contents/MacOS/align_image_stack -a aligned4.tiff $(ls *.tiff | awk 'FNR == 4') $(ls *.tiff | awk 'FNR == 5') $(ls *.tiff | awk 'FNR == 6') $(ls *.tiff | awk 'FNR == 7') $(ls *.tiff | awk 'FNR == 8') $(ls *.tiff | awk 'FNR == 9') && /Applications/Hugin/tools_mac/enfuse -o $(ls *.tiff | awk 'FNR == 4' | cut -d "." -f1).tif aligned4.tiff0000.tif aligned4.tiff0001.tif aligned4.tiff0002.tif aligned4.tiff0003.tif aligned4.tiff0004.tif aligned4.tiff0005.tif && rm aligned4.tiff0000.tif aligned4.tiff0001.tif aligned4.tiff0002.tif aligned4.tiff0003.tif aligned4.tiff0004.tif aligned4.tiff0005.tif & pid4=$!
#wait for jobs to end
    wait < <(jobs -p)
mv $(ls *.tiff | awk 'FNR == 1') $(ls *.tiff | awk 'FNR == 2') $(ls *.tiff | awk 'FNR == 3') $(ls *.tiff | awk 'FNR == 4') tifftmp
done

mv $(ls *.tiff | awk 'FNR == 1') $(ls *.tiff | awk 'FNR == 2') $(ls *.tiff | awk 'FNR == 3') $(ls *.tiff | awk 'FNR == 4') $(ls *.tiff | awk 'FNR == 5') $(ls *.tiff | awk 'FNR == 6') tifftmp
rm aligned.tiff0000.tif aligned.tiff0001.tif aligned.tiff0002.tif aligned.tiff0003.tif aligned.tiff0004.tif aligned.tiff0005.tif aligned2.tiff0000.tif aligned2.tiff0001.tif aligned2.tiff0002.tif aligned2.tiff0003.tif aligned2.tiff0004.tif aligned2.tiff0005.tif aligned3.tiff0000.tif aligned3.tiff0001.tif aligned3.tiff0002.tif aligned3.tiff0003.tif aligned3.tiff0004.tif aligned3.tiff0005.tif aligned4.tiff0000.tif aligned4.tiff0001.tif aligned4.tiff0002.tif aligned4.tiff0003.tif aligned4.tiff0004.tif aligned4.tiff0005.tif

mv $(find tifftmp | tail -10) ./

while grep 'tiff' <<< $(find . -maxdepth 1 -iname '*.tiff')
do
/Applications/Hugin/Hugin.app/Contents/MacOS/align_image_stack -a aligned.tiff $(ls *.tiff | awk 'FNR == 10') $(ls *.tiff | awk 'FNR == 9') $(ls *.tiff | awk 'FNR == 8') $(ls *.tiff | awk 'FNR == 7') $(ls *.tiff | awk 'FNR == 6') $(ls *.tiff | awk 'FNR == 5') && /Applications/Hugin/tools_mac/enfuse -o $(ls *.tiff | awk 'FNR == 10' | cut -d "." -f1).tif aligned.tiff0005.tif aligned.tiff0004.tif aligned.tiff0003.tif aligned.tiff0002.tif aligned.tiff0001.tif aligned.tiff0000.tif && rm aligned.tiff0000.tif aligned.tiff0001.tif aligned.tiff0002.tif aligned.tiff0003.tif aligned.tiff0004.tif aligned.tiff0005.tif & pid=$!

/Applications/Hugin/Hugin.app/Contents/MacOS/align_image_stack -a aligned1.tiff $(ls *.tiff | awk 'FNR == 9') $(ls *.tiff | awk 'FNR == 8') $(ls *.tiff | awk 'FNR == 7') $(ls *.tiff | awk 'FNR == 6') $(ls *.tiff | awk 'FNR == 5') $(ls *.tiff | awk 'FNR == 4') && /Applications/Hugin/tools_mac/enfuse -o $(ls *.tiff | awk 'FNR == 9' | cut -d "." -f1).tif aligned1.tiff0005.tif aligned1.tiff0004.tif aligned1.tiff0003.tif aligned1.tiff0002.tif aligned1.tiff0001.tif aligned1.tiff0000.tif && rm aligned1.tiff0000.tif aligned1.tiff0001.tif aligned1.tiff0002.tif aligned1.tiff0003.tif aligned1.tiff0004.tif aligned1.tiff0005.tif & pid1=$!

/Applications/Hugin/Hugin.app/Contents/MacOS/align_image_stack -a aligned2.tiff $(ls *.tiff | awk 'FNR == 8') $(ls *.tiff | awk 'FNR == 7') $(ls *.tiff | awk 'FNR == 6') $(ls *.tiff | awk 'FNR == 5') $(ls *.tiff | awk 'FNR == 4') $(ls *.tiff | awk 'FNR == 3') && /Applications/Hugin/tools_mac/enfuse -o $(ls *.tiff | awk 'FNR == 8' | cut -d "." -f1).tif aligned2.tiff0005.tif aligned2.tiff0004.tif aligned2.tiff0003.tif aligned2.tiff0002.tif aligned2.tiff0001.tif aligned2.tiff0000.tif && rm aligned2.tiff0000.tif aligned2.tiff0001.tif aligned2.tiff0002.tif aligned2.tiff0003.tif aligned2.tiff0004.tif aligned2.tiff0005.tif & pid2=$!

/Applications/Hugin/Hugin.app/Contents/MacOS/align_image_stack -a aligned3.tiff $(ls *.tiff | awk 'FNR == 7') $(ls *.tiff | awk 'FNR == 6') $(ls *.tiff | awk 'FNR == 5') $(ls *.tiff | awk 'FNR == 4') $(ls *.tiff | awk 'FNR == 3') $(ls *.tiff | awk 'FNR == 2') && /Applications/Hugin/tools_mac/enfuse -o $(ls *.tiff | awk 'FNR == 7' | cut -d "." -f1).tif aligned3.tiff0005.tif aligned3.tiff0004.tif aligned3.tiff0003.tif aligned3.tiff0002.tif aligned3.tiff0001.tif aligned3.tiff0000.tif && rm aligned3.tiff0000.tif aligned3.tiff0001.tif aligned3.tiff0002.tif aligned3.tiff0003.tif aligned3.tiff0004.tif aligned3.tiff0005.tif & pid3=$!

/Applications/Hugin/Hugin.app/Contents/MacOS/align_image_stack -a aligned4.tiff $(ls *.tiff | awk 'FNR == 6') $(ls *.tiff | awk 'FNR == 5') $(ls *.tiff | awk 'FNR == 4') $(ls *.tiff | awk 'FNR == 3') $(ls *.tiff | awk 'FNR == 2') $(ls *.tiff | awk 'FNR == 1') && /Applications/Hugin/tools_mac/enfuse -o $(ls *.tiff | awk 'FNR == 6' | cut -d "." -f1).tif aligned4.tiff0005.tif aligned4.tiff0004.tif aligned4.tiff0003.tif aligned4.tiff0002.tif aligned4.tiff0001.tif aligned4.tiff0000.tif && rm aligned4.tiff0000.tif aligned4.tiff0001.tif aligned4.tiff0002.tif aligned4.tiff0003.tif aligned4.tiff0004.tif aligned4.tiff0005.tif & pid4=$!
#wait for jobs to end
    wait < <(jobs -p)
mv *.tiff tifftmp
done

fi
EOF
bash mac_ml.sh && rm mac_ml.sh &
clear
"


Your script is now working


Original


Cleaned


Original(crop)


Cleaned(crop)


Original(crop) Check the grain


Cleaned(crop) Check the cleaned grain


Original(brightened)


Cleaned(brightened)


Original(crop) Check the grain


Cleaned(crop) Check the cleaned grain

#12
Switch

Switch automator app is a multiprocessing program being able to process dualiso as well as non dualiso files coming from Magic Lantern generated CR2, DNG, RAW and MLV files. Different magic lantern related workflows are all being simplified through different self explanatory bash menus which all are started from within Main menu.

Following processing workflows are included:
* Process dual iso generated files from multiple cameras
* Process CR2, dng, RAW and MLV files(both dualiso and non dualiso)
* Export to ProRes4444 and proxy(FFmpeg, dcraw)
* Process other files such as mov, mts, mpeg etc to ProRes(X to ProRes menu)
* HDR processing from MOV files. (ffmpeg tblend averaging filter. 48, 50, or 60fps recommended)
* 3D lut support(cube)
* White balance correction
* Darkframe averaging automation(mlv_dump)
* Flatframe automation(mlv_dump)
* MLVFS workflow integration
* MlRawViewer integration(previewing)
* Multithreaded
* Full auto mode


The program itself is depending on cr2hdr(a1ex) and mlv_dump(g3gg0, a1ex), mlv_dump_on_steroids(Bouncyball),  raw2dng(a1ex), dcraw(dave Coffin) and FFmpeg(Fabrice Bellard) for processing the different dualiso generated files. Processing includes white balance correction through exiftool(Phil Harvey), exiv2(Andreas Huggel) and bwfmetaedit(FADGI) for audio metadata adding and if adobe dng converter is installed in applications folder Switch is able to include perfect correlation of white balance going from CR2 to dng files. Switch also includes a menu selector created in bash from where the user can select or deselect different settings inside Switch. Included in code as well is dfort pixel fixing lists for cameras with focus pixels such as eos m, 650D etc. https://bitbucket.org/daniel_fort/ml-focus-pixels
Also incorporated is a MLVFS workflow menu. For this to work and take effect you need MLVFS(dmilligan) installed onto your system. In conjunction with MLVFS I also put in very fine movie player MlRawViewer(baldand).
Switch works with different menus created in bash from where the user can select or deselect different settings inside Switch. The program is able to run all processes in a chain so just fill up the folder with various files and after selecting settings in the different menus simply run Switch and wait for it until it,s done.

A very special thanks to Bouncyball for dedicated support and groundbreaking development(mlv_dump_on_steroids, fpmutil, RAW to MLV converter) in general.

Source code
https://bitbucket.org/Dannephoto/switch-git/src

Mac version
https://bitbucket.org/Dannephoto/switch-git/get/b832bc4315e8.zip

Ubuntu version
SWITCH_LINUX.tar.gz
linux_source_code
Linux_Forum_post


Main menu


HOWTO
1. Move Switch to applications folder
2. Double click Switch and select a folder with dual iso CR2, DNG, dng or MLV files then navigate from the Main menu.
3. For compressing and matched white balanced Adobe dng converter needs to be installed into application folder. Switch works perfectly fine without ADC but white balance will be slightly off balance due to missing camera calibration information.
4. 3D luts can be added to both ProRes and proxy folders to further tweak the output.

Gatekeeper
To supress gatekeeper hold ctrl button down(mac OS Sierrra) while opening the application the first time. You can also change permissions from within privacy/security settings.

For coders
About working inside the source_code folder
Inside source_code folder there is a Build_dmg_package.command script. When double clicked it will copy and overwrite all .txt files over in source_code folder into the Switch one level up in source tree. After copying a mac dmg package will be created. Run chmod u=rwx on the script for full privilegies if needed.

MAIN
If you want to include changes done to Switch_MAIN.txt these have to be copied by opening up Switch in automator. Automator is installed in your system by default.


Thanks to:  a1ex, g3gg0, bouncyball, Dave Coffin, Fabrice Bellard(FFmpeg community) Phil Harvey, Andreas Huggel, dmilligan, baldand, so-rose, Chmee, dfort, deafeyejedi.

Official GPL statement(Magic Lantern)


#13
Important
MLP project is abandoned and replaced with:
Switch for macOS Sierra.
Please use that instead to keep yourself updated with the latest.


MLP NO LONGER MAINTAINED! Use Switch above instead.

MLP – Magic Lantern Processor
download_source
user_guide

Forum discussion regarding MLP starts here
MLP_discuss

Word of advice. All processes should be run separately. Keep different  files and processes separated if not stated otherwise. It,s all up to you to test and validate this workflow. I leave no guarantees. It should be treated as beta.

What,s MLP about?
MLP works with the following files:
-   RAW/MLV to dng conversion. Files workable in DaVinci Resolve(embeds audio) and Premiere Pro
-   RAW/MLV and folders of dng files to ProRes4444 files
-   Dual iso CR2 still images are converted to workable DNG files with correct white balance applied
-   HDR processing of both MLV/RAW and H264 mov files
-   HDR processing of CR2 still image files
-   Dual iso dng sequences are processed automatically coming from RAW/MLV files
-   RAW/MLV/dng/DNG/mov previewer
-   Multithreaded


Description
By right clicking a folder, containing any of the above mentioned files, and when selecting MLP from the contextual services menu to specified folder two additional folders will be created prior to running any further processing:
-   A_dan_log_3d_luts
-   A_lut_hold
By adding these folders you are able to add or change different settings before continuing processing such as white balance, brightness, gamma, add different luts. You are also able to change settings for HDR processing.
Adding setting files is easy. Simply pick something from the "A_dan_log_3d_luts" and put it in the "A_lut_hold". Open up the txt file and change setting and save. Then start processing you files. The tricky part is to find the right combinations for how you want your files to be processed.
Whatever setting you create will be viewable as preview tif files if right clicking a RAW,MLV,dng,DNG or mov file directly. For more in depth information the user_guide above is highly recommended.


What you need
You will need some additional files to have MLP fully functional, FFmpeg among them. If you follow the HOWTO.txt in the download package you should be good to go. For doing changes in dng raw files dcraw(Dave Coffin) and exiftool(Phil Harvey) and exiv2(Andreas Huggel) are used. Mlv_dump(g3gg0, A1ex) raw2dng(A1ex) and cr2hdr(A1ex) for  developing dng files. For creating prores dng files are piped to FFmpeg(Fabrice Bellard) via dcraw. (FFmpeg not included in the download). For additional functionality see Howto.txt in the download folder.

For creating 3D luts I used Ben Turley´s cool tool online LUTCalc here https://cameramanben.github.io/LUTCalc/

Thanks to dfort for the tip which lead to being able to have all processes run from the same path. Also for testing and working out ways with the dead pixel fix function in dcraw and detecting a dual iso seg fault which now A1ex has fixed. For feedback and bugtests as always thank you deafeyejedi and dfort.

MLP is an open source project(GPL).
Main reason for this workflow is to optimize processes and get around issues arising in cr2hdr-r when upgrading to OS X El Capitan.
The workflow itself is build around bash scripts run through an automator service. You install it by double clicking the MLP workflow.
The best way to learn MLP workflow is to work with the user_guide.
All MLP sources are in the download. You can easily add changes in the scripts yourself. Add changes in the source_code_MLP folder then double click the A_move_content_to_workflow.command before installing MLP. More about this in the "Howto" file.
MLP still uses the core philosophy from cr2hdr-r but processes are optimized and gives a lot more possibilities to change settings manually. I rewrote the way HDR files are being treated and added some white balance templates. Processes are still multithreaded.


Many ideas and solutions are coming from people here at the forum, stackoverflow and other forums. I tweaked and optimized almost all scripts to fit the way I want it to work. MLP is still a work in progress and everything is open for changes.

Thanks
A1ex, g3gg0, Dave Coffin, Phil Harvey, Fabrice Bellard, Bouncyball, dmilligan, cpc, chmee, Scrax, Jerrykil, Dubzebass, Kichetof, Baldavenger, Andy600, Baldand, dfort, deafeyejedi and others I might forgot to mention here.

GPL (magic lantern)
http://www.magiclantern.fm/forum/index.php?topic=13335.msg128757#msg128757


cr2hdr-r automator app workflow NO LONGER MAINTAINED! Use MLP instead. For further questions regarding cr2hdr-r please pm me.


- Transcodes MLV/RAW to folders. Dual iso movie files also supported. Dng files will work both in Davinci resolve and Premiere pro CC(thanks cpc for repackto16bit binary)
- ProRes444 creation
- HDR movie (thanks to Jerrykil script)
- CR2 dual iso to DNG conversion
- 3d lut support
- Multithreading
- speed_preview (adding speed and ability to preview one frame)

thread starts around here (lut_lab version)
http://www.magiclantern.fm/forum/index.php?topic=13512.msg144696#msg144696

Always run the app from the parent folder!


Usage
- cr2hdr-r creates two additional folders (HDR_RAW_MLV and PRORES) inside the parent folder on first run, then the app quits.
- Place files in parent folder or in the created subfolders or in all three of them.
- Run the app again from the parent folder and it will convert first from parent folder then search the created subfolders for files.
All RAW/MLV originals will be placed in ORIGINAL folders after conversion

About created folders

Parent folder
- Transcoding MLV/RAW files. Dual iso is supported. dng files will work both in Davinci resolve and Premiere pro CC (Thanks @cpc for 16bit repacking binary).
- Dual iso CR2 files. If adobe dng converter is installed it will reduce the size of the resulting DNG lossless.

PRORES folder (ProRes444 creation)
- Creation of ProRes files.
- White balance control when using silent pic DNG or adding a CR2 with desired WB.
https://www.youtube.com/watch?v=S5SAnakpum0&list=UUomeOeghS6wanMOCQ8BtH_A
- add 3d luts in the mix(up to 20 luts can be used)

- FFmpeg binary needed for ProRes encoding. You find it here http://ffmpegmac.net/
The binary must have the name ffmpeg and have to be placed in /usr/bin/ folder on your computer


More speed and previews
http://www.magiclantern.fm/forum/index.php?topic=13512.msg147712#msg147712
http://www.magiclantern.fm/forum/index.php?topic=13512.msg148522#msg148522
http://www.magiclantern.fm/forum/index.php?topic=13512.msg149104#msg149104

- cr2hdr_r_lut_lab version will install a "speed_preview" workflow. Simply right click the parent folder and run "speed_preview" from services and it will add an extra process to PRORES and HDR_RAW_MLV_MOV folder. If you run the speed_preview by right clicking a mlv/raw/mov/MOV file you get one preview frame from the chosen file. Add CR2 for white balance and add a 3d lut for preset looks.
https://www.youtube.com/watch?v=2ZkXeISWC0c&feature=youtu.be


3D lut support
- Added lut support. add lut inside the PRORES folder or in subfolders together with the RAW/MLV file
- Hardcoded flat looking 3d lut when transcoding dual iso ProRes files. Thanks Andy600.

Up to 20 extra 3d luts can be added. When running the app the first time it creates some additional folder. Inside the PRORES folder some luts and a text description will be provided.

White balance handling
http://www.magiclantern.fm/forum/index.php?topic=13512.msg144750#msg144750
http://magiclantern.fm/forum/index.php?topic=13512.msg148069#msg148069
http://www.magiclantern.fm/forum/index.php?topic=13512.msg148231#msg148231
http://www.magiclantern.fm/forum/index.php?topic=13512.msg149797#msg149797

Preferred workflow in PRORES folder is to add one or more CR2 files( for white balance) and/or up to twenty 3d luts to you files.

Brightness, white balance, denoiser
Change above settings by adding commands to a generated png preview.
http://www.magiclantern.fm/forum/index.php?topic=13512.msg149461#msg149461
works with speed_previews
http://www.magiclantern.fm/forum/index.php?topic=13512.msg149476#msg149476


HDR_RAW_MLV_MOV folder  Updated 2015-09-16! here
http://www.magiclantern.fm/forum/index.php?topic=13512.msg154260#msg154260

Place HDR MLV/RAW footage(48, 50, or 60 fps) in folder and it will transcode to a .mov file.
Place a .MOV HDR file and it transcodes to a merged .mov file
More info here
http://magiclantern.fm/forum/index.php?topic=13512.msg147144#msg147144

FFmpeg binary needed for HDR encoding. You find it here http://ffmpegmac.net/
The binary must be named ffmpeg and have to be placed in /usr/bin/ folder on your computer


All processes are multithreaded!

Thanks Andy600 for provided dual iso luts and N/A for updated dcraw compiles, cpc for DNGRepackto16,
Deafeyejedi and others for tests and feedback.


What is it
Cr2hdr-r relies on script made in bash calling for different binaries through an automator app. Most of the scripts have been gathered and tweaked from users here at the ML forum. The app is also provided as an automator workflow. The processing is done the same for both alternatives.
Main interest for starting this was for fast dual iso conversion(multithreaded) and to apply same levels(prevent flicker) using exiftool, to dual iso movie files but as it emerged it is now a sort of an "all in one" processing solution handling above files.

Usage
Collect all the files you want to convert into a chosen folder. You can add multiple MLV, RAW, CR2, dng, MOV files. They will be converted one after the other. While processing an ORIGINALS folder will be created and original files will be moved to this folder after after processing is done.


*Good to know
Regarding format RAW. If filmed with spanned files such as R.00, R.01 etc the app will automatically cat these files and after the cat process start converting and then erase the spanned files replacing it with the concenated file. I personally I don,t see any reason to keep the spanned files after conversion since you get a new big file instead.


Why use it
I consider it a laid back all in one processing solution taking care of  many of the magic lantern processing needs.
Fast conversion of dual iso dng movie files and dual iso CR2 files (multithreaded).
Exiftool adds back metadata to processed MLV and RAW(fps) files. Also applies the same white level to dual iso movie sequences to avoid flicker.
Audio is shortened(sox) and wav metadata added(bwfmetaedit) to fit with autolinking in DaVinci Resolve.
HDR .MOV files which is converted multithreaded(thanks to Jerrykil).


Additional
automator http://www.macosxautomation.com/automator/
dual iso movie thread http://www.magiclantern.fm/forum/index.php?topic=12796.msg123437#msg123437

Recommended(mac)
MLVFS - dmilligan
http://www.magiclantern.fm/forum/index.php?topic=13152.0

MlRawViewer – baldand
http://www.magiclantern.fm/forum/index.php?topic=9560.0

Lightroom plugin cr2hdr - Kitchehof
http://www.magiclantern.fm/forum/index.php?topic=11056.0

Thanks
This is a great community. No scripting or any creation around this workflow would be possible without the community, and a special thanks to these guys.
Great thanks to A1ex, g3gg0, (cr2hdr20bit, raw2dng, mlv_dump.)
Andy600(dual iso log_lut), @cpc (DNGrepackto16), Dmilligan, Baldand, Kitchehof, Chmee, 
Scrax, Jerrykil, Dubzebass and others I forget to mention.
Tester(s) for feedback.

And of course the other authors of the included binaries.

I think of this as an open, sharing community. I learn and pick up stuff along the way.
This project is me learning scripting and creatng a personlized workflow.
I have no commercial interests. If any questions please feel free to pm me.

GPL (magic lantern)
http://www.magiclantern.fm/forum/index.php?topic=13335.msg128757#msg128757

Source
#14
Share Your Videos / dual iso 2,5k movie thread
July 26, 2014, 01:45:47 AM
Hi!
Decided to deepen my testing with dual iso movie mode again and created some 2,5k movie files which show what an amazing kind of dynamic range dual iso can achieve. Alex work on refining the conversion tool has been amazing to say the least.
I get the best results when in 3x zoom mode. (less aliasing, cleaner picture). 3x zoom mode is closer to dual iso still photography.

5D mark 3 magic lantern (nightly build)
dual iso movie (mostly 100-1600 iso)
3x zoom 2560x1090 raw
hacked preview
24 fps override

Lenses used:
Samyang 14mm f2.8
Canon ef 85mm f1.8


Movie and workflow description

Movie (Watch in 1440HD)


Real estate


Below app and workflow service will apply same level(avoids flicker after dual iso conversion) and work multithreaded (run 4 conversions simultaneously).

Info on the app here
MLP batch conversion app
http://www.magiclantern.fm/forum/index.php?topic=13512.msg130562#msg130562

Other ways to work with dual iso files below


http://www.magiclantern.fm/forum/index.php?topic=13512.msg130562#msg130562
http://youtu.be/J5JR3oCYcFE?list=UUomeOeghS6wanMOCQ8BtH_A


MLVFS thread (mac, windows)
http://www.magiclantern.fm/forum/index.php?topic=13152.0

Lightroom plugin (mac, windows)
http://www.magiclantern.fm/forum/index.php?topic=11056.0

Workflow using terminal and binary and exiftool commands
http://youtu.be/tCszO1nGrwc
Workflow (this one still have some issues with exiftool regarding overwriting)
http://youtu.be/Nn-64YP1hW8


So let,s start making more dual iso movies and put it up in this thread. Workflow tips and other useful information are also welcome.
2,5k 24fps will probably only be achieved with the 5d mark 3 but other aspect ratios are welcome as well of course.

Thanks to Alex and all other contributing on this forum.

update* Published at planet5D
http://blog.planet5d.com/2014/08/magic-lantern-movie-2-5k-dual-iso/
#15
A question.
How about a "Full time color option" in advanced menu in 5d mark 3 and also other cameras of course instead of having to press half shutter in 3x zoom mode when global draw on to get color view? It,s a little slower but the picture is of so much higher quality.
Love your work!
//D
#16
Share Your Videos / Film of a hungry Goshawk
January 06, 2014, 03:45:53 PM
Did some naturephotography from a hide in middle of Sweden yesterday. mixed it up with movie filmed in raw in normal and 3xmode. about 60gb of material, processed in acr exported to ProResHQ, edited in premiere pro.


Thanks for watching
#17
Feature Requests / [WTF] Two separate streams
August 02, 2013, 08:38:25 PM
Question. Filming two streams simultaneously at different iso so that in postproduction being able to mash them together. Why? To create best possible dynamic range in the moviefiles without moiré and aliasing artefacts. I,m thinking the master raw stream to cf together with a simultaneous h.264 stream going to sd card at a different iso on a 5d mark 3 for instance. Maybe at lower aspect ratios or close to full hd. Nice idea or time to get spanked ;)?
#18
Share Your Photos / Thread photos dual iso
July 30, 2013, 09:05:45 PM
A thread to share photos taken with dual iso. If you want to try and learn how please enter this thread here. http://www.magiclantern.fm/forum/index.php?topic=7139.msg62864;topicseen#msg62864

Some more examples of what dual iso can achieve. The shadows pop out like never before. Mostly used interval between 100-1600 and ETTR to find exposure settings. Works perfect most of the time. From a visit in Copenhagen. I used a 5d mark 3.

*updated with more pics and with 900px width, maximum forumsize.


#19
Raw Video / Stuck, dead, pixel, removal
June 28, 2013, 03:40:50 PM
I,ve made a short tutorial regarding stck/dead pixel removal in premiere pro. Enjoy :)
#20
Raw Video / Raw batch through adobe media encoder
June 16, 2013, 07:44:13 PM
I just fooled around with trying to export the raw via the ginger hdr direct import plug-in (demoversion) and come up with a way to use adobe media encoder to batch-export to any format from within adobe media encoder.

By adding the ginger plug-in folder to the adobe media encoder plug in common folder, the same way it,s done when adding it to the premiere pro folder. I can simply drag and drop all the raw files to the encoder making all the settings from there. Awesome!

Somebody made a tutorial how to create a ProRes template here. Rather slow but he gets the point out, eventually :)
http://www.youtube.com/watch?v=XFpfuv7HCvQ
#21
Short tutorial using after effects