I have a question: do you set the BV yourself or does the module do that for you? I have no idea how to compile ML, so I can't try it
- Welcome to Magic Lantern Forum.
News:
Etiquette, expectations, entitlement...
@autoexec_bin | #magiclantern | Discord | Reddit | Server issues
This section allows you to view all posts made by this member. Note that you can only see posts made in areas you currently have access to.
#51
Modules Development / Re: Auto exposure algorithm for shooting - auto iso, auto ae
July 27, 2013, 02:30:20 AM #52
Tutorials and Creative Uses / Re: Flicker Free ETTR Timelapse: - -Beginners Guide & Basic Post Processing --
July 25, 2013, 03:04:32 AMQuote from: andyshon on July 24, 2013, 02:01:01 PMYour photography isn't crappy
Not knowing how the algorithm works setting -4EV to get essentially unity makes no sense to me. And could it be adjustable in finer increments, half or third stops?
K, back on topic. I do agree with you on the finer increments. Sometimes the difference between 1 stop can be very significant.
Quote from: andyshon on July 24, 2013, 02:01:01 PMYes we do indeed need a utility to offset exposure gain in post. I asked that a while back and the devs said you could write a script to offset the expo comp values in the sidecar files, but I don't know how to do that. I did also ask for help on writing a script to do that but got no reply.
A utility that allowed you to offset exposure gain in post, whilst maintaining deflicker, would be very handy. Does anyone know of a way to do this?
I don't know if it will work for you but you could try the script in http://www.magiclantern.fm/forum/index.php?topic=7022.0
Do not use it with post deflicker. You also have to change the shadow_level (to 1) and highlight_level (to something very high like 500000) to disable any recovery.
#53
Modules Development / Re: Dual ISO - massive dynamic range improvement for 5D3 and 7D
July 24, 2013, 01:54:10 AMQuote from: daancalo2013 on July 23, 2013, 09:07:16 PMI'm not going to make a video tutorial because I don't feel it's needed, plus I don't have a 5D3.
hello I have a 5d mark 3 and want to know how do I install dual iso, video tutorial please.
Anyways (5D3 users please correct me if I'm wrong, I don't have a 5D3).
1. Follow the instructions in this thread to install ML http://www.magiclantern.fm/forum/index.php?topic=2602.0
2. After you're done doing all those stuff, download everything here: https://www.dropbox.com/sh/xiksvwbehzmycq4/QbuV17WuE5 (I just linked this from the first post in this thread)
3. Replace autoexec.bin on your SD card with the one you downloaded in step 2
4. Create a folder under the ML folder on the SD card, and call it "modules" (without the quotation marks)
5. Copy everything else you downloaded from step 2 into that folder
#54
Feature Requests / Re: Geeping focus through zoom.
July 23, 2013, 03:13:55 AMQuote from: mk11174 on July 23, 2013, 02:49:05 AMI don't know, but your post does not seem to help him very much. It might be your English but what I got from your post is that after zooming to 50mm, zoom out to a wider focal length to regain focus. However there is a problem with this: the purpose of zooming in to 50mm is to shoot at 50mm, not something else. This might not be what you meant; if it isn't, then I'm sorry for the misunderstanding.
I don't see why it matters, I am just trying to be helpful, I really don't see why you have to point out it might not be relevant, can't people just help people without all this attitude, I don't see why it always comes to this in these boards!
#55
Feature Requests / Re: Geeping focus through zoom.
July 23, 2013, 02:40:50 AMQuote from: mk11174 on July 22, 2013, 11:17:31 PMI don't see how your post is relevant to his question. He has a problem where the lens does not retain focus after zooming; some lenses have this problem. He wants some sort of feature that re-focuses after zoom to the same focus distance as before the zoom.
Maybe your lens is like mine, mine is the kit lens, try focusing first of coarse, switch to MF and the big thing that is a bug in my lens is any time you turn lens in the zoom direction, when you zoom to the point you want, just always nudge back in the wide direction, that will give you your focus back. On my other lens I dont have this issue, once you focus, if you zoom in and out it dont get messed up. But this kit lens is kinda flimsy it seems. So my rule is always nudge back to wide any time I zoom.
I think it might not be possible, because some lenses do not report focus information accurately (they report focus distance in large steps). Focusing to infinity (not to be confused with hyperfocal) is possible though; I see a script on this forum that does that.
#56
Modules Development / Re: Dual ISO - massive dynamic range improvement for 5D3 and 7D
July 19, 2013, 09:58:16 AMQuote from: Walter Schulz on July 19, 2013, 09:53:00 AMThat works fine in Windows, I'm not sure about whether you can just use it like that if you have to run it using wine.
Copy your RAW video file to a location you like. For you it will do in Z:\Users\Seba\Desktop\Raw\ and drag and drop this file onto raw2dng_shadow050.exe. After this step you will get a bunch of files in this very folder/directory for further processing.
Ciao, Walter
Normally what I'd do would be to run
Quotewine ./raw2dng_shadow050.exe file.raw
Of course replace file.raw with whatever the filename is.
If you want a prefix to your dng files then put the prefix after the filename
#57
Modules Development / Re: Dual ISO - massive dynamic range improvement for 5D3 and 7D
July 19, 2013, 03:42:33 AMQuote from: jkdjedi on July 19, 2013, 03:30:04 AMYou'll either have to compile yourself, or wait for someone to release the updated autoexec.bin for 7D. You'll need both the dual_iso modules and the autoexec.bin
Sorry if I missed it...but....Is there a noob guide on how to implement this hack on the 7d? My guess is that you'll need the original Magic Lantern firmware and just copy and paste to some bin files..I know, I know...we're not worthy..but please, point us in the right direction..Thank You.
#58
General Development / Re: ML UI rationalization
July 19, 2013, 03:23:15 AM
I have a quick suggestion on the UI.
Change "Customize Menus" under Preferences tab to "Customize 'My Menu'" or "Customize Favourites Tab". While it may be obvious to some people what "customize menus" mean, it was not immediately obvious to me what it did, and I only "found" the feature accidentally. Such a useful feature should not be hidden; it should be immediately obvious even to first time users of ML.
Change "Customize Menus" under Preferences tab to "Customize 'My Menu'" or "Customize Favourites Tab". While it may be obvious to some people what "customize menus" mean, it was not immediately obvious to me what it did, and I only "found" the feature accidentally. Such a useful feature should not be hidden; it should be immediately obvious even to first time users of ML.
#59
General Help Q&A / Re: [5D Mk2] Using FPS override is overexposed
July 19, 2013, 01:59:19 AM
If you use very low fps, your shutter speed converges to 1/fps. If you don't have a ND filter, you're most likely going to end up with an overexposed image. This is for video mode. I don't know how FPS override works in photo mode though.
#60
HDR and Dual ISO Postprocessing / Re: Automatic color grading script for photos (uniform_exposure.py)
July 18, 2013, 03:27:59 PMQuote from: scurrvy2020 on July 18, 2013, 02:22:45 PMHere: https://docs.google.com/file/d/0BzFGDdZw7pVwUnFKVjZoQXE4WVU/edit?usp=sharing
Is anyone mirroring the automatic color grading script? I'm not able to download it because drop box has stopped the link.
#61
Feature Requests / Re: capability for read /download /upload of lenses' firmware
July 18, 2013, 02:57:51 AMQuote from: bogdan_XXI on July 17, 2013, 06:34:06 PMFirst of all, the 18-55 is not a classical mediocrity. It's decent, apart from the fact that the aperture range may not be ideal.
Cheers to all of you
I have a proposition in relation to a project of mine...
Have a Canon 550D, very happy about it. I wanted a replacement for the clasical mediocrity Canon 18-55 and went for a Sigma 18-50 2.8-4.5. The lens is some expensive for a standard one, about 200 euros so.. after some researching, i decided to buy a new 18-50 for the SA mount and convert it to EF.
Swapping the mount and connectors was easy job but i didn't expect it to have software differencies, sigma and canon protocols are identical, conectors identical.. practicaly is the same lens with different mount or .. this is what i thought
All works except for
- optical stabilisation with behaves strange - it doesn't want to switch off, and ii start and stops even if i do not take pictures and just for example viewing the menu. Also, it depleted half the battery in 20 pics
- when focusing it sounds louder than usual like its beeing slightly forced into action
Maybe is more to it but doesn't show yet
My conclusion is that i need the firmware replaced with one from a 18-50 ef mount .. probably forced replace
Awaiting your opinions on the topic
BTW The subject of lens customisation is just getting hot, check this out
http://petapixel.com/2013/06/10/testing-out-sigmas-lens-calibration-usb-dock-and-software/
Now, let's get on with your main problem. I don't think anyone apart from Sigma can change the firmware of the lens. The USB dock mentioned in the article you linked is for the newest line of Sigma lenses, they do not work at all on old Sigma lenses such as the one you have.
Your best bet is to sell off the SA mount one and get a EF-S mount one instead. I don't know what your reasons are for buying the SA mount one instead of the EF-S mount (cheaper perhaps?), but in general, if a lens is available in the mount you are using, you should get that one over other mounts.
#62
Modules Development / Re: Dual ISO - massive dynamic range improvement for 5D3 and 7D
July 17, 2013, 04:24:51 PMQuote from: Dns on July 17, 2013, 11:44:45 AMI'm by no means an expert on this, so take my words with a pinch of salt (or a tablespoon for that matter)
No hope for poor people like me(550D)? Finger Crossed

They need to program the ISO for each separate amplifier circuit for this trick to work. If the "poor men's cameras" don't have separate amplifier circuits, they have to find another way to implement this, like maybe somehow finding a way to hack a single amplifier circuit to alternate ISO every two lines, if it's even possible.
I don't know if it has a lot to do with the channel readouts though; all I've read about that was that it helped with higher readout speed and hence higher drive speed and better contrast detect AF.
#63
HDR and Dual ISO Postprocessing / Re: Automatic color grading script for photos (uniform_exposure.py)
July 16, 2013, 02:07:11 AMQuote from: togg on July 16, 2013, 12:14:16 AMThe DR is there, he just found a good way to squeeze all of it out of the image. I don't think you can "increase the DR of a single photo"; what's captured in a raw photo is stored in the raw photo, you just need to be able to bring it out.
I'm not sure I've got it. You have found/invented something that increase the DR of a single photo?
#64
Share Your Photos / Re: Sunrise in WY
July 16, 2013, 02:02:20 AM
Very nice! Most of the HDRs I see that contain some form of greenery have them destroyed with the processing, but you got the processing pretty good here
#65
HDR and Dual ISO Postprocessing / Re: Automatic color grading script for photos (uniform_exposure.py)
July 15, 2013, 11:30:12 AMQuote from: a1ex on July 15, 2013, 10:07:37 AMI doubt setting the thresholds to extreme values will help, especially in something like a sunrise/sunset/day to night time lapse. If you set highlight level to the max (65k or something), for the dark photos in the whole sequence, the script will try to push the highlights up, causing what is supposed to be a dark sky to appear bright.
Cool.
For timelapse, this script may not be ideal; you probably want the same settings on all files, rather than analyzing every single image and deciding how many exposures it needs.
If you disable highlight/shadow recovery (e.g. by setting the thresholds to extreme values), you should get similar results as with ML post deflicker. Maybe slightly less accurate because of downsampling.
Nevertheless, I'll still try playing around with the thresholds to see if it works. Maybe something like setting the shadow level to 1 but lowering the highlight level from the default value.
UPDATE: setting shadow_level to 1 and highlight_level to 500000 as suggested by a1ex produced results similar to post deflicker (no highlight or shadow recovery) for time lapse purposes. Exposure transitions were smooth for the most part but there were a few inconsistencies towards the end of the video
Quote# from 0 to 65535The values there can't be 0. Using 0 as the shadow level results in a divide by 0 error
highlight_level = 50000
midtone_level = 10000
shadow_level = 1000
#66
HDR and Dual ISO Postprocessing / Re: Automatic color grading script for photos (uniform_exposure.py)
July 15, 2013, 09:59:33 AMQuote from: a1ex on July 15, 2013, 09:53:52 AMOk, setting the output file to png works. Thanks!
Here, imagemagick says:Code Select
convert: Sorry, there are legal restrictions on arithmetic coding `00000001.jpg' @ error/jpeg.c/EmitMessage/235.
So... try to output a png or tiff or something:Code Select
j = os.path.join(out_dir, change_ext(f, ".tif"))
#67
HDR and Dual ISO Postprocessing / Re: Automatic color grading script for photos (uniform_exposure.py)
July 15, 2013, 09:50:41 AM
Strangely enough though, GIMP is able to open it. Some programs, like the default image viewer in Ubuntu, as well as Avidemux (which I use for time lapse sequences) are unable to open it
#68
HDR and Dual ISO Postprocessing / Re: Automatic color grading script for photos (uniform_exposure.py)
July 15, 2013, 09:39:50 AM
Sure, here is the dev.log: https://docs.google.com/file/d/0BzFGDdZw7pVwTmFSTW9TUFdIb3M/edit?usp=sharing
Intermediate files open fine, I'll try enfuse now
EDIT: enfuse produces a file with the same error, though I don't see anything unusual in the command prompt when I run enfuse
Here's a final output file: https://docs.google.com/file/d/0BzFGDdZw7pVwRlZLMzh1d3lMcFU/edit?usp=sharing
Intermediate files open fine, I'll try enfuse now
EDIT: enfuse produces a file with the same error, though I don't see anything unusual in the command prompt when I run enfuse
Quoteenfuse: info: input image "00000001-h0.jpg" does not have an alpha channel;
enfuse: info: assuming all pixels should contribute to the final image
enfuse: info: input image "00000001-h1.jpg" does not have an alpha channel;
enfuse: info: assuming all pixels should contribute to the final image
enfuse: info: input image "00000001-m.jpg" does not have an alpha channel;
enfuse: info: assuming all pixels should contribute to the final image
enfuse: info: input image "00000001-s0.jpg" does not have an alpha channel;
enfuse: info: assuming all pixels should contribute to the final image
enfuse: info: input image "00000001-s1.jpg" does not have an alpha channel;
enfuse: info: assuming all pixels should contribute to the final image
enfuse: warning: no usable resolution found in first image "00000001-h0.jpg";
enfuse: warning: will use 300 dpi
enfuse: info: loading next image: 00000001-h0.jpg 1/1
enfuse: info: loading next image: 00000001-h1.jpg 1/1
enfuse: info: loading next image: 00000001-m.jpg 1/1
enfuse: info: loading next image: 00000001-s0.jpg 1/1
enfuse: info: loading next image: 00000001-s1.jpg 1/1
Here's a final output file: https://docs.google.com/file/d/0BzFGDdZw7pVwRlZLMzh1d3lMcFU/edit?usp=sharing
#69
HDR and Dual ISO Postprocessing / Re: Automatic color grading script for photos (uniform_exposure.py)
July 15, 2013, 09:04:20 AM
I tried running the script and while I got the output files, opening them produces this error message: Could not load image 'imagename.jpg". Error interpreting JPEG image file (Suspension not allowed here)
Anyone knows what is going on? Screenshot:
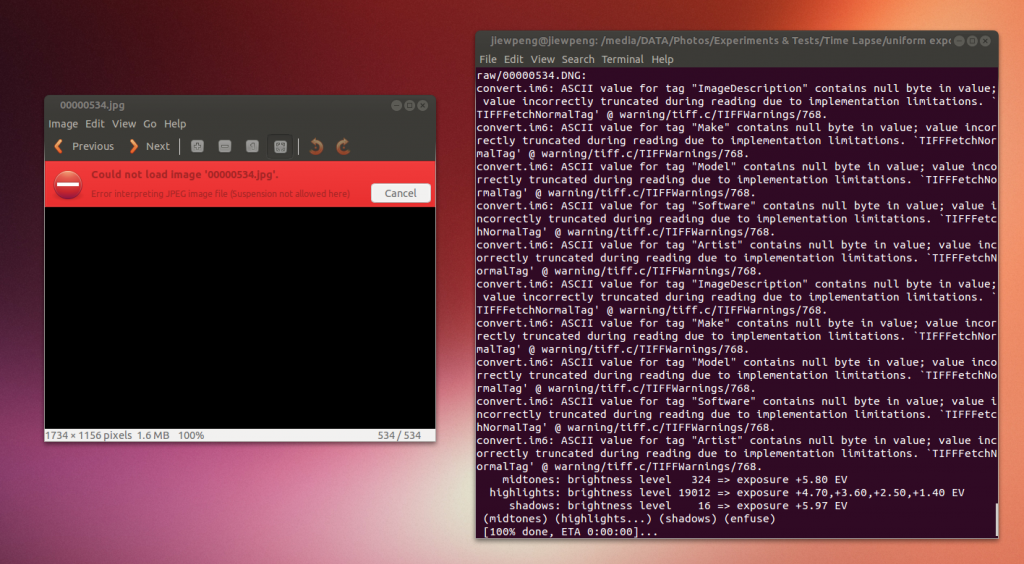
The errors that appear in the command prompt seem to be related to EXIF info, which shouldn't affect the image
Anyone knows what is going on? Screenshot:
The errors that appear in the command prompt seem to be related to EXIF info, which shouldn't affect the image
#70
Feature Requests / Re: "Intelligent" P/full auto -- ability to create rules, minimums, maximums, exc...
July 14, 2013, 03:43:50 PMQuote from: Erik Krause on July 14, 2013, 02:54:21 PMHmm really? I've tried turning the dials with the camera in P mode and I see the exposure changing sometimes, and sometimes it does nothing, so I pretty much gave up on P mode. Aperture Priority and Manual mode worked pretty well for me, so I didn't really spend a lot of time figuring out how P mode worked.
Wasn't this ever possible on EOS cameras? In P mode if I use the main dial I can change aperture and time changes accordingly to maintain the same exposure. I can change exposure by turning the back dial.
EDIT: I just saw the Canon manual and it isn't true you can do it like the Pentax P mode. It has a couple of aperture and shutter speed combinations you can scroll through, but it doesn't actually change to aperture priority or shutter priority
QuoteAbout Program Shift
In the Program AE mode, you can freely change the shutter speed and
aperture combination (Program) set automatically by the camera while
maintaining the same exposure. This is called Program shift.
#71
Feature Requests / Re: "Intelligent" P/full auto -- ability to create rules, minimums, maximums, exc...
July 14, 2013, 10:29:09 AM
On a slightly related note, I'd love to see something like the Program mode in Pentax DSLRs.
However I think the devs mentioned that switching shooting modes via software is dangerous. Perhaps a different way of implementing it can be done (Auto mode with ML expo override?). What BlueToast suggested sounds pretty good but can be quite slow to operate.
I think for such purposes, using manual mode with Auto ISO seems to be the best bet, provided you have an idea of what kind of shutter speeds/aperture is required for the scene, for the ISOs you want to use.
QuoteHyper-Program mode
By day, this is a conventional program mode that selects aperture and shutter-speed combinations based on the program-line you've told the camera to use. But with a turn of either of the dials, it transforms itself into 'Hyper-program' mode. The two dials allow you to set the shutter speed or aperture, effectively putting the camera into Tv or AV mode. A quick press of the green button and the camera reverts to its usual, unassuming program mode.
However I think the devs mentioned that switching shooting modes via software is dangerous. Perhaps a different way of implementing it can be done (Auto mode with ML expo override?). What BlueToast suggested sounds pretty good but can be quite slow to operate.
I think for such purposes, using manual mode with Auto ISO seems to be the best bet, provided you have an idea of what kind of shutter speeds/aperture is required for the scene, for the ISOs you want to use.
#72
Feature Requests / Re: [ALREADY DONE] Auto Preview for long exposure.
July 12, 2013, 06:53:19 AM
Actually what he's suggesting is to have a function where live view "bleeds in" the image to show you what you are capturing. FPS override can allow you to use live view in very dark conditions, but what he wants is to capture a picture in bulb mode by holding down the shutter, and in order to know when to stop the exposure, the live view image updates according to the exposure time.
I don't know how this can be done, in fact it's impossible for a full res picture, but I think it might be possible to do it for something like silent pic.
I don't know how this can be done, in fact it's impossible for a full res picture, but I think it might be possible to do it for something like silent pic.
#73
General Development / Re: RAW video timelapse with frame skipping
July 05, 2013, 04:17:58 PMQuote from: gerk.raisen on July 05, 2013, 02:51:44 PMYup, I meant that I installed that build and replaced the raw_rec.mo with the one dhilung made (of course I copied in the raw_rec.c as well). It works that way, at least for the intervals I tested (1s, 4s). Was just a quick test to see if anything changed.
@brapodam
I've just tested the exact build you write and the "Skipping interval" entry doesn't appear.
That build is compiled "vanilla" without external patches applied I think.
Only the "Frame skipping" entry are present (because it is in the standard ML code and isn't part of a patch)
#74
General Development / Re: RAW video timelapse with frame skipping
July 05, 2013, 02:26:30 PMQuote from: gerk.raisen on July 05, 2013, 02:17:29 PMI've tried it on a very recent build (ML-RAW-60D-hourly_2013-07-04_00-00.zip) and the mod works.
@dhilung
Yes, I'm in Movie mode (also because on last versions RAW Video can only work in movie mode)
I tried enable it to 2 or 4 second and than pressed liveview button to star recording
Have you tried your patch also on last committs? Maybe one of the last changes broken it...
(FPS override disabled, just to be sure)
Frame skipping disabled (it's correct, isn't it?)
#75
General Development / Re: RAW video timelapse with frame skipping
July 05, 2013, 12:52:25 PM
Is there any way to use this for a time lapse with exposure changes (i.e. sunrise/sunset/day to night time lapse)? I've tried many settings with this mod and just can't get it right. I was never really a time lapse guy but I'm still trying things out. The "demo video" in the first post was also full of flickering 
-Movie auto exposure screws things up because it uses pushed ISOs which just don't work
-Auto ETTR doesn't work while recording; Manaul ETTR produces flicker
-Gradual Exposure with aperture priority (using the old version of the mod that allowed shooting RAW video in photo mode) goes crazy and produces corrupted frames and still has flicker in the video (does it use pushed ISOs?)
-HDR video doesn't work (only one ISO used)
Am I missing something?