Menu

Show posts

This section allows you to view all posts made by this member. Note that you can only see posts made in areas you currently have access to.

Show posts Menu

Messages - Alex546

#1
This is a specific after effects problem. If you render out your video, your fps should be great.
The "not in realtime" problem could be hardware based, or a result of a missing pre-render.
I would recommend you to render out your footage.
#2
So I wonder if it is possible to have a 1080 output for connecting an external recorder?

- Not without hardware mods. You may grab the RAW stream and send in directly to a ssd with a custom grabber. This should be possible, but you will need to know where the RAW stream comes from/it goes to .

Without telling you much bullshit, the cameras RAW stream is, as far as I know, constructed like this.

Sensor => CPU => SD card

The sensor grabs the full RAW stream, the CPU convert the raw Stream in a .mov stream and then it is written to the SD card. The trick to get the RAW feature in magic lantern is, that the display of the camera (please correct me if Iam wrong) is using the full RAW stream to display the image. There, they have grabbed it to write it directly to SD card - genious. As all we know, the 550d is limited to about 21mb/s write speed, so technically the only problem would be the writespeed on SD card.

I had concepts to replace the camera SD card writer with an IDE ssd, but there are still some limitations on the firmware.
I thought about using the USB 2.0 controller to stream 1080p raw to a notebook (USB 2.0 is 480Mbps max. so this should be ok) (well Iam definitly not the first one) But there are also some limitations. The standard grab from the camera to usb goes after the stream is converted by the cpu, so there is technically a little chance to overwrite the CPU stream to USB with the RAW stream, but I had no concept to get this working :(
Well, there are a lot of more competent people in this community than me. So just my two cents here.

 
#3
ғᴏɢ ᴅʀᴇᴀᴍ
a Canon 550d RAW test.


A testshot in a foggy forest.
This video demonstrates the current RAW features. The clips were shot at diffrent ISO brightness levels.


#4
Hello together!

I searched for a simple batchscript that will convert more than one raw file at once.
I thought it would be great, if you just copy all of your RAW footage into one folder, click on start,
and get the final converted footage into another folder.

So I built up the RAW Batcher.
It's nothing special and is based on the raw2dng batch.
But it can help you being faster.


You can download the RAW Batcher for free:
http://movies.online-arts.de/content,30,raw-batcher.htm
#5
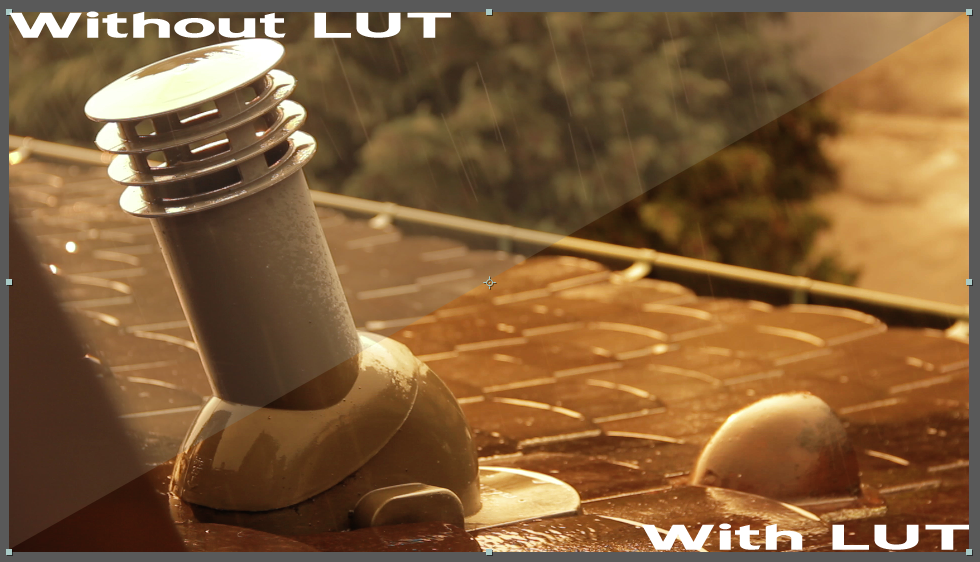
I always put my LUT's to the footage. Like in the video.
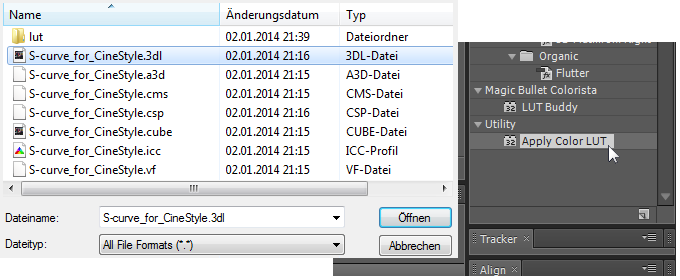
You can put your LUT anywere. If you apply the plugin "apply color LUT" you get an open dialog to choose your 3dl LUT file.
#6
Thank you for your comments :-)


I'am using adobe dynamic link, so I don't have to export my footage from after effects to premiere.
And you can also apply the LUT's directly in after effects.

I have also made a simple RAW to dng converter based on raw2dng, but with stacks, so you can render more than one footage, at a time!
Check out this video tutorial:
#7
You can use the Online Arts RAWBATCHER to convert more than one RAW file.
Check this out:
http://movies.online-arts.de/content,30,raw-batcher.htm

#8
I have also done a video to explain how to use this Cinestyle LUTs:

#9
English and Germand captions added.
#10


Hello together.

LUT Buddy from Reg Giant isn't free anymore. It is not simply possible to add the cinestyle LUT for free anymore.
Therefore I have converted the Cinestyle LUT to different LUT formats such as: 3dl, a3d, cms, csp, cube, icc, vf

Now you can simply use a .3dl Cinestyle look up table and the standard after effects plugin "Apply Color LUT".
This keeps the better 8bit DSLR workflow cheaper and universal. :-)


You can download all Look up tables here:
http://movies.online-arts.de/content,27,cinestyle-lut.htm


Instructions and explaination:


--

For the free idea of a better image!

#11
How to shoot
in RAW on a canon DSLR


Hello together.
I have done a simple and quick video tutorial how to shoot in RAW,
in order to spread the magic lantern idea :-)


     Introduction

   In this tutorial, I'll explain you how to use a canon DSLR to capture 14bit RAW footage.
   First of all, the RAW feature is not fully implemented and unless you have a 5D Mark III, 
   it is not possible to shoot RAW in all resolutions.
   But even if you shoot RAW on smaller resolution,
   you get more sharpness and detail in your picture,
   than the standard canon 1080p footage.


1. Camera + Magic Lantern
The most canon DSLR cameras should be able to have magic lantern and the RAW feature. You can visit the magic lantern homepage and check out your camera support. If you don't have magic lantern,  you can grab it there. All necessary links are posted in the description.


2. RAW Module
Once you have magic lantern installed, you might need the ,,raw_rec" module.  The module should be implemented, but if you don't find it,  you can download the module direct from the nightly builds.


3. SD Card
You also need a good SD card to record the RAW Footage. I have a transcend SDHC Level 10 card for my 550d.  The only important thing is, that your card use the full write speed of your camera. If you do not know your card write speed, you can search for benchmarks on the internet.
I have a simple list for you to find the writespeed of your camera. I will link an even better list in the description.


4. Shoot
Now lets get some footage.
   Assure you shoot in 1080p mode. Load up the RAW module and set your fps overwrite    to your desired framerate. I use 24 fps, to keep the write buffer of the camera small.    Then enable the RAW module. Set your Resolution and Ratio and you are ready to go.

   I've done several recordings. One of them should be fine.


5. RAW2DNG
   Its not simply possible to import your recorded footage directly to after effects,    therefore I use a tool from the magic lantern forums called RAW2DNG. This program    allows you to    simply   drag your files on the executable and this file will convert your    RAW file to a readable .dng sequence. You don't have to do anything beside that.
   Maybe I should write a GUI like the Online Arts HDR gui, for being able to mass
   convert your files. Post this in the comments.


I have also done some demonstration footage to test the current RAW features:


#12
Looks like good work for me :-)
You are using a dynamic camera movement and an interesting montage.
I'am looking forward to see more :)


Is it me, or is the skin color in the first video too red?
The 2nd video is looking awesome.
#13
This talk ain't just for fun.
It's the constant attempt to break the limits. :-)

#14
ML is good for the dslr sales but bad for the even more expensive professional market.
#15
Share Your Videos / Re: Auto ETTR Sunrise Timelapse
November 27, 2013, 01:15:26 AM
Really nice timelapse. :)
#16
Flickering, but still looks good!
I hope for a flickerfree example to compare the results :)
#17
After you enabled modules, you are able to load each available module. It is recommended to load just the modules you need for your RAW record session.

Greetz, Alex546
#18
Share Your Videos / RAW 550d Morning light test.
November 25, 2013, 04:13:45 PM
Hello folks.
I recorded some RAW footage with my 550d just to test the grain in low light situation.
Maybe this could also help you to determine the right shooting situation


Camera:
Canon 550d

Lens:
Canon EFS-18-135mm set on 50mm

SD card:
Transcend SDHC 32gb Level 10 card


Camera Settings:
1080p 24fps mode
Iso 200
Shutter 48


frame override:
24 fps

RAW module settings:
Res: 1280x536
Aspect: 2.39:1

Got around 140 frames/take

Each lightlayer in this video was filmed 5 minutes after the other with exact the same settings each time.


Greetings, Alex546
#19
Quote from: prabhath.mp on November 02, 2013, 11:04:53 AM
I downloaded the latest nightly build for 550D and when I try to record in 960X540 16:9, I only get few seconds of record on my 30MBps SanDisk Pro 32GB card. Also, it indicates some bug (after it has stopped recording). I'm not sure if I have missed anything. I just replace ML and autoexec.bin to update to latest build.


dafassi  is right. If the fps limitation doesn't help, you could run a speed test for your sd card.
Have you done a low level format before you started recording? 
This can help sometimes to get more writing speed.


I have also done experiments with relativly low and diffuse sunlight.
I've tried to get the maximum grain out of the sensor.
#20


Thank you for the raw module :)


Please enjoy your new colors:
(No color correction)


SD Card: Transcend SD HC 32 GB
1920p mode
FPS override:23.9 fps
Raw Res: 1344x610 (Upscaled with Instant HD)
max 96 frames
#21
Quote from: MaKsOZ on June 08, 2013, 05:40:03 PM
Also I noticed that the RAW module doesn't save the last resolution setting I used, is there a way to keep the resolution by default at 1280*450 for exemple?

Currently, the modules can't save data.
#22
Quote from: JuanIrache on June 08, 2013, 05:25:51 AM
REALLY? You mean 544 after stretching from 326, don't you?

Yes I mean 326, streched to 544, Sorry! :-\
#23
Thank you for the new version!
I get 1280x544 with 24 fps with Tragic RAW in 720p mode.
#24
Share Your Videos / 550d RAW 1280x426 3:1 @24fps
June 05, 2013, 04:22:31 PM
This video was shot using the experimental version with the RAW module.
I shot in 1280x720p 50fps

fps override:
24 fps
Exact fps

RAW settings:
1280x304
3:1


Workflow in a nutshell:

I used Raw2Dng.exe

In after effects I imported the dng sequence and created a composition with the normal width of my sequence and the height of my sequence, multiplied with 1.4.

DNG: 1280x304 => Comp: 1280x425    (304*1.4=425.6)


Then I scale the height of my footage to 140%.


#25
Could it be possible to record your RAW movies with a higher resolution but monochrom? Maybe 2k or 4k on a 550d.


550d, 1280x425(streched) @24 fps: