Menu

Show posts

This section allows you to view all posts made by this member. Note that you can only see posts made in areas you currently have access to.

Show posts Menu

Messages - screamer

#76
so i will finally use that neverused button :))) i like the idea (but think it's not a omnipresent button, some cameras did'nt have it i think). anyway it's a good idea and could be a feature for who has that button
#77
agree,
a good improvement on an already really interesting software
#78
Share Your Photos / Re: focus stacked bee
July 30, 2012, 12:01:00 PM
Thank you Michael :)
unfortunately i've already deleted the source files, but if i remember well every pic is made by something like 10/15shots (one was 13, the other probably 15) with f18 and a time of about 1/10 per shot. but with that aperture probably less shots is really needed (but i hate the out of focus slices when you don't shot sufficient slices, so i tend to shot more than i need :)
and about the poor bee, i found it dead on my balcony, on the floor. So really she is very still, and all the shooting session taked a quite long time. quite impossible to take a living bee this way.
But i've readed some macro photographers tips about working with insects, for example the best hour of the day is the early morning, when they are in a sort of stasys and you can take long session without a movement. Another one says that the best way is to capture the insect you want to shot, then put it in the fridge (to simulate the "fresh night" condition and to put the insect in a sort of cryogenic stasys (i don't mean to put in a subzero fride, the suggested temperatures are over the zero). But personally i havent't tried this things, find it a little cruel :D but everytime i found a dead insect that looks like it's living, i shot a macro ;)
#79
hi, i like a lot your idea. and growing up with the dreams, would be nice to have a way to keyframe all the aspects of a timelapse (for example a keyframed interval time for acceleration/deceleration, or a keyframed combination of time and aperture, with a timelapse starting with sharp crips movements and ending with a long expo look, or again keyframing the focus or the white balance over time).
in my unexperienced vision, the most difficult thing about that should be to create a sort of guy for all that. whats about an external tool (a sort of timeliner capable of creating a script usable for magic lantern). so one can have a gui, set graphically the timelapse via keyframing on a timeline, export to a script, and load it in ml. in this way one can have a sort of templates with more behaviour. and last, for have a greatest control on the road, one can stretch the timline to a desired number of frames. for example i have a script starting with f1.4 and 1second, and ending with f6.3 and 30seconds time, and on the field i want that the duration of this timeline is 300shots.
it could be a precise and powerful way to program complex timelapses that i think for now are impossible also with the most pro hardware intervalometers
what do you think about it?
#80
ah però, scrax a anche nanomad italiani, e chi l'avrebbe mai detto :))

another italian here :D
#81
User Introduction / Re: Another frenchy is here :)
July 30, 2012, 01:56:26 AM
welcome :)
#82
hey guys, i like a lot this thread, and i find the new design proposal very interesting, especially the latest versions. And as i undersstood there's the problem of space. and i agree with alex about scrollbars, it's more functional to have all visible. So, what about using more than one menu for dividing features? that is what canon does in it's menu. So we can have 2 or 3 menu about shooting, 2 or 3 about video and so on. So one can divide the features in 2 or 3 or whathever you want windows. And, at this point, should be interesting that the upper menu, the main one with all the tabs, has the arrows to indicate that there are others menu on the right, or on the left if you are at the end of menu... i don't know if i was able to explain well because of my poor english.
Anyway, using this kind of way, should be interesting to use the color for the categories, so for example all the "photos related" tabs are green, all the "movie related" tabs are blue and so on.

Here is an example of what i mean. i really don't have though much about the colors to use, it's only an example:


Anyway, adding multiple tabs for the same category should be very useful in future, when the ml feauters will grow up so much to stay in the space that have now :)
#83
mine is 90k, and my camera is 1 year old... think that if i continue like this i have only some moths before remaining without shutter :\
#84
Share Your Photos / focus stacked bee
July 29, 2012, 10:32:45 PM
Hi guys,
here is a couple of pics taken using focus stacking funcion in magic lantern and then combined with combinezp software.


and speaking about focus stacking... any news b4rt? :D
#85
great work guys
#86
ahaha, in fact the music is perfect for this situation, really funny :))
#87
Hi Tom,
well done, i think the ml team will appreciate it ;)))
#88
General Help Q&A / Re: Cropmark issue
July 29, 2012, 03:27:59 PM
Hi Joe,
first, your image is not visible directly in the forum because a bad link, here is the image:
Second, i've tried that cropmark, and on my canon60d simply the camera crash (probably because of memory). So i've opened the cropmark in photoshop, appllied the correct palette, exported uncompressed, compressed with my .bat (here is the post where you can download it if you are on windows)
anyway, i've managed to have the same cropmark, but with the right palette and right rle compression. and now it works, at least on my 60d.
here is the cropmark i've done
let me know if it works
#89
General Help Q&A / Re: Dead pixel...?!
July 29, 2012, 02:09:41 PM
Ops, i don't know if it's magic lantern related, but the strange thing is that me too noticed yesterday, for the first time, a bunch of red or white pixels in a star timelapse. and they are still there. I've tried the manual cleaning procedure, and not only one time. But seems that these pixels are burned out :\ the strange thing is that i'm shure that pixels wasn't there only some day ago. I compared the shots of yesterday with the shots of 1 week ago (quite same shooting conditions, with black sky and some stars). And there was'nt.
I know in post one can remove them, but it's strange that they happens in the same time (they are at least 5 hot pixels really visible, and other less visible random distributed.
I'm a little worried about this, because if (and i hope no) magic lantern caused this, for example with some function that warm up so much the sensor or something like this, i'm scared that continuing to use it i will have an unusable camera in a couple of months.

I can add as observation that this morning i switch on the camera and the battery was drained out, it's the second time that i have this issue with ml 2.3, never had before. And i understood when it's happen, so from the next time i'll take care of detaching the battery when i know this could be. What i've done was to use intervalometer with behaviour "take pics like a crazy" and with a shutter time  of 30 seconds. So, on a certain point i've switched off the camera (in the middle of a shot). So probably the camera hasn't really turned off. result, the battery was completely discharged this morning (yesterday it was quite full) and i have all this hot pixels. The manual cleaning procedure dosen't work here :(
I don't know if this things are related, but probably if the sensor was active for all night long this time, and the other time too, i think it could be overheated and the pixels can be burned out for this reason.

here is a shot taken with the cap at 30seconds, as you can see there are a lot of hot pixels :\
http://www.bcaa.it/hotpixels.jpg
#90
@scrax: that's the point. You finally can keyframe all the lightroom stuff over the time and export directly the video. for me is better than afterfx for timelapses :))
if someone is interested here is a video of the new (no more free) version. Actually i'm using the previous version that you can download for free on rttimelapse site, but i think i will buy the new version soon because i love that new interface and all those new functions.
#91
Hi guys,
today i'm trying for the first time lrtimelapse
It's a very powerful software, that is used to set all you need about timelapses (like deflickering and other things, such as keyframing every aspect of the scene in time).
And i've tried it with a old bulb ramp that i've discarded because it was too flickering. And surprisingly the result with LRtimelapse is quite interesting. The idea behind this software is very genial, in my opinion. It is like a brain, that calculates all the parameters needed in lightroom frame by frame. Then it saves all this calculation in the metadata of files, and when back in lightroom, you only need to reimport the metadata et voilà, the timelapse is done. for me is amazing! :)

here is the video: http://www.flickr.com/photos/pedroscreamerovsky/7664015610/
#92
hi guys, i've gone forward with cropmarks :) started a new topic here:

http://www.magiclantern.fm/forum/index.php?topic=1752.msg5570#msg5570
#93
hey guys, today for me was the cropmarks day :))) i have new things for you:
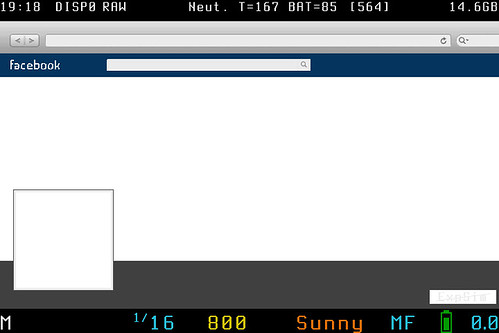
ive done a new cropmark for facebook, now with some facebook interface around, just to give the feeling.
and i've done an automated way for compress the cropmarks correctly, using the ruby script and a file batch (for windows).
I've managed to obtain a very simple way to use it. Simply put the .bat file and the .rb file in the same folder (not necessary the same of your crompark). Then, create your bmp cropmark following the guides on the wiki. The simply drag your uncompressed cropmark over the .bat converter i made. And the converter take care of using the ruby script for rle compression, deleting the uncompressed cropmark and renaming the rle into bmp. So you finish with the same image, but compressed in rle ;)

here is the zip containing the facebook cropmark, the script and the batch converter/renamer.

and this is the cropmark as it appears on ml :)


Enjoy ;)))
#94
wow, great work, i like it so much ;)
#95
Hi guys, i've already post this in another thread related to crompmarks, but i think could be useful to create a new topic about it here, in tutorials and creative uses. If the moderators think, can remove this or the other post, if not, better :)))

So, for who want to do by himself cropmarks in windows now i've discovered how to do that. This is because the file convertrld.rb is a ruby script (i'm not a programmer, so i was not shure on how the hell was this script, but with a bit seraching around found it's ruby). So, for windows users, you can install ruby on your pc, i've used this: http://rubyinstaller.org/

Then, after following the procedure already described very well in the ml wiki you simply have to do this:

1. when you install tell to the installer to add ruby in your global path
2. after installing, open a console using windows key + r and typing "cmd" (this opens a command prompt)
3. drag the .rb file in the command prompt window
4. put a space in the string you have on the cmd prompt
5. drag the .bmp you want to compress in rle
6. the script create a .bmp.rle file in the same foldr of your bmp cropmark. simply delete the original, rename the new one cutting the .rle and put it in you magic lantern cropmarks folder

enjoy :D

this is my first crompmark. I saw there's a lot of useful and fantastic and really professional crompmarks out there, so here i've done something different. This cropmark tells you the proportions of the facebook timeline cover and profile image. So in a single shot you can do a spectacular combination of cover and image profile. Simply shot, putting for example your face in the small square profile border, with a great panorama behind you :)
Then in photoshop you have to use this template and aligning/scaling your shot with the template. cut out the profile and the cover et voilà, a perfect facebook profile :))

if you need more info i'm here ;))
#96
i've already answered myself to my question. And for who want to do by himself cropmarks in windows now i've discovered how to do that. This is because the file convertrld.rb is a ruby script (i'm not a programmer, so i was not shure on how the hell was this script, but with a bit seraching around found it's ruby). So, for windows users, you can install ruby on your pc, i've used this: http://rubyinstaller.org/

Then, after following the procedure already described very well in the ml wiki you simply have to do this:

1. when you install tell to the installer to add ruby in your global path
2. after installing, open a console using windows key + r and typing "cmd" (this opens a command prompt)
3. drag the .rb file in the command prompt window
4. put a space in the string you have on the cmd prompt
5. drag the .bmp you want to compress in rle
6. the script create a .bmp.rle file in the same foldr of your bmp cropmark. simply delete the original, rename the new one cutting the .rle and put it in you magic lantern cropmarks folder

enjoy :D

this is my first crompmark. I saw there's a lot of useful and fantastic and really professional crompmarks out there, so here i've done something different. This cropmark tells you the proportions of the facebook timeline cover and profile image. So in a single shot you can do a spectacular combination of cover and image profile. Simply shot, putting for example your face in the small square profile border, with a great panorama behind you :)
Then in photoshop you have to use this template and aligning/scaling your shot with the template. cut out the profile and the cover et voilà, a perfect facebook profile :))

if you need more info i'm here ;))
#97
Hi guys, about cropmarks, i'm interested in do some of that. readed the guide, all clear, except that the correct way for compressing rle. This i because i have only windows, but if i understood well the only tool that works is the SztupY's "convertrle.rb". But it's for unix like os (i think). So there's a windows way to do the same? i've already done all the rest in photoshop, using the table etc.. and it already works, but if i understood well the rle compression is important, especially with 60d. Any hint/suggestion?
#98
Share Your Photos / some startrails
July 27, 2012, 02:01:43 PM
Hi all,
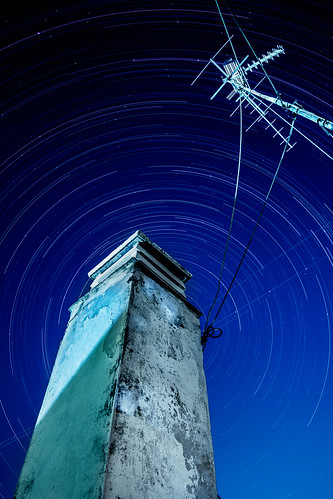
here is a 371 frames startrail. About 3 hours of real time (every shot is 30seconds, iso 160, f2.8).


Just for information, i've first processed the shots in lightroom for gaining the stars and lowering down the light pollutions in the sky, because i'm in rome, and there's no pretty skys here :))) than gived an overall contrast and saturation and applied to all my shots. Then i've exported in tiff, and opene with the great (and free) startrails:

http://www.startrails.de/html/software.html

after that i've merged manually with some masks and some layer blen styles in photoshop, between the trails and the first shot (so as you can see i have a not so strong trail and the pointy stars of the single shot visible.
and that's all :))

if you like it you can find the other startrails i've done here:

http://www.flickr.com/photos/pedroscreamerovsky/sets/72157628569216291/with/7655714546/


And just about intervalometer, i've posted some days ago, in the features request section, this post: http://www.magiclantern.fm/forum/index.php?topic=1628.0
about some new interesting features in intervalometer function.
In that post i speak about changing the interval between 2 shots dinamically in the timelapse (for acceleration/deceleration purpouses, for example).
But doing this timelapse, i thought that should be incredible if you can also change all the values during the timelapse. For example a great effect with startrails should be to start with a very open aperture (and probably with high iso) and fast time (to have pointy and bright stars). And then decreasing every frame the iso/or aperture and increasing the time. The result should be something like a startrail with a big start and a trail that goes tiny...
should be great to experiment :)))
#99
Feature Requests / Re: Onion Skin
July 27, 2012, 02:22:45 AM
I think it's a great idea (and for the 422 files too)

+1 :)
#100
ClicketyClick pointed out exactly the meaning of my question: is it possible to have lower iso than 100 (with conseguent less noise and better iq than the standard 100iso lowest value? but if i understood well, the answer is no, or better the lowest iso is a pull down of a more great value (160?)
And if it's true, is the image quality of 160iso the same of 100iso (i mean with raw shooting, the noise level is the same?)