Menu

Show posts

This section allows you to view all posts made by this member. Note that you can only see posts made in areas you currently have access to.

Show posts Menu

Topics - Roman

#1
Hey,

Firstly please dont rip my head off if this is an idiotic idea, I dont know tooo much about audio but just had a random thought about audio and gain control. :)

People hate AGC, why?

Because it's automatically adjusting, and often not how you'd like. Once it's recorded, you've got no idea how loud it 'should' have been.

So first thing that comes to mind is turning the bloody thing off haha.

But I was thinking, what if there was a way to make the AGC aim to instantaneously normalise every volume to say 75% volume of what the mic can do... BUT the difference being that it datalogs the gain 'offset' required to get the audio to this level.

So something that would normally clip, records at 75% volume. Something that would normally be a pin dropping, records at 75% volume. So it would sound terrible, but the idea is that you post process this to use the 'offset' information to make the pin dropping super quiet again, and the clipped parts really loud again. But you never have to worry about clipping or signal:noise ratio being awful.

Here's a very poor visualisation of what I'm thinking.

First picture down is how you normally record... Volume goes up and down with recording.

Second picture down would be the "75% goal" AGC turned on.

And then third picture down would be the 75% goal AGC post processed into an 'HDR' audio file.


#2
Hey,

So in the Canon menus you can set the exposure to adjust by either 1/2 or 1/3rd of a stop per click of the dial.

However! There are a few situations where having slightly finer control over the shutter speed would be beneficial.

Panning shots with motorsport, generally I start at about 1/100th of a second exposure time and then dial it up or down to suit distance from the vehicle, vehicle speed, etc.

However the jump from 100th to the next setting up or down can be quite significant, in terms of how much motion blur is in the picture. So sometimes I wish I had finer control.

Is there an ML option to somehow temporarily set the camera to increase/decrease exposure time in 1/10th stops or similar?

Or another option, is there a good way to take 3 shots at differening exposure lengths, say 1/80th, 1/100th, 1/120th while compensating exposure or aperture to keep the same brightness as the first shot? It would be handy for dialing in initially, which shutter speed suits best.

It's probably something that can be acheived already, but I'm not sure which combination of features would allow for it.

Apologies if this is a repeat or annoying question, I've used ML extensively over the last year or two but have not seen a combination which can acheive the above.
Thanks,
#3
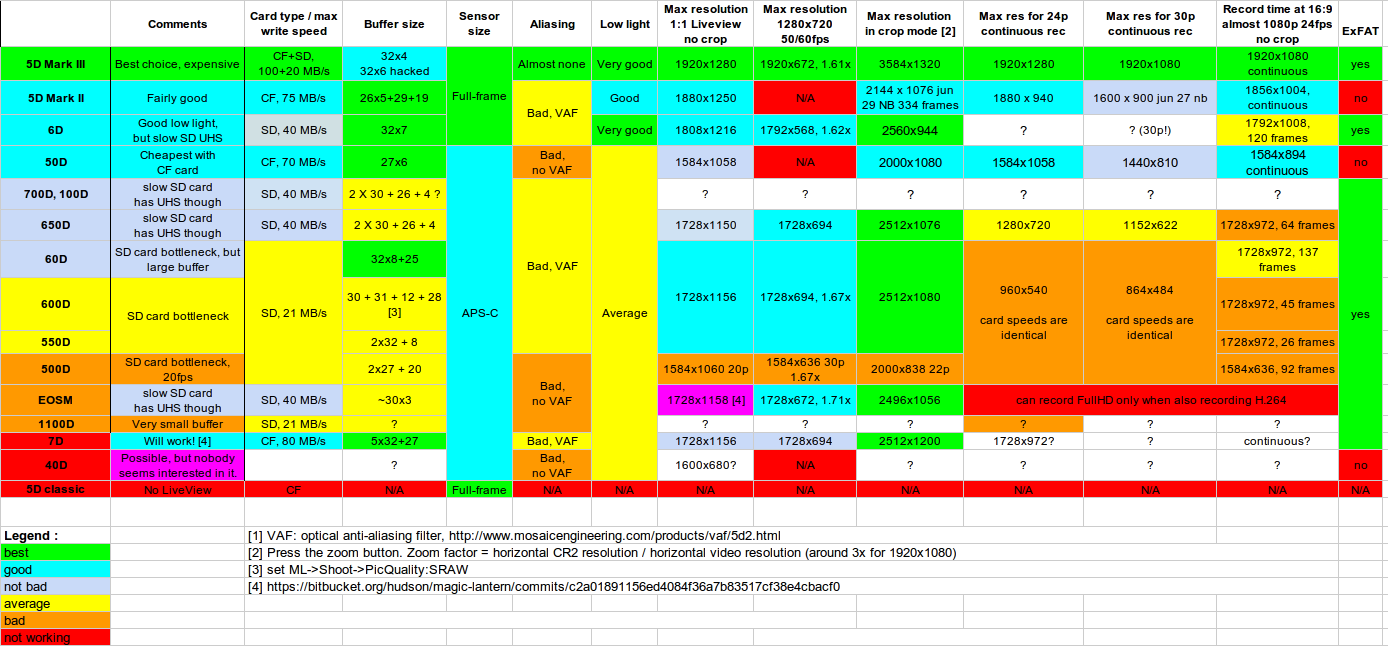
Hey, I thought I would put together a quick comparison of where things are currently at with raw video for each camera type, and what the comparative upsides/downsides/limitations/strengths/etc of each are.

I've listed them top to bottom, of which to my understanding are currently the best options.

Here's a google docs version that you can edit:
https://docs.google.com/spreadsheet/ccc?key=0AgQ2MOkAZTFHdFFIcFp1d0R5TzVPTVJXOEVyUndteGc#gid=5

Note:  The image below is simply a screenshot of the chart, and may not contain updated accurate information.  Please visit the link above for the latest updated chart.


#4
Feature Requests / USB port mic on the 50D?
June 03, 2013, 09:58:34 AM
Hey, Just following somewhat on the train of thought from this topic:

http://www.magiclantern.fm/forum/index.php?topic=5915.msg45075;boardseen#new

It seems it's possible to transfer data to/from the camera via USB port in non ordinary ways.

Soooo, being a new found 50D owner, the natural conclusion...

The gopro camera has a cable that converts its mini USB port into a mic jack:

http://gopro.com/camera-accessories/3-5mm-mic-adapter

If using a battery powered 3.5mm mic, would it be possible to stream the info from it into the camera in a way that would be useful to gain audio/wav file record? Or even just a very basic audio data or some sort that could be comprehended in a way to make it good enough to synch an external recorder with.

I realise the 50D has the same digic processor as other cameras, but does this handle the audio component too, or just image processing? I think I recall someone saying something about seperate audio chips for various cameras.

Obviously the 50D has the most to gain from this possibility, but it could also be handy for other cameras having a second audio input/output if that helps with monitoring or whatever perhaps...

Yes, I have checked the "Dont ask for this/not possible" thread first... If this gets added, so be it :)

If it seems somewhat possible-ish I can find the pin outs for the gopro cable etc if need be.

Thanks.
#5
General Chat / Bit rate - the new camera currency
June 02, 2013, 04:09:02 AM
When I was growing up as a kid, it was (comparatively) expensive for the average family to take photos...

People used to only take some pictures unless they were really sure that it would be worthwhile.
The average kid probably had maybe enough photos of them to barely fill an album, from birth to their 21st.

If you were at a beach, you'd only think about taking a photo of a sunset if there was a supermodel mud wrestling party going on, with dolphins jumping out of the water, and some biplanes having a dogfight over the ocean.

Now with no cost associated, you might see someone upload 500 completely rubbish photos of a party they went to, or 100 photos of a bland beach on an overcast day.

The removal of any cost has also removed the minimum quality requirement.

In some ways, the removal of 'cost' has affected video too - I can chuck 5-10 $10 8gb SD cards into a bag, some spare batteries and just film the hell out of anything in H264, because I can.
24fps, 30fps, 60fps, whatever I want for whatever reason (or not)

With the raw video, one thing that I think is really great... is that it's reintroduced a form of currency/cost back into the equation in a similar way that there was for film.

24fps isnt for the sake of artistic mimicry of a film camera - there's a very real reason in both on site shooting and post processing to stick with 24fps. If you want/need to go to 30fps or stretch to 60, you'll need a reasonable justification to offset the downsides of doing so, and will have put thought into why it's wanted/needed - same as if you were paying for each frame of film to be processed.

Since I've been playing around with raw video on 50D (where I've only got one 16gb memory card, and cant delete things on site) I've learnt to be a bit more frugal with which shots I am planning to take, on account of the above limitations.

I've noticed that I've put a little more thought into how a shot has been composed, because I really didnt want to waste what little space I had haha.

In the same way that Italians came up with a bunch of brilliant food because they only had tomatoes and pasta to work with - I'm looking forward to how the new found limitations of the medium of raw video helps shape the creative process into new directions.

There's always been a chip on peoples shoulder about trying to make things look 'filmic' (I hate this word) however now I hope things will branch away from this mindset with the new found creative control over the look and feel of shots which are now possible. There have been some reallly stellar looking test videos, I'm looking forward to seeing some raw video implemented into projects as it matures.
#6
ML features are ever expanding! And it can be a little overwhelming for new users.

So I was just wanting to hear some opinions on a general guide for best standard practice / starting point for filming with a 600D for giving the best scope for adjustment etc in PP.

Was thinking along the lines of:

-Set to 1080p, 24fps or 30fps as desired

-180 degree shutter speed

-ISO 100 if possible

-Neutral or flat picture style (If the total scene is within the dynamic range without a flat profile, are you better using a normal one?)

-Set sharpening, contrast, etc to zero

-Auto set the white balance? Does this matter much if this is a little off, if doing PP?

-Does ETTR mean anything useful for video/non raw? Or best to expose 'correctly'?

-It seems to be in debate currently, are there any tangible benefits to increasing the bitrate?

I've probably missed a thing or two, but you get the idea.
#7
Since the bitrate is consumed by movement or detail, and the normal 720p 60fps mode leaves a bit to be desired quality wise compared to 1080p...

How about adding black borders around the frame of a video taken at 1080p, with the idea of cropping it to 720p in post?

(So the video would only effectively be captured in a smaller square in the middle of the frame)

I would assume that the completely black border will consume little/none of the bitrate, leaving whatever bitrate you have for concentrating on the 720p centre portion rather than spreading a given bitrate thinner across a 1080p full detail frame.
#8
Share Your Photos / Moonlight Gannet Colony
October 30, 2012, 10:18:54 AM

bigger:
http://iforce.co.nz/i/elwr5hy0.yyt.jpg

13 second exposure at ISO 100 and F1.4 with a Samyang 35mm.

Dont think I could have taken this pic half as well without some of the ML features!

-Used the FPS override set to 5fps, and LV display gain to focus correctly in the dark. (as it was dim moonlight only)

-Used HDR picture mode as exposure bracketing to quickly get a picture with the exposure levels I wanted, while spending a minimal amount of time out in the cold smelling like rotting fish and gannet poo  :)
#9
Share Your Videos / Snails Pace - Time lapse
October 23, 2012, 01:32:05 PM


Was out taking some photos of some boats, and just about stood on this little guy...

Then thought it was kinda funny that cars on the motorway at 100kph were just meters away from one of the slowest things which was on its own journey home too... Just on a different scale of distance and time.

Pretty narrow depth of field at F1.4 that close, so was pretty happy that the Snail kept going in a straight line over that distance haha.

Set the FPS override function set to 2.5 FPS down from 24, and fired away... too easy!
#10
Hey guys,

Took some footage yesterday in varying light conditions, where I'm at the mercy of natural lighting.

Panning with a fisheye lense means that there's no way I could use any additional lighting or anything without it being in the shot (not that I've got any, haha)

And generally was optimising towards the lowest shutter speed possible, for maximum detail on fast moving objects.

I've been trying a few different things to make the colours look natural/good, but not quite there yet.

Shooting in the 'neutral' picture style with a few different lenses on a 600D

(mainly Kit 55-250mm, Samyang 8mm, Sigma 24mm F1.8 )

In Sony vegas loading:

Colour curves, Brightness and contrast, Sharpen, saturation.

I've generally adjusted the brightness slightly up or down to suit, sharpened it, and then eyeballed saturation and colour curves so it's not too blue (As I probably had whitebalance orienting towards blue while shooting, woops)

However I've not managed to find something that looks good, and if I'm using the fisheye lense or the stock lense, they seem to give slightly different colouring to start with.

In the footage below the colouring etc isnt consistent between clips, because I've just still been trying to find a 'look' that I like. Then try to make the rest of it consistent with this when I'm happy with something.

I think at around the 25 second mark is what has come out the best so far...
Although I realise that shooting into the sun, away from the sun, in overcast etc its not going to be possible to make it completely consistent I guess. Will keep this in mind for next time.

Is 'Neutral' good to use, or are there alternatives which are better? I dont have any 3rd party picture styles loaded, thought I'd try get my head around the normal ones first.

I'm also thinking I might try 1080p next time and ditch the 60fps in favour of better clarity etc.

If anyone can impart some of their knowledge and experience for some good ways to shoot initially or grade colours afterwards, or any other constructive advice it would be much appreciated!

Thanks

http://www.youtube.com/watch?v=tYC6N7Fzz7U
#11
Hey,

The Auckland Harbour bridge is a bit of a local icon, and cliche for aspiring photographers ;D

However ML helped out heaps to get a great shot!

Rather than the viewfinder I used Liveview, with a cheap 3x magnifying loupe so I could make use of some ML features to help out.

This way I could use Zebras, Focus peaking, and 10x digital zoom to get a really nice clear picture.

Since it's a stitch of about 20 photos it's important to have the tripod level, and I dont have a levelling bubble.
So I used the ML crop mark 'crosshairs', to setup my tripod with a few quick test pans, which worked great.

Preview:


Picture below, warning is just under 5mb:
http://iforce.co.nz/i/ejxyz5il.rx1.tif

Thanks to the ML team for the hard work towards these great features to make nice photos easier to take.

Also used Hugin for the stitching which I highly reccomend, it's great.

Taken with 600D and 55-250mm kit lense, ISO 100, F7.1, 8sec exposure.
#12
Feature Requests / [brainstorm] Digital clapper board
September 26, 2012, 10:16:15 PM
Hey guys,

While filming at a race track I can leave audio recording for a long time without worries, but start and stop a lot of short clips as particular cars etc come past, for maybe 20-30 secs per shot.

If I leave the in camera audio turned on, with current SD cards I can shoot at 1.2x bitrate, turned off 1.7x bitrate.

I've got an external audio setup that works well, but have been thinking about how to sync a lot of small clips to the audio if I had sound disabled to enjoy the benefit of increased bitrate.

So obviously what's required is a way to leave a 'mark' on both the audio and video to denote the start of each shot. Using an actual clapper board would be inconvenient for a lot of short shots.
Especially so if the Mic is intentionally mounted away from the camera to avoid camera noise or cameraman farts etc. :)

So I was thinking of a few ways to implement this for the video portion:

1. Have the ISO cranked right up for a set amount of frames that increases with each 'take'
e.h. shot 1, first 5 frames are cranked to max ISO, next shot first 6 frames, next shot first 7 frames, etc. Similar to how HDR mode works, but only adjusting ISO right at start of clip in a predetermined way.

2. Have ML overlay some text onto the video at the start, if that's possible? Take 1, take 2 etc? I guess just relating back to the .mov filename could work just as well.

3. Have an LED or laser pointer that is out of the shot, but visible when turned on, that flashes x amount of times to denote which take it is (will require a basic circuit board to activate, generate beeps as well, totally external to ML)


And some audio trigger ideas:


1. Wire up an external flash trigger as a trigger for a small speaker/beeper when starting a vid?
Not sure how these work, might not be cost effective to butcher a flash trigger for this.

2. When monitoring Audio, people cut up the AV cable, would it be possible to blip something down through one of the other video monitoring wires to trigger a speaker to make a beep? Or just use the unmodified AV cable audio output to trigger a small beeper speaker perhaps? Since headphone monitoring on camera isnt required if synching to external mic.

3. Use a wired remote trigger, that when starting to record video has a split cable that runs off to a basic circuit that does a simple (last amount of beeps+1) output near the mic that could somehow correspond to the video.

I'm beyond useless with electronics and what not, but my Dad is pretty handy with these kind of things if I can salespitch him with a well thought out plan. :)

Anyone got any thoughts on the above?

Although this is in the 'new features' forum it could potentially be a hardware solution that works well, just wondering what other ideas people had which could help.

Thanks.
#13
Hey guys.

Just something I've been pondering. What are some examples of actual use of live audio monitoring, in a way that you find doing so useful?

When you're listening to the live sounds, you cant hear if it's clipping, you can only see that via tha bars on screen anyway so seems more worthwhile to monitor that.

I can see the benefit of using it to set up initially, I just dont understand the benefits of continuously monitoring through a shot.

I can understand if you're using a narrow focus shotgun mic or something, but I cant see the benefit of sitting there with headphones on listening to... whatever?

I've got an external audio setup, I'm incredibly novice admittedly, but I've found once it's set up initially there's not much more that needs doing.

Perhaps as per above it's a lot more useful with a shotgun mic compared to cardioid pattern or 360 degree pickup.

Can anyone here can give some examples of their process for continual monitoring audio, and how it benefits them.

As I feel there might be something I'm missing!

Thanks.
#14
Feature Requests / Depth of field reporting
September 07, 2012, 08:10:46 AM
Generally when I'm taking pictures or shooting vid, I pick the settings I think will be appropriate and then check to see how the depth of field etc 'looks' in the camera and adjust from there. (I'm guessing most people do the same)

However I've got some upcoming scenarios where I want a specific depth of field ahead of time, as I cant afford to spend the time configuring the camera on site but need it to be right.

Like for example, which of my lenses can give me a 3m depth of field 20 meters away from the camera?

I found this really handy site:

http://www.dofmaster.com/dofjs.html

Which has some great calculations and tables etc.

Now what I was thinking, is that doenst the camera already have all of the necessary variables available to do these calculations?

(So long as you're not using a manual lense)

It would be fantastic to be able to have your DOF reported, even if it was just a calculator that couldnt run from the lense info.

Anyone else got any thoughts on this? I think it would be great to have some quantifiable units, rather than mashing the apeture up or down.

It would be a damn handy replacement for having to prepare a little chart or graph to figure these things out on site!
#15
Hey,

Just thinking about how with ML you can format the card, and opt to reinstall ML afterwards.

I know it's a different kettle of fish when the SD card door opens, but would it be possible to store some information in a buffer somewhere about what settings you've just been using in ML, so it translates across to another SD card?

This is the scenario I have issues with:

-I have 5 8gig SD cards, as this was the most efficient way $$$ wise to get that much space, and 8gigs is big enough for any one thing that I've done so far.

-If I fill up one of my SD cards and load the next one in, ML defaults to the settings last used on that card, rather than what I've just been using prior to switching the card over.

It would be great to be able to retain my last used settings between card swaps!

However I can also imagine that's a lot harder than it sounds, if there's some sort of shut down that happens as soon as the door opens.
#16
Hey,

Using a 600D with the APS-C sensor.

My understanding is that the sensor in the camera is 18 megapixels, 5184x3456.

However when shooting video at say 720p, the video resolution is 1280x720. Just under a quarter of the width across.

In order for the sensor to produce the smaller sized image, instead of using 5184 'receptors' across, it might use say every 4th one instead to give an image that's a smaller width, and downwards for height. (Sorry not sure what the right word is for the individual elements on the sensor)

An 18 megapixel photo will be taken wih the sensor operating like this:

(where an asterisk represents part of the sensor in use)

_____________________
|********************|
|********************|
|********************|
|********************|
|********************|
|********************|
|********************|
|----------------------------|

However for video it's using the sensor like this:
_____________________
|*  *  *  *  *  *  *  *  *  *|
|                                    |
|*  *  *  *  *  *  *  *  *  *|
|                                    |
|*  *  *  *  *  *  *  *  *  *|
|                                    |
|*  *  *  *  *  *  *  *  *  *|
|----------------------------|
The problem being that the spacing of the receptors being used is one of the contributors of the aliasing issue.

However, when you use digital zoom, is it effectively working like this instead?

_____________________
|                                    |
|                                    |
|           *******            |
|           *******            |
|           *******            |
|           *******            |
|                                    |
|----------------------------|

If so, would this reduce the aliasing issue?

Does this also mean that there's no quality loss in buying say a 20mm lense and using it with digital zoom instead of an 80mm lense?
Obviously you cant make the depth of field etc work the same.
However it is true, it's definitely worth considering when picking lenses for filming, vs how you'd pick lenses for photos where the digital zoom isnt worthwhile.

Although it would obviously be nicer to have say a 35mm and an 80mm lense, I'd rather spend $$$ on a good 35mm (or there abouts) prime and fake it as an 80, rather than the same money on two lesser equivilents if the 35mm is what I'd be using 90% of the time.

My favourite lense that I have  is a Sigma F1.8 28mm prime, thinking I'll have a play with it tomorrow using the digital zoom and see how it works out, might be able to wring some extra milage out of its usefulness.

I wonder what a particular lense becomes an equivilent field of view angle to, when using 5x or 10x zoom.
#17
Hey guys,

Given that I've got a limited budget for camera gear (who doesnt) to me it makes sense to pay $$$ for the things I cant make myself (like fancy lenses/glass) and not spend $$$ on things I can probably hobble together myself.

Had the day off work today, so thought I'd put together a basic camera rig to help with my otherwise parkinsons-esque shakeycam shots.

Consists of:

-Some wood and 12mm ali rod from the local hardware store as crossmembers/runners
-a plastic lunchbox for the base of a matte box (need to build shades yet)
-a smaller plastic box for a matte box for the liveview screen
-12mm rod with a ground down nut bashed into the end, + some hoseclamps that they wind onto as a basic follow focus
-Aluminium U section to attach to the tripod.
-A can of matte black paint

Apologies for the bad pics, lense was stuck on F1.8.


Will spray the whole thing matte black when more or less finished, so it passes the '10 meter rule' for not looking ghetto  ;D

I cut and drilled about 6 of the wooden crossmembers, so if I think of other stuff that might be useful to add later its all modular.
I can take bits off and add bits on to make it a shoulder mounted rig, or on tripod, etc.
So still a few more bits to do before it'll be useful for much.

Even so, it's cost me about $40 worth of materials so far, vs an equivilent off the shelf rig that costs $450 or so here.

Need to practice focus pulls, it isnt easy!
I've got a good idea for making some stoppers for the focus 'arms' though, will see how that goes...

Anyone else here made anything DIY for a camera setup?
#18
Hey guys,

First of all I'd just like to say that if not for Magic Lantern, I'd have not bought a DSLR.

I had in mind that if I was going to spend $$$$ (comparatively) on a camera, it would need a minimum amount of features such as timelapse, which none seem to have out of the box... Found Magic Lantern, bought a 600D and life has been grand  ;D

Okay, so one thing that I want to acheive this year, is to make a good quality video about taking my racecar to the track, racing around, the social side of it, etc. As well as a timelapse or two and a few of Magic Lanterns other fun features.

My plan so far is to record with:

600D with 8mm Samyang fisheye lense, stereo shotgun mic.
This will be mounted in the car looking out the windscreen / view of driver, will record at 720p 60fps.

Netbook with a 20hz GPS receiver and software, a webcam connected recording at 640x480 30fps for a picture in picture view of perhaps the pedals/drivers feet.
The audio portion of the webcam video will be with a Blue Yeti USB mic in a secondary position to capture engine noise, or exhaust noise or whatever.

A Contour HD modified to recieve an external mic input, this could possibly use the headphones output of the Yeti mic as the input, or put the shotgun mic on this and use the standard Canon audio.

So I'm pretty much sorted for what I want to do with the above I guess, but there are some other segments I am planning to shoot where I am torn between aiming for 1080p or 720p.

Since there's a maximum bitrate for the camera (is this before or after compression?) is there any picture quality to be gained by shooting at say 720p 24fps over 1080p 24fps? Would less colour detail etc get compressed down by the codec, if more data can be allocated to each frame? Or is it not likely to make a difference?

Since some portion of the video will be 720p anyway to get 60fps, I figure I'll aim for this for the rest, if it's a case of post codec quality advantage vs pixel count.

If anyone can help, or perhaps has any hints or tips for shooting in car / out of car automotive stuff, I would greatly appreciate it :)