Menu

Show posts

This section allows you to view all posts made by this member. Note that you can only see posts made in areas you currently have access to.

Show posts Menu

Topics - rainless

#1
General Help Q&A / 5D Mark II Double Exposure
November 03, 2016, 04:24:11 AM
Hey! Long time no see...

I'm thinking about picking up a 5D Mark II tomorrow. I'm wondering if ML has a way you can do Double Exposures like you can on the Fuji cameras (i.e. You take one photo... move the camera a little... and take another one and it saves it as one image?)

Anything like that in Magic Lantern's bag of tricks?

(And also... Should I just get a Panasonic GX85 instead? Same price...)
#2
Well this is it... I told you guys that I'd been working on a Kickstarter campaign this whole time.  Well it's finally here.  I wasn't able to do nearly as much of it in RAW as I'd have liked due to time constraints... and for reasons that are pretty obvious, I had to switch (sell one, buy another) microphones in the middle of production and deal with shipping delays... but this is the long-promised Kickstarter video.


Equipment: Magic Lantern Nightly (one of the March builds)
Canon 600D
Sigma 30mm 1.4 lens
Canon 55-250 lens (MKI i believe)
DSLR Controller AP
TP-LINK TL-MR3040 Portable Router (to give my 600D wi-fi)
Veedion shoulder Rig
Rode VideoMic Pro (sold in the middle of the project).
Rode NTG2 (wish I started the project with this.)
Sony PCM-M10 Field Recorder (Best in the bidness.)
Elinchrom D-Lite 4 400 watt lights

Probably all kinds of other stuff... there was a LOT that went into the making of this project.

If you're interested in checking out the project itself... just follow this link:

https://www.kickstarter.com/projects/2036808210/the-worlds-1st-democratic-radio
#3
I've shot about half a dozen videos using the March 26th version of ML.

Somewhere north of 80 percent of the mlv videos I shoot have pink frames in random places... and the .raw videos do not.

Is this common... or is this just a thing I'm having?
#4
Duplicate Questions / Replacing SD card controller
April 07, 2014, 12:55:37 PM
Has anyone attempted to just crack open their camera (or maybe one of the cheaper ones), break out the old soldering iron, and replace the SD card controller with a similar, but faster model? (such as this http://ww1.microchip.com/downloads/en/DeviceDoc/224x.pdf )

I would imagine temps might be an issue... but other than that it doesn't seem so tricky to do. Especially if you're rocking the same brand of controller. Granted this is more an engineer thing than a programmer thing...
#5
(DISCLAIMER: This post is going to take a LOT of time to put together. Maybe an entire month... but I'll try to make it worth it.)

I've been really sort of BAFFLED by a lot of really well-known, professional photographers as the stumble and bumble their way through attempting to get great images out of RAW video.  I'm talking about people like Dave Dugdale ( https://www.youtube.com/watch?v=rAgPaiLgeE4 ) and Phillip Bloom ( http://vimeo.com/73259922 ). 

People with a LOT more money and experience than I have.

I look at these videos and think: "What the hell are these guys doing?"

Dave Dugdale even says he spent half an hour trying to color what looked, to me at least, like a pretty straightforward shot (it's in the video above). He then asked a professional colorist to look at it and that guy nailed it in two minutes.

My background is in videography and post-production editing. I've been doing that for 17 years and I've only been doing photography professionally for about 8 years. So I would've given guys like Bloom and Dugdale every advantage in the world over me when it comes to RAW video because it plays to all their strengths as professional photographers (who also do video). Instead, what we have is akin to Zoolander.

So... without further adieu... I'm going to write a guide to Color Grading, Color Correcting, and breathing life into your RAW videos.

Before I get into in-depth Camera Raw/After Effects stuff, I figured I'd just throw a simple ground rules out there.

1. Color grading starts with White Balancing.

Forget about how much blue, magenta, or green you need in each image.  The first thing you need to do for your editing software is help it define what WHITE is. For Camera RAW this is simple: Just select the White Balance tool and click on something "white" in the image. DONE. It will neutralize, not only whatever you click on, but the entire image.  You can start building up colors from there. If there is nothing white around when you're shooting video, it could be helpful to have a white card somewhere in the first frame so you can use that to balance and then take it from there.

2. Find out which color is overdone

Easiest way to do this is, again, with a white card... or somebody's white shirt, the white of someone's eyes. Just LOOK at the image and see what color is overpowering your shot. White balancing will automatically minimize that color, but it's important to at least identify what that color was so that you can go through and find points that were missed or kick that color back up if it gets knocked down too-far.

3. Sit WAY back from your image or video and compare the colors in the image with the colors around you

I like to do this on a laptop... maybe in the park. Your images should look as close to the real world as possible. (Unless you're making a sci-fi movie... and even then...)

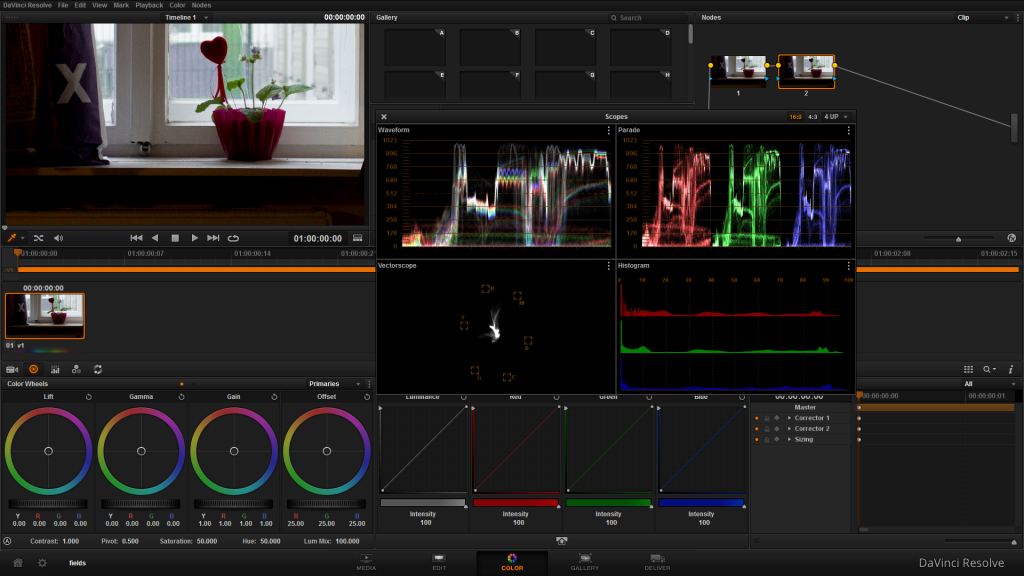
Here's the first image we'll be working with. This is just something I threw together in a few minutes just to explain the process. This was a crop mode .mlv from my 600D at 1280x720, 23.976 frames a second. This was converted to DNGs using MLVRawviewer, and then imported into After Effects (I'm in Windows 7). There I applied white balancing and minor corrections as outlined above. Then I exported an .mov and opened it in Resolve.


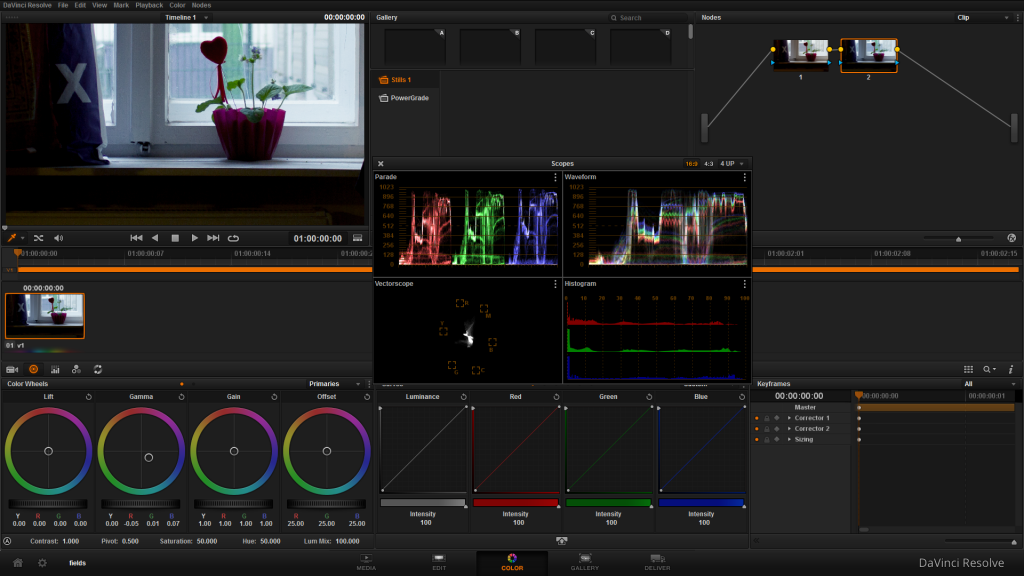
Here I should talk a bit about "warm" and "cool" colors.  For simplicity's sake we'll just say that I love the way the flower looks, but the rest of this image is too warm because there's too much red.  Without any effort at all (and in the most ham-handed "Your ass is blind if you can't see the difference) way possible, I just grabbed a color wheel and moved the gamma closer to the blue.


What you have now is a much "cooler" (more blue) image that more faithfully reflects the chilly morning that I recorded it. But also the flower no longer looks good.


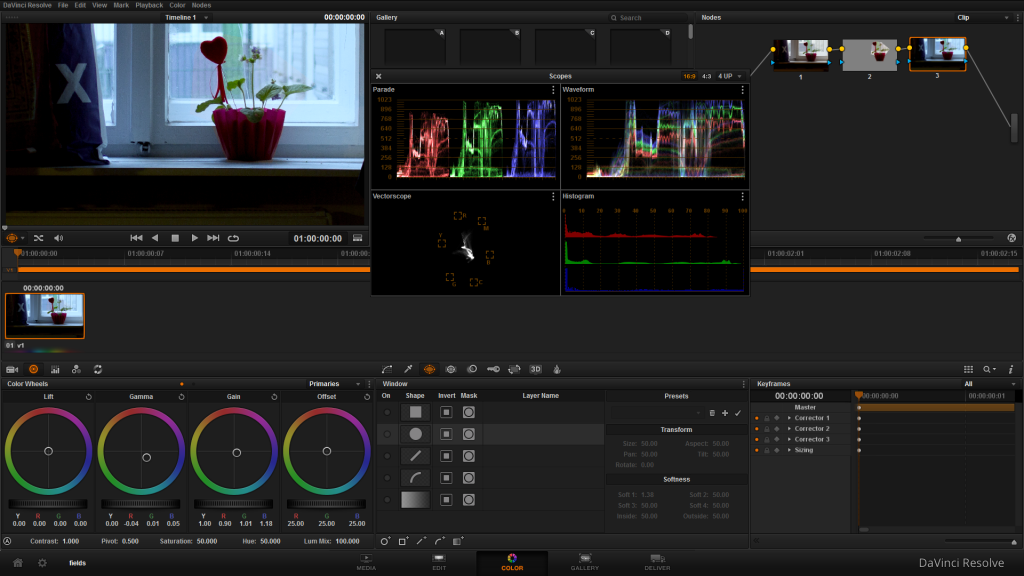
So I just added another node with a mask over the flower (best, mask, system, EVERRRR!) and boosted only the red of the flower (I could've also masked out the flower and done the blue there.) As you can see it's not a very detailed mask at all. But you've got the cool blue in the rest of the image and the red of the flower is back.

And the whole thing took ten seconds to do.

Now look at the scopes.  I know, if you're not familiar with looking at this sort of thing then they probably look like something out of The REAL Ghostbusters. (Handing out points to anyone who knows why they were called that...) A good way to think of it is those solid lines you see at the bottom, middle, and top of the scopes. The bottom would be the shadowy parts of the image. That solid line at the bottom should be are ZERO (0). If it's higher than that then you need to lower it. Most of the time, when you're shooting raw video on these Canons... it will ABSOLUTELY be higher than zero. But that's relatively easy to fix. You just spin the first "Color Wheel" in Resolve. To control the midtones you use the second  wheel and to control the highlights you use the third wheel. I'm still working on my Kickstarter video so I don't have time to show you how that's done... but I did find a guy who is (sadly) less busy than I am... and HE had the time!


Now you can tell in our flower pic that the shadows are fine and the midtones look okay... but the highlights are clipping! What this means is that if you upload or send your video somewhere COMPLETE AND UTTER CHAOS will ensue (like when that guy that did the Africa video who got mad at me uploaded his video to youtube and the white stripes on the zebra were suddenly yellow). All you have to do is bring the highlights BACK down to earth and you're back in business.

(Have to get back to work. Be back in a bit.)
#6
Raw Video / 2014: NEW Current Raw Capabilities
March 28, 2014, 04:16:35 PM
It seems like the newest threads about RAW video are all from 2013. (Particularly the thread that lead to me getting into RAW on my 600D) How about a simple list of the CURRENT current state of RAW video for people that just got here?

Here's my understanding (and you can correct me if I'm wrong on any of these...)

1. raw_rec has actually fallen out of favor and more people now use mlv_rec (also known as RAW 2.0)
2. mlv files can be converted to DNGs with mlv2dng ( http://www.magiclantern.fm/forum/index.php?topic=7802.0 ) or newer tools like MLRawViewer ( http://www.magiclantern.fm/forum/index.php?topic=9560.0 )
3. If you have any camera from the 500D to the 600D then it really doesn't matter how fast your SD card is (as long as it's at least 45mbs) because all of those cameras are limited to a 21mbs write speed.
4. RAW settings (whether MLV or RAW) are no longer reset everytime you restart your camera (although if the camera isn't shutdown properly, modules are still not loaded on the next boot.)
5. Pressing the zoom button one time will give you ML Grayscale preview  and twice will give you a full color 10x zoom
6. Your data transfer speed appears at the bottom of the screen when recording raw (along with lots of other useful information.) With my 16GB 45mbs Sandisk Extreme I get a consistent 20.5mbs transfer speed at 960x544.
7. The transfer speed for each resolution is listed at the bottom of the "Q" menu in the Movie section of ML under both "raw" and "mlv"
8. Bootflag can now be disabled on the 5D MKIII! http://www.magiclantern.fm/forum/index.php?topic=11017
9. Oh... and this cool tip will ABSOLutELY save your ass: How to open up After Effects, Adobe Camera Raw (because I hate acronyms) on ANY frame - http://www.magiclantern.fm/forum/index.php?topic=5683.msg43962#msg43962

Quote1) go to your project browser, right click the footage and select Reveal in Bridge.

2) Instantly Adobe Bridge pops up with your sequence and you can highlight the whole lot and right click then select Open in Camera Raw.

3) Now you can select any frame on the right hand side, then click Select All, and then perform your adjustments. When you are finished, click "Done".

4)Then all you have to do is right click the sequence in the project browser and click Reload Footage and BOOM - behold your adjustments ;)

10. Under the "RAW Video" Movie Setting in the ML (press Q) you can select the preview setting. (I'm not sure what the cropped image that in standard in MLV  live view is... but ML Grayscale is what you actually get in the final RAW file. Thanks to a1ex for providing the scoop). http://www.magiclantern.fm/forum/index.php?topic=5441.0

QuoteNote 6. Canon preview is standard full color, ML Grayscale is in B&W and also shows the video in its final cropped view (used for framing), Hacked is special fast hack to increase card writing speed at the expense of freezing Live View.

11. About sRAW (a note from a1ex):

Quote from: a1ex on April 03, 2014, 08:39:15 AM
sRAW:
- causes corruption on both GUI and captured picture (at least on 550D)
- judging from the kind of corruption, the side effects could be worse (hint: Canon code does not use memory protection)
- valid code for one camera can soft-brick another camera (that is, ERR70 even after you remove the ML card, but recoverable)


12. Unbricking the camera: Well you've ruined everything... What now? - http://magiclantern.wikia.com/wiki/Unbricking

13. Tip for making Compact Flash cards more reliable:

Quote from: Midphase on April 04, 2014, 06:42:41 AM
One of the things you could do is enable the Card Warm-Up option. Sometimes CF cards need to have data written on them a few times before they get up to full speed. Not sure why.

RAW/MLV file conversion

(The file you get after a successful shoot is either a .raw or a .mlv file which can be converted using one of the following programs.)

RAW2CDNG The best program of them all! Cooks you breakfast! http://www.magiclantern.fm/forum/index.php?topic=5618.0
MLV2DNG (my favorite) - http://www.magiclantern.fm/forum/index.php?topic=7802.0
MLVRawViewerhttp://www.magiclantern.fm/forum/index.php?topic=9560.0
RAW2DNG (Mac, Win, Linux) - http://www.magiclantern.fm/forum/index.php?topic=5404.0
OS/X gui wrapper for RAW2DNG - http://www.magiclantern.fm/forum/index.php?topic=5508.0
RAWmagic (OSX) - http://www.magiclantern.fm/forum/index.php?topic=6218.0
RAWanizer - http://www.magiclantern.fm/forum/index.php?topic=5557.0
Cr2HDR - http://www.magiclantern.fm/forum/index.php?topic=11056.0
#7
Hi everyone.

I've been using the 600D nightlies since the 21st of March and, for some reason, "sRAW" does not appear under "Shooting" or "Shooting Preferences."

Anybody have any idea why that could be?

(raw_rec and mlv_rec and every other setting appears to be fine... even Arkanoid is present...)

Is sRAW simply deprecated now? (I believe the posts I've been reading that mentioned it are from 2013...
#8
General Development / Nikon WU-1B on 5D MKIII
March 25, 2014, 11:08:13 PM
Hi.

I'm mostly an Android and iOS developer. But i recently worked on a few dslr apps and it got me thinking...

...why not create a module or script that would allow Nikon's cheap WU-1B to function on the 5d3? *or any magic lantern canon for that matter...

I already have source files from my nikon app... it seems like a simple matter of convincing the adapter that it's connected to a D600.

Any ideas on where I could start? (don't know much about lantern dev...)
#9
Maybe this is just really... REALLY hard to do... but it would be nice.

Also it would be great if there were a way to disable Exposure Sim for the 600D-
#10
You can go a long way with just a camera and a handheld reflector.  You can get even farther with a camera, a speedlight, and a reflector. But to really take your images to the next level you're going to eventually want to get some studio lights.

I originally intend to buy a git with three Tokura/Starblitz 150 watt strobes but a good photographer friend of mine recoiled in horror when I told him this and almost died. The salesman at the camera shop here in Barcelona wouldn't even sell them to me.  Even though the kit I was looking at only cost 259 euros... he reccommended the 700 euro Elinchrom D-Lite 4 it system.
n
Why the hell would I have even considered this?

The same reason I'm holding a Canon camera.  I used to have a Sony A200. I loved the camera. It took great pictures while I had it, but I never noticed what I was missing until I got my Canon (bigger selection of lenses, larger selection of Flashes, more wireless options, more accessories... etc...) It's the same with my choice of lights. I'm brand new to studio lighting... but even I had heard of Elinchrom.

Support for their products is DEEP with everyone from PocketWizard to Paul C. Buff making special versions of or adaptors for thier products to Elinchrom. Not only that, but the variety of original Elinchrom products is vast as well. And it's simply a higher quality of light and reliability and... ultimately... it actually winds up being cheaper. (Less money spent on parts breaking down, shipping for warranty, cheaper accessories... or NO accessories for the Tokura/Starblitz units and I probably would've had to buy the Elinchrom's in the long run anyway.)

Which brings me to Magic Lantern and my first photo shoot with the new kit.

Studio lighting really helps you learn to appreciate F11 and above... the caviat being it's hard to see a damned thing under ideal lighting conditions (ideal being pitch black). This is where the modeling lamps built into the Elinchrom units come in handy.  You can test out your lights and do your focusing under similar lighting conditions to when you snap the flash. The drawback being that it's sort of a pain setting up the modeling mode in-between every single shot. (One drawback to the D-Lite 4 it is that it comes with the Skyport Eco transceiver... which should've never been invented... instead of the Skyport Speed. The Eco stands for "Economy" as in "The Current State of the..." as in... "Not So Good" and you don't have control over the flash power or the modeling lamps like you would with the Skyport Speed. It ONLY snaps the flash.)

I went through a couple of settings but couldn't find anything that would buy me a better LiveView preview at high F-Stop (i.e. The kind of preview you would get if you had a flash attached to your camera at the same F-Stop) I just had my camera in my hands. At 1/160 F16 with no flash you have DARKNESS in LiveView. I attach my Yongnuo flash and you have LIGHT. I wish there was a way of telling the camera "But the light is COMING! I swear it!"

Obviously the camera is unaware that I've got two 400watt heads aimed at the subject. It would be nice if Magic Lantern could allow you to select the "I have a Flash" preview in LiveView.

But I was forced to squint hard and trust my gut feelings with the photos. All things considered I was very pleased with the results: http://www.flickr.com/photos/42146365@N06/7569125100/in/pool-elinchrom-d-lite

The Skyport Eco was a bit of a letdown... but the D-Lites did not fail me.